DIY bar carts – 10 homemade drinks trolleys because it's 5pm somewhere
These DIY bar carts serve up a healthy measure of style and functionality to fix up something strong for guests or yourself

Whatever the reason, or the season, DIY bar carts will always come in handy. Got some good news? Toast with a glass of bubbles. Guests coming over? Roll out the good stuff? In need of a nightcap? You know what to do.
Admittedly, we love the look of the best drinks trolleys on the market, but sometimes great taste can come with a high price tag. So if you've muttered the words 'how much?!' or the cost of a cart has made you almost spit your drink out – we've got you covered.
From Art-Deco inspired, golden hoop designs, unique upcycles using diaper changing stations and microwave carts and rusty flea market finds, these DIY bar cart ideas can be built at a fraction of the price of the designer and main street models. Yes, you'll need to get your hands dirty, but that first sip of your chosen beverage will taste so much better...
DIY bar carts
'It's no secret that bar cart ideas are a home decor trend that's been popping up more and more in the last few years and it looks like it's not going anywhere for a while,' says Tricia Rawlings aka @rosewoodandgrace, a lifestyle blogger and DrPH student.
'Sure there are tons of places to buy a bar cart, but let's face it - finding one that fits your style in your price range is like finding a needle in a haystack. So stop spending time searching for one and make one.'
As a stylish, space-saving home bar idea, bar carts are the perfect option for small spaces, so here's our round-up of carts you can make yourself.
1. Add your own spin to a budget bar cart
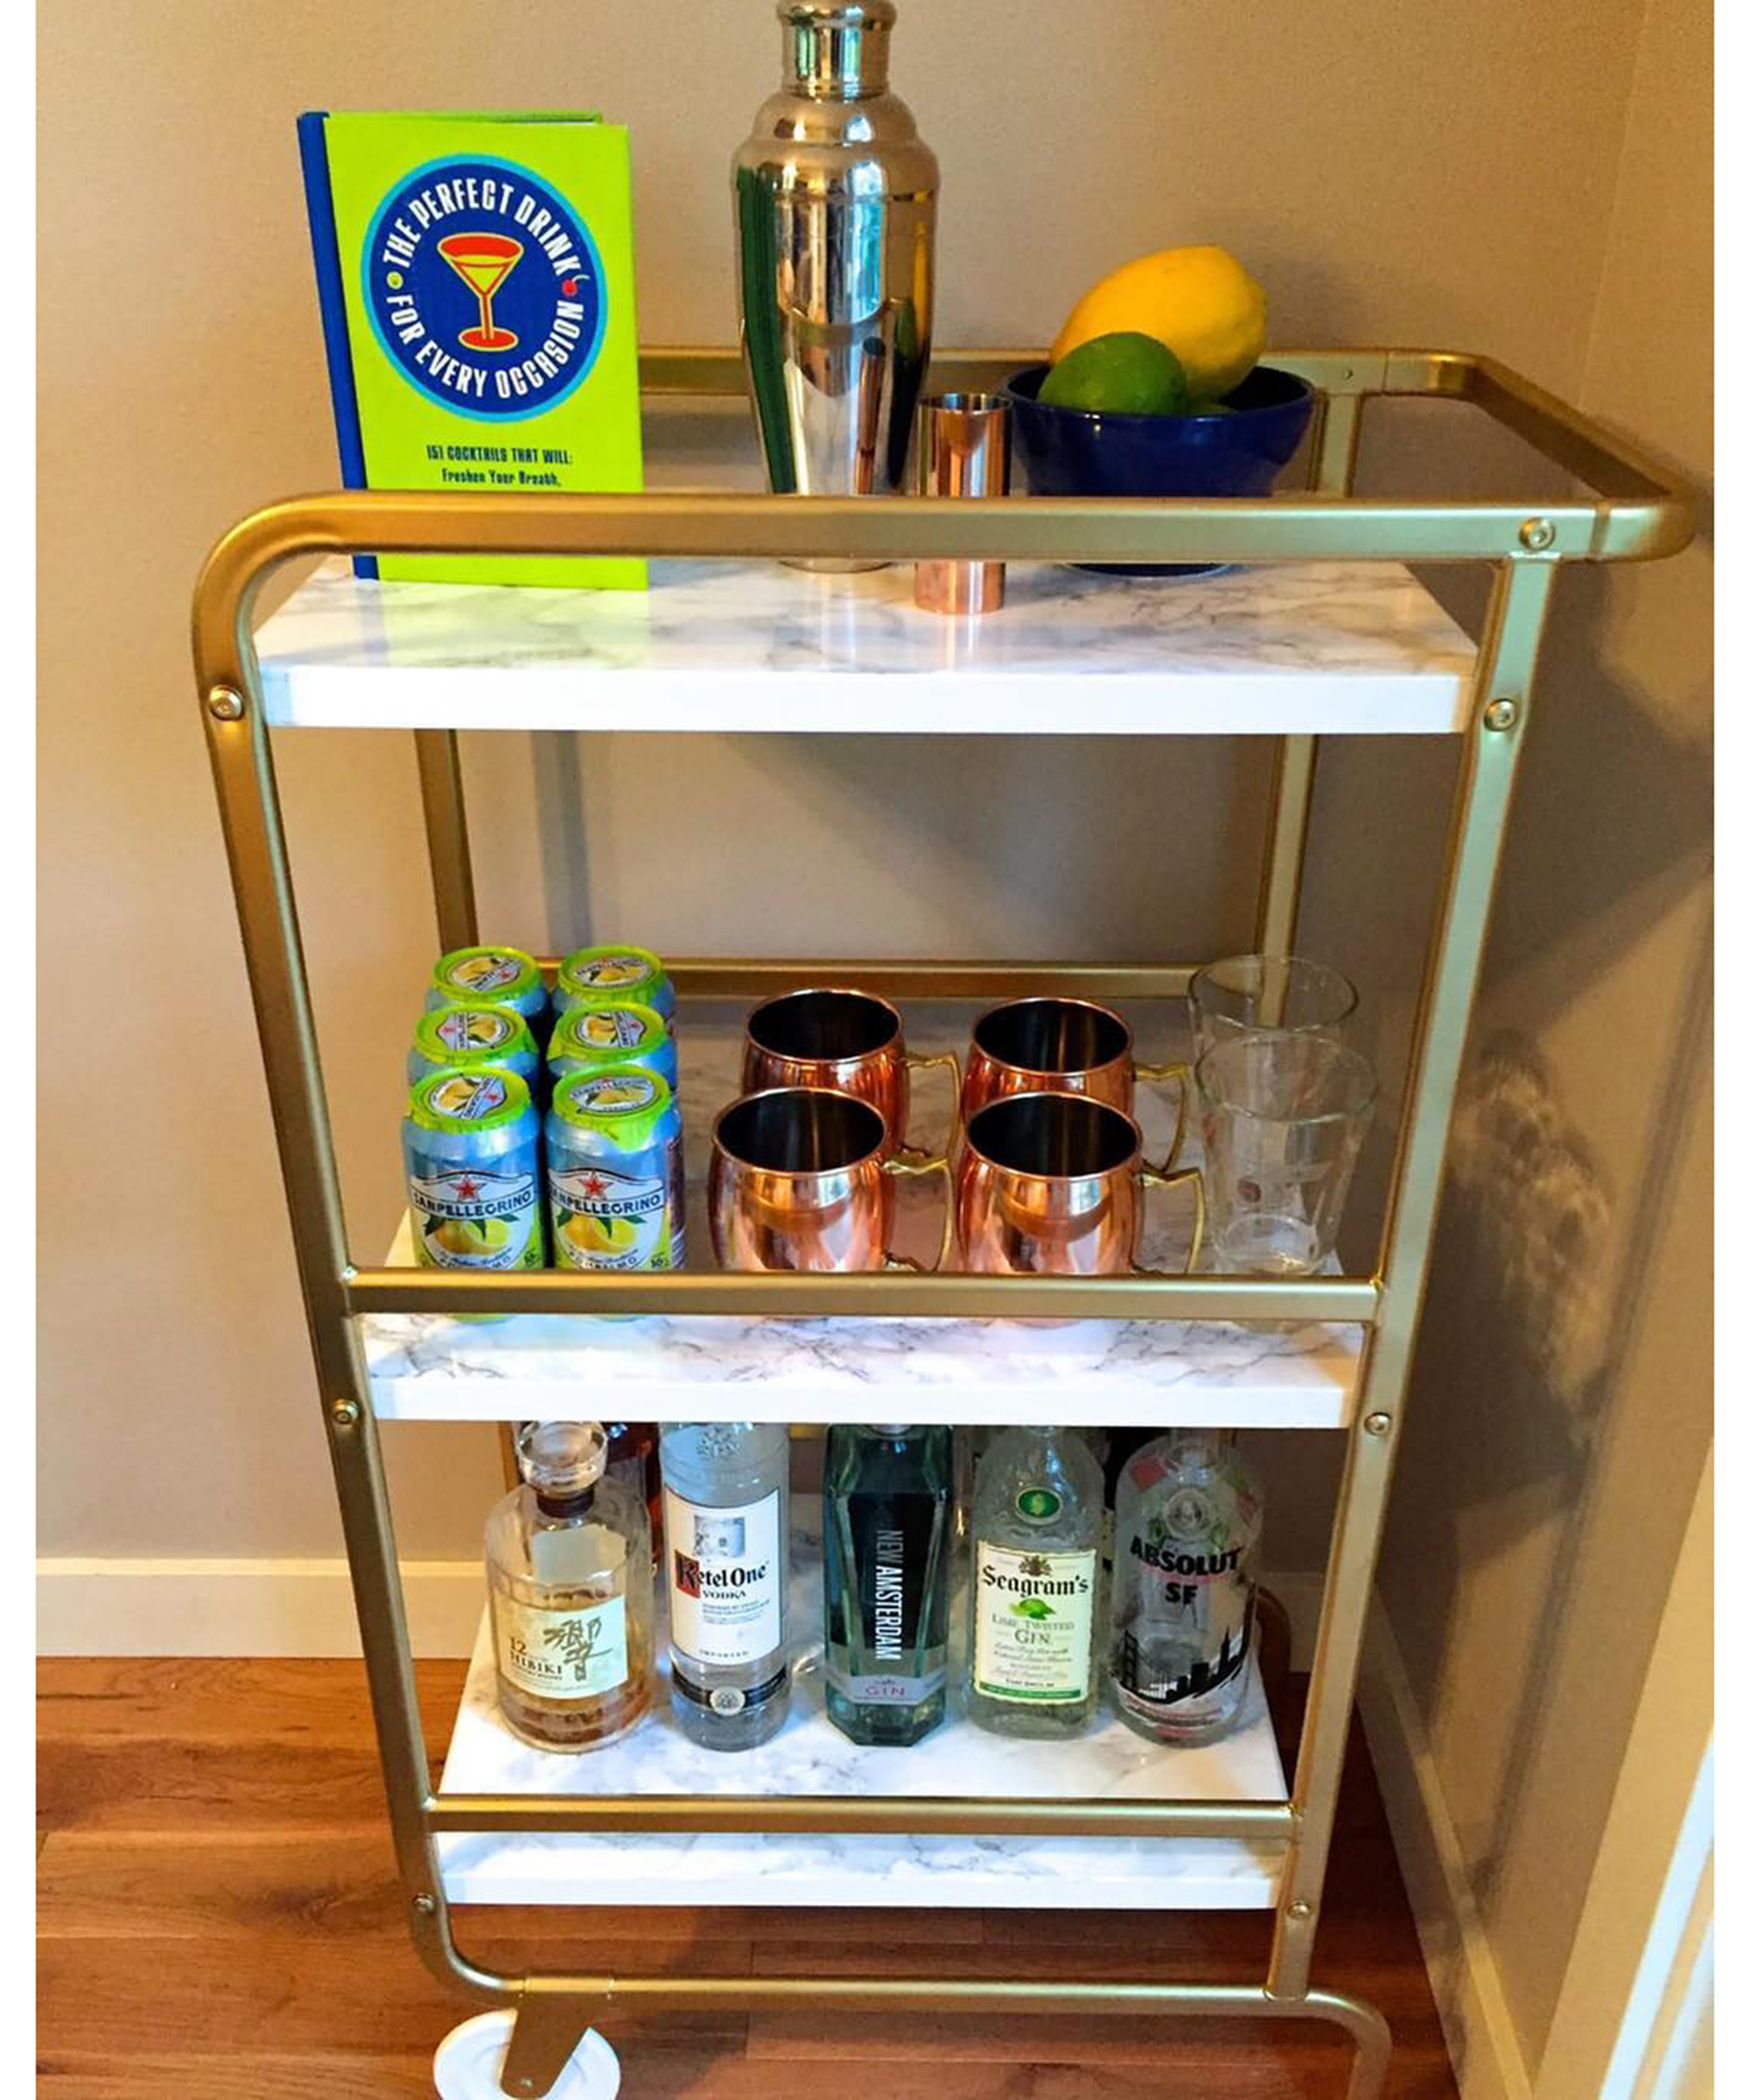
'This is still one of my favorite DIYs to date,' says Alyson aka @finneganfixerupper.
Get small space home decor ideas, celeb inspiration, DIY tips and more, straight to your inbox!
'When it comes to bar carts, I love the idea of them but they can be so dang expensive. The ones that I loved from Target, West Elm, or Wayfair were anywhere from $150 up to several hundred dollars,'
'So, I hacked together this $30 Ikea cart, upgraded it with gold spray paint and marble contact paper, and made it for under $60. It took only a couple of hours between building the cart, spray painting it (two coats), and applying the contact paper.'
Know your Espresso martini from your Moscow mule? Shake things up with one of the best cocktail shakers on the market.
2. Krys Melo's Ikea hack DIY bar cart
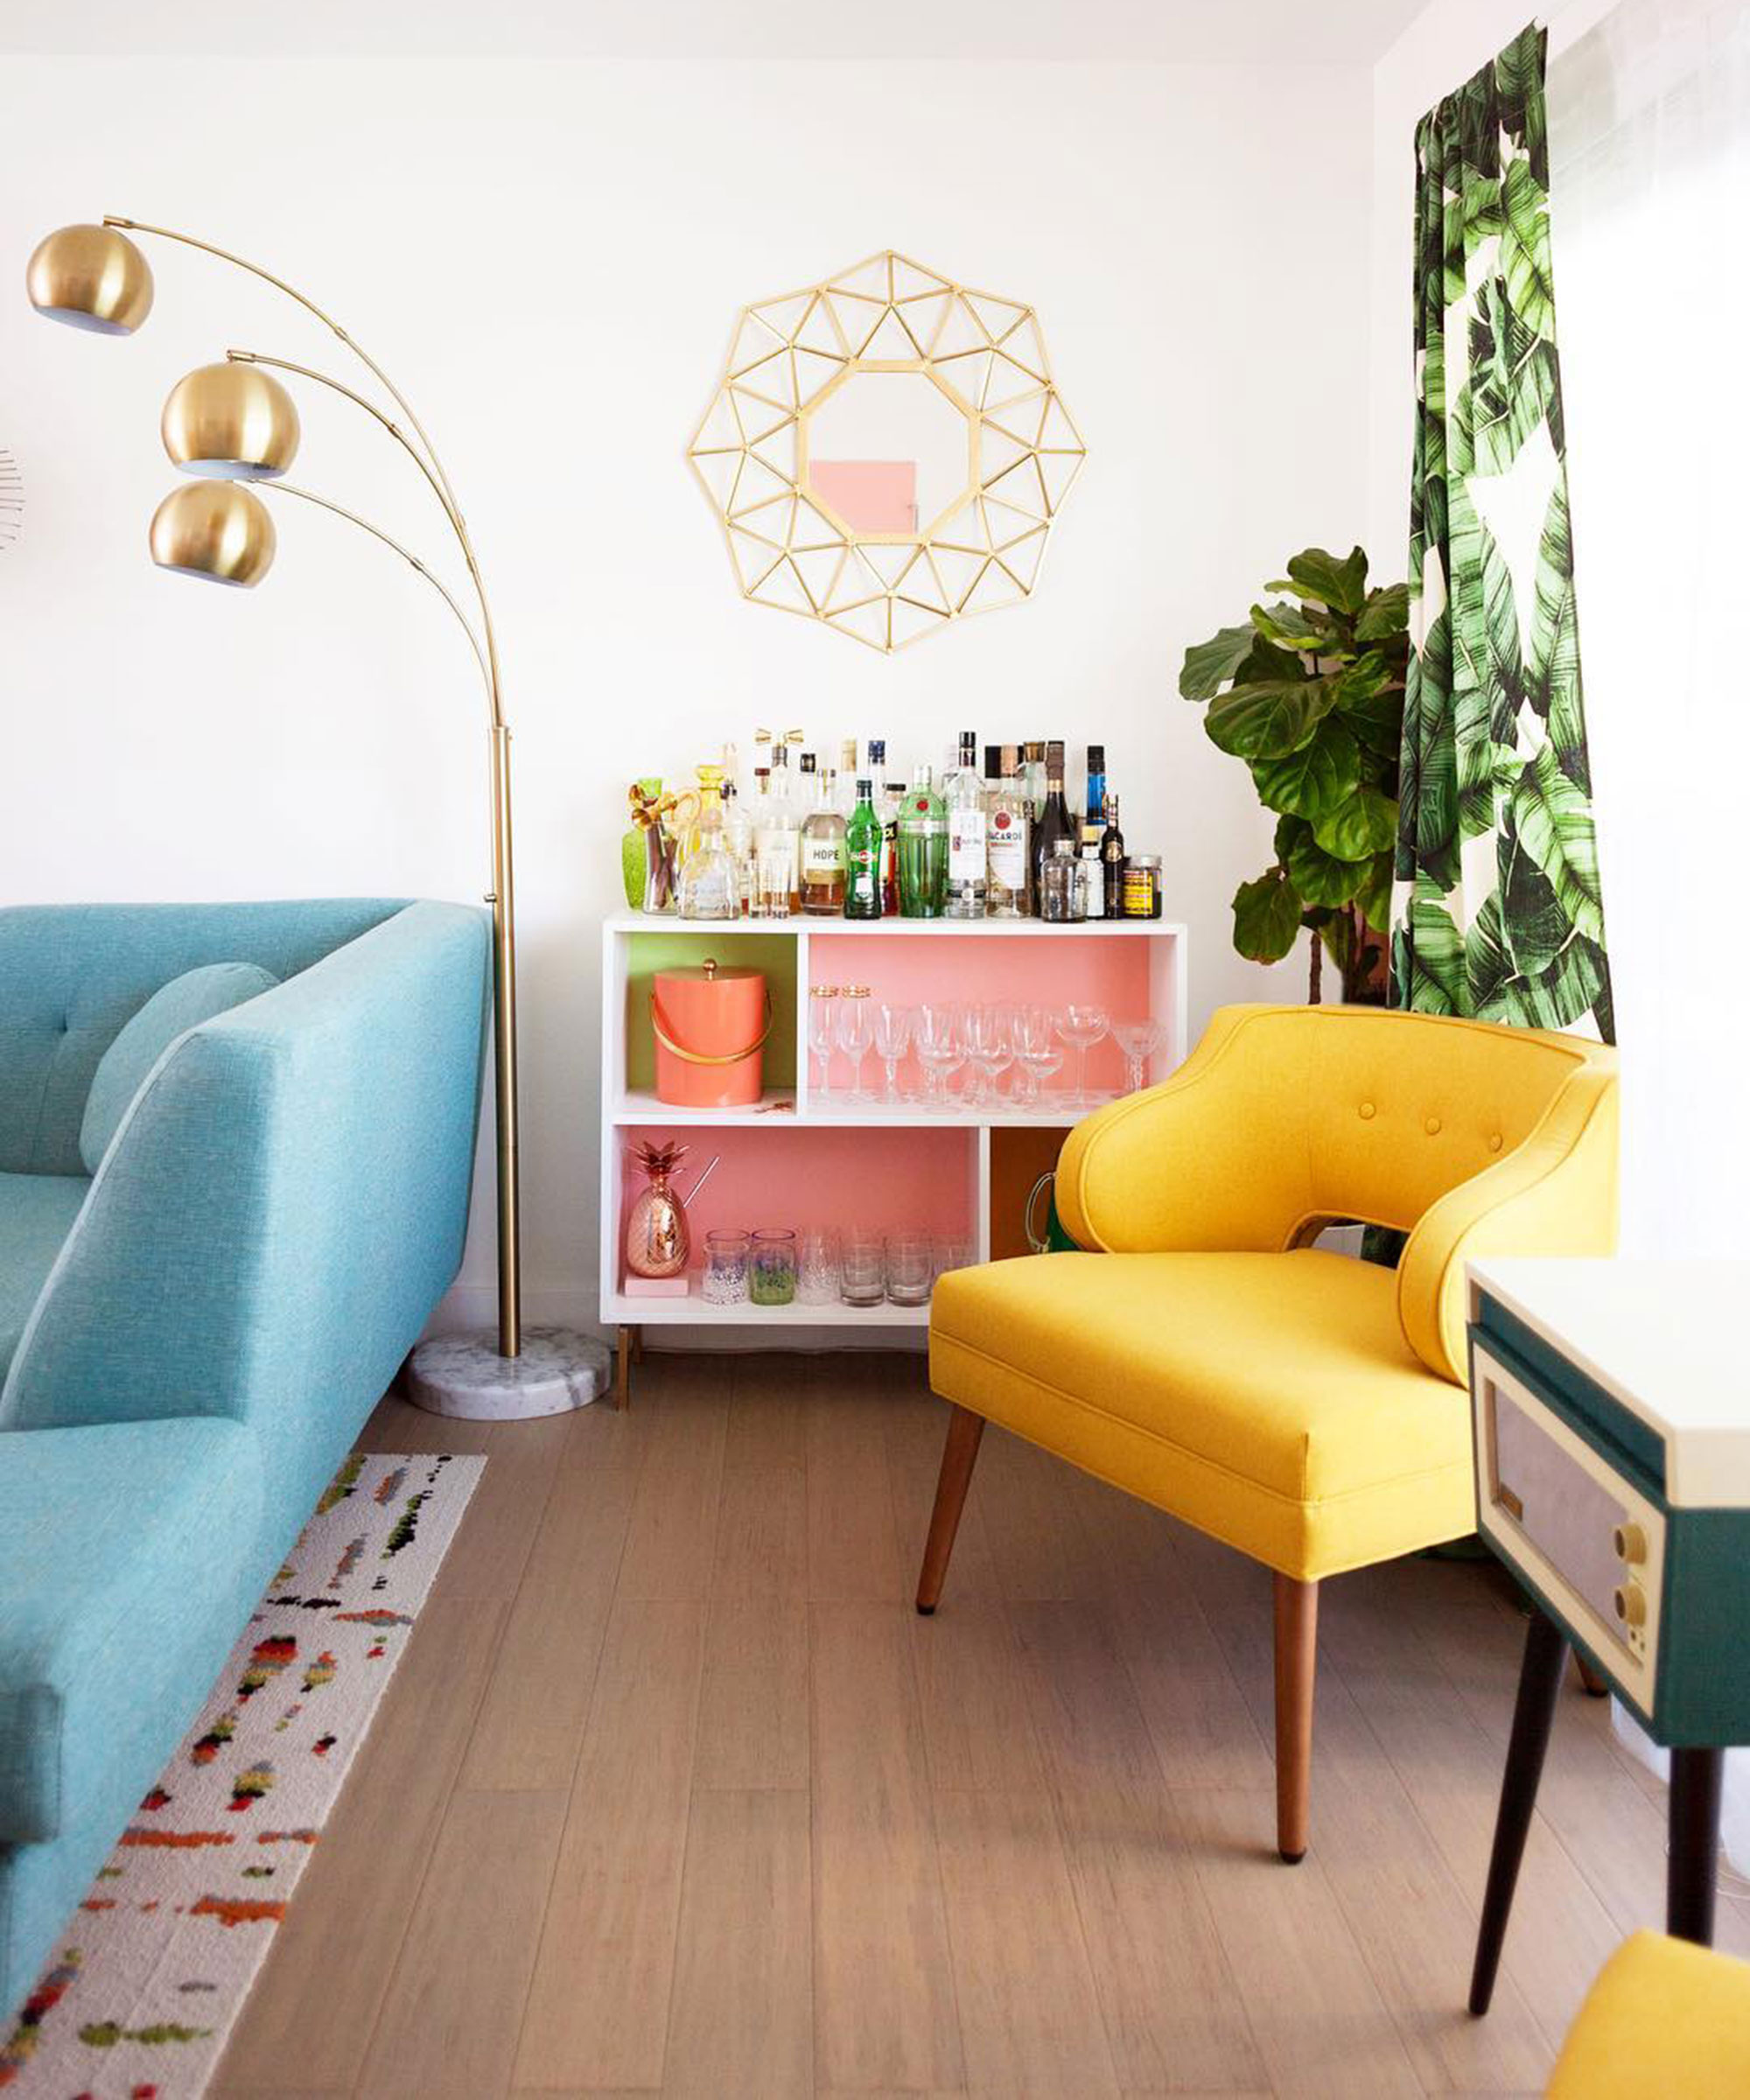
'I’ve been redecorating my living room and needed a new home bar set up,' says Krys Melo aka @melodrama.
'I’ve been using a bar cart for a few years, but I needed a better set up to store my liquor and glass collection. A bar cart wasn’t going to cut it anymore, so I went on a search for a cabinet. I’m no stranger to an IKEA hack, so I took a trip to IKEA and spotted the VALJE shelf and liked the size and set up of the shelves.'
'It reminded me of some mid-century pieces I’ve seen in my vintage home decor magazines. It took about two minutes for me to figure out how I would transform it.'
Unfortunately, the VALJE has been discontinued, but you can recreate this DIY bar cart using the IKEA EKET.
You will need:
- Ikea EKET
- Furniture paint sample pots
- Metallic gold spray paint - check out Rust-Oleum's selection on Amazon
- Pencil
- Flat screwdriver
How to:
- Spray paint the leg pieces gold and then put it all together by following the IKEA assembly instructions.
- When it gets to the part where you insert the backboard, mark a line where the vertical shelves divide the board and then use paint to make the different colored squares. I got house paint samples in custom colors from Lowe’s and painted the cardboard side of the backboard with a few coats.
- Insert the backboard and finish the remaining assembly instructions. If you already have this piece you can just carefully paint in the squares.
We're sure you can see that her DIY bar cart is well-stocked, but if you're running low on wines and spirits, discover the alcohol delivery services available in your area.
3. Angela Marie's DIY bar and coffee cart
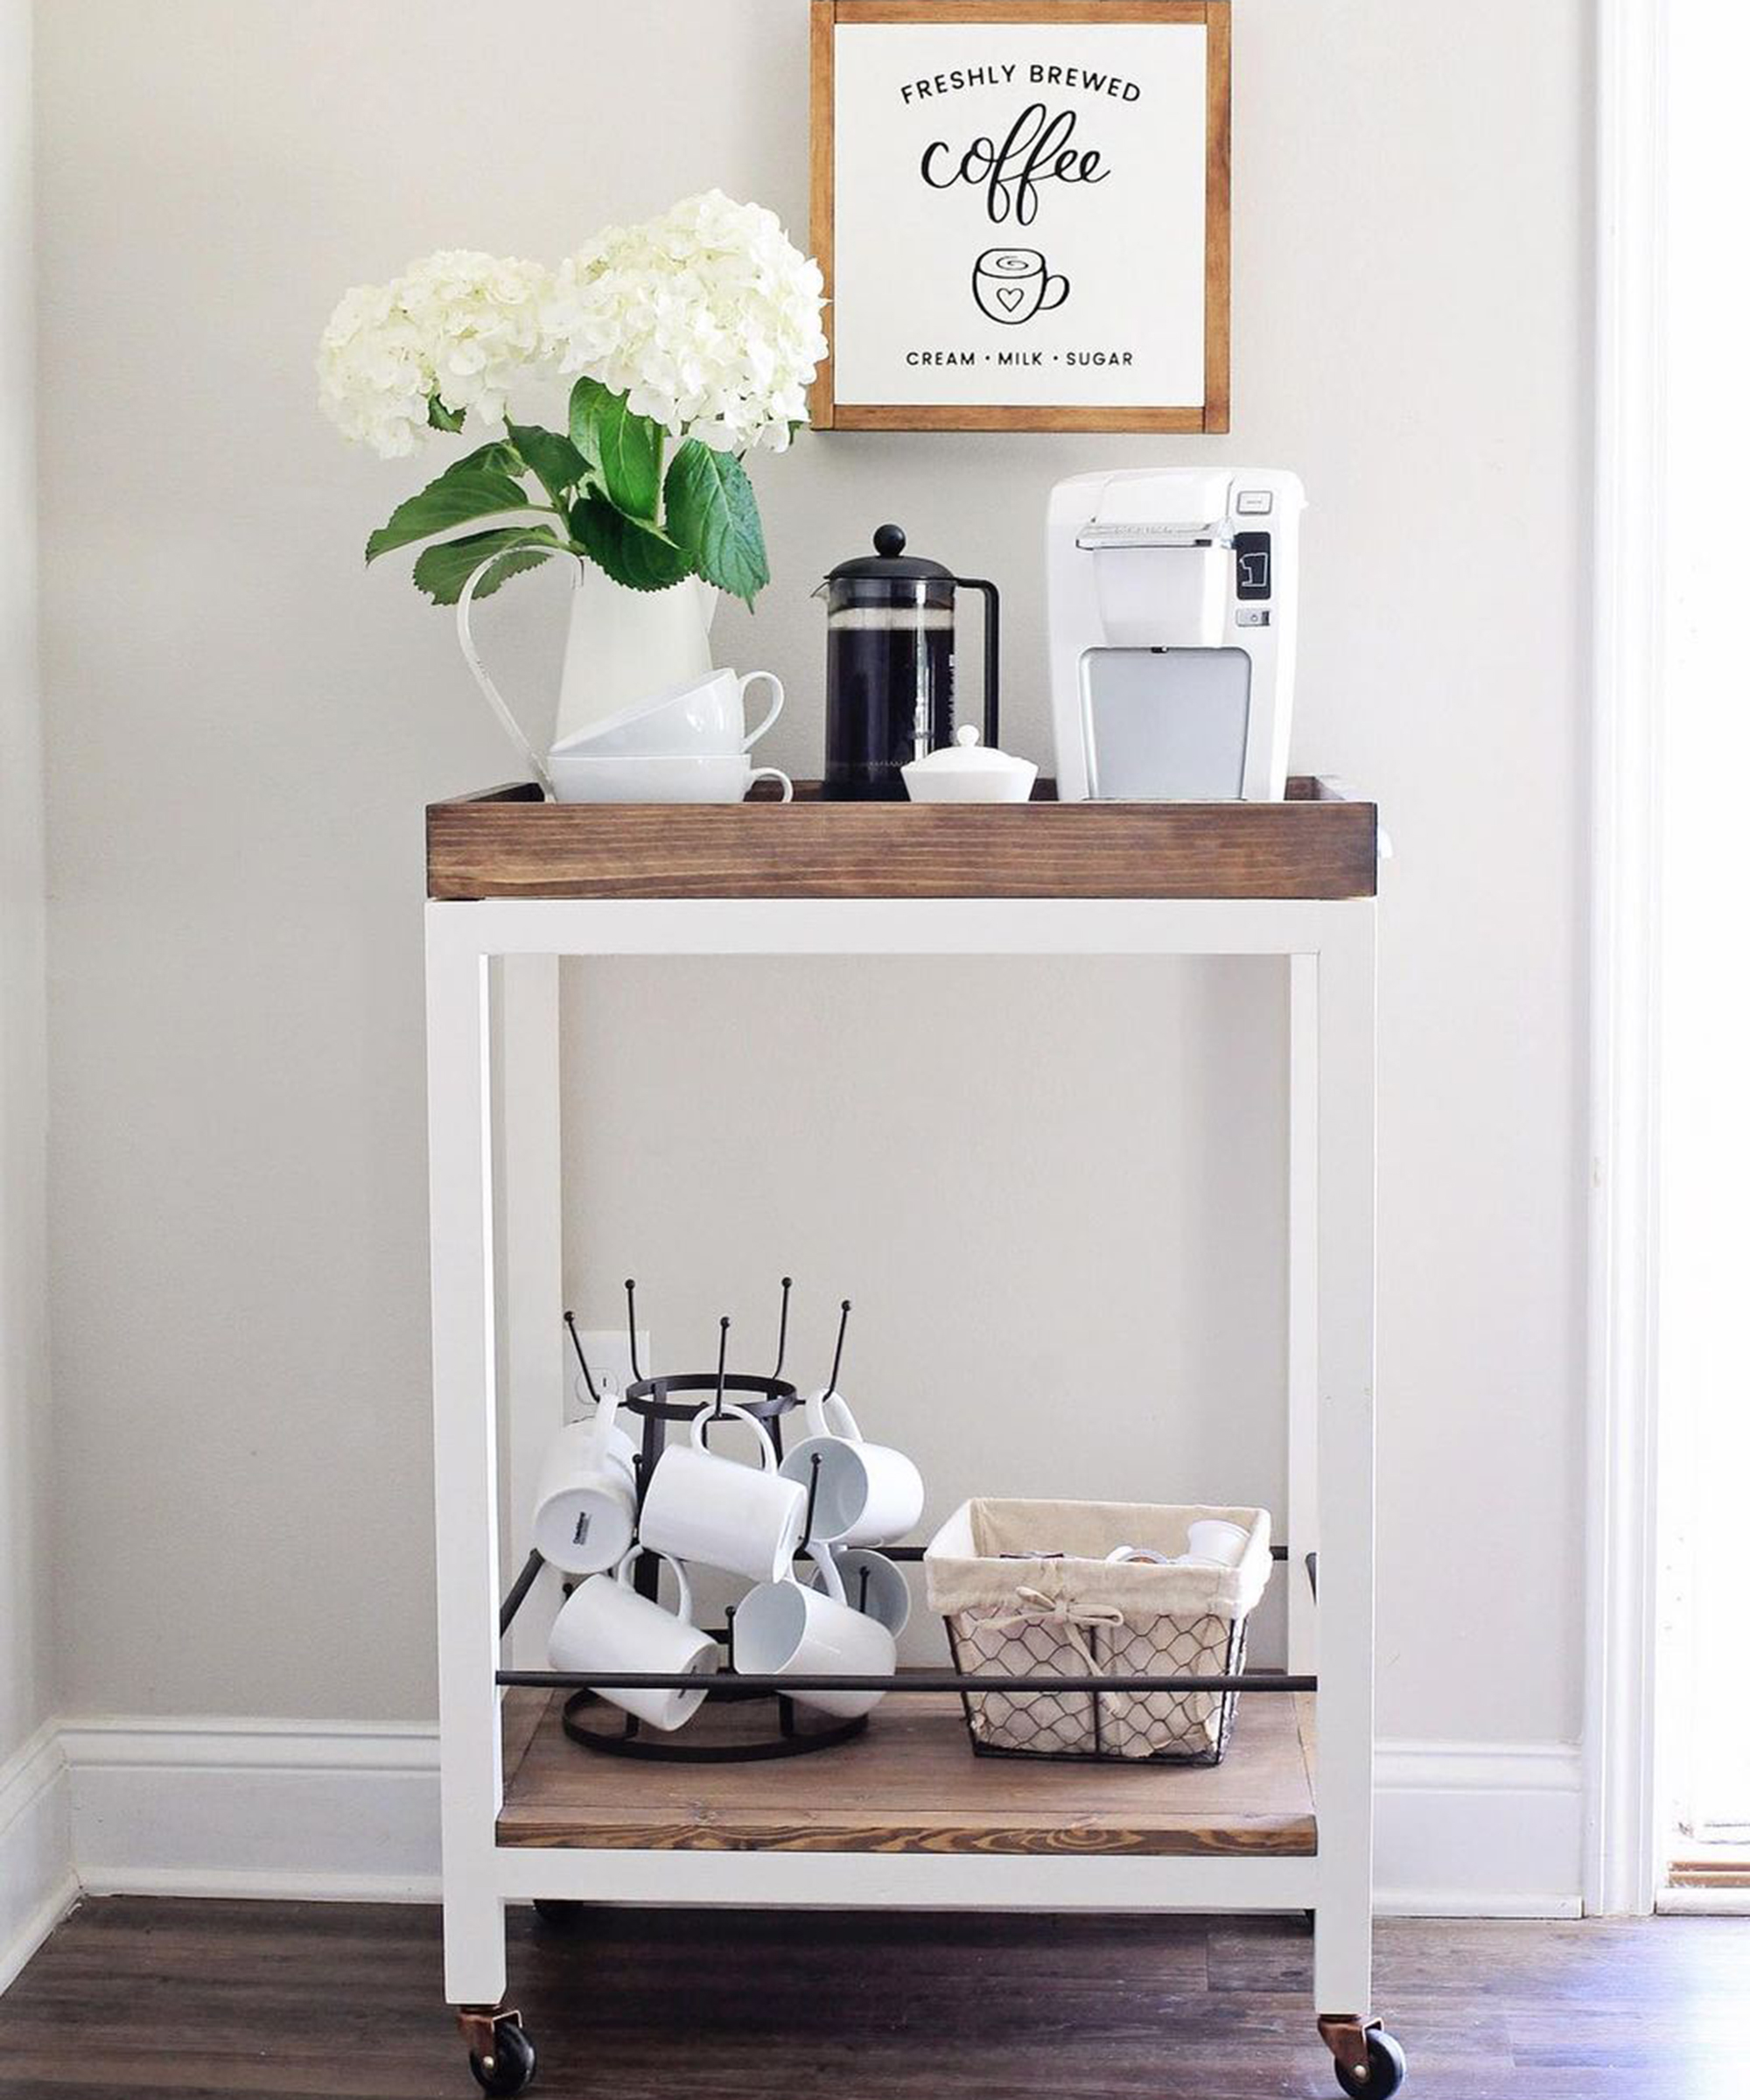
'This project has been in my head for months and the plans on how I was going to actually build it changed forms many times. I wanted to make a DIY wood bar cart that really looked like a custom, higher-end bar cart and that was also a bit rustic. I am thrilled at how it turned out after changing my mind so many times about the design of it.' says Angela Marie of @angelamariemade.
'This DIY bar cart was a little more time-consuming to build, but definitely worth it in the end, especially for the amount of savings. It cost me less than $50 in building materials to build, whereas other similar bar carts retail around $150+. Note, I did have the paint and stain on hand already for the finishing, so that is not included in the material cost.'
This DIY bar cart could double up as a coffee or portable breakfast cart, perfect for special holidays like Christmas and Valentine's Day or if you want to get your home ready for guests.
You will need:
- 3x 2×2 at 8ft furring strips
- 1x 1×1 at 8ft
- 1x 1×4 at 8ft
- 1x 1×3 at 8ft
- 1x 2ft x 2ft at 3/4″ thick pine plywood
- 4x 2" Casters (Angela used these)
- 2x 3/8″ round wood dowel rods at 4ft
- 2x 1/2″ and 1x 1/4″ Kreg screws
- 1x 1/4″ Brad nails
- Wood glue
- 2″ wood screws
- 2 x cabinet pulls
- Kreg Jig
- Drill
- Miter saw
- Circular saw
- Clamps
- Brad nailer
- Phenopatch Patch-N-Paint Interior/Exterior Lightweight Spackling - 1 Quart 01511 (available from Amazon)
- Make your bar cart frame cuts from the 2x2s: Angela used 2×2 furring strips for the frame of my bar cart. This saved her a ton of money, but try to choose really straight 2x2s and make sure you sand them really well since they are a more rough grade of wood. Make the following cuts: 4 pieces at 30.5″;4 pieces at 22.5″; 4 pieces at 14″.
- Drill pocket holes and attach frame pieces: Lay out how your frame is going to go together. Use two of the 30.5″ 2×2 pieces for your sides and two of the 22.5″ 2×2 pieces for the top and bottom of the frame. Angela placed her bottom frame piece 3″ up from the bottom of the side pieces since this is what the bottom shelf of the bar cart will sit on. Mark where your pocket holes need to go, one on each end of the two 22.5″ pieces (make sure you do them on the bottom side of your 2x2s so they don’t show). Then, drill your pocket holes with a Kreg Jig. Use 2 1/2″ Kreg screws to attach the frame together. Repeat these same steps for the other side of the frame. Angela used a scrap piece of 2×2 to help keep the pieces even as we drilled them together.
- Finish assembling the DIY bar cart frame: Drill one pocket hole on each end of your four 14″ 2×2 pieces. Add two of your 14″ 2×2 pieces to the bottom of one frame side and to the top of the other frame side using pocket holes and 2 1/2″ Kreg screws. The pocket holes can be either on the inside or underneath part of the 2x2s as you attach them, either way, they won’t show. Now attach your two frame pieces to form the final bar cart frame. Note, when attaching the frame on the short 14″ sides, the long Kreg drill bit to drive screws into the pocket holes, is too long with a standard drill. Angela had a smaller square tip drill bit that she used instead for this part.
- Make the bottom shelf of the DIY wood bar cart: Cut your 1×4 into four 24″ pieces. The cuts don’t have to be perfect for this step. Then, line up your 1×4 pieces and drill pocket holes as shown in the photo below and attach with 1 1/4″ Kreg screws. To get a perfectly straight edge on each side, use a circular saw and trim each side, so that the final length of your shelf is 22.5″ (the width should be 14″ already from your attached four 1x4s). Next, cut two 1×2 pieces at 22.5″ and two at 14″. These pieces are going to be attached to the sides of your shelf piece. But, before you attach them to the shelf, make sure they fit snugly between the frame sides, you may need to sand them down slightly to get a better fit. Add two pocket holes to the bottom shelf sides and attach 1×2 pieces with 1 1/4″ Kreg screws. Go ahead and place the bottom shelf on the lower frame and make sure it fits well but don’t attach it yet to the frame.
- Make the top tray shelf of the bar cart: Using a circular saw, cut one side of your 2ft x 2ft plywood piece to 15.5″ so that the final size is 24″ x 15.5″.
- Joining the sides of the top tray shelf: You can either do straight cuts or 45 degree angled cuts. Angela chose to do the angled cuts to make the bar cart look a bit higher-end, even though angled cuts are a bit more challenging. Either way, cut two 1×3 pieces at 25.5″. Attach the two 25.5″ pieces to each long side of the plywood using a brad nailer and 1 1/4″ brad nails. If you did angled cuts, make sure the inner angles on the ends are lined up correctly to the plywood edges before nailing. Now measure the exact width for your two side pieces. It should be just about 17″ but mine was off by 1/16″ so I adjusted my cuts accordingly. Then, attach your two side pieces with brad nails to complete the top shelf tray of the bar cart. Also, for these side pieces, Angela put brad nails along the bottom edge and side edges to make them more secure.
- Prepare dowel rods: Cut the 3/8″ dowel rods as follows: two pieces at 23.5″ and two at 14.5″. Then, mark the center point on the inside edge of the 2×2, 4″ up from the bottom shelf (on all inside edges for a total of 8 marks). Use a 1/2″ drill bit and drill 8 holes where your markings are. Note, Angela first drilled a 1″ deep hole and then 1/2″ deep on the opposite side and continued this pattern until I finished all 8 holes. She marked 1″ and 1/2″ on a scrap dowel piece to test my depths for each hole to make sure she drilled deep enough.
- Assemble your cart: Add your dowel rods to the holes to make sure they fit properly. It works best to put them into the 1″ deep side holes first to get them in. If you are having trouble getting them in, trim off 1/4″ or so more but be careful not to trim too much off.
- Paint bar cart frame and fill holes: If you’d like to have a cleaner look use wood filler to fill holes on the top tray shelf over the brad nail holes. Use the spackling to fill any wood knots/cracks in the frame that is getting painted. If you are staining the frame, use wood filler. Sand where needed to prep the frame for painting (or staining). Then, paint (or stain) the frame. Angela chose to do a white frame for the bar cart.
- Attach caster wheels to bar cart frame: Angela bought 2″ casters at Lowes. They come two to a pack and each caster has a spiky metal piece that you need to remove from the caster. Flip over your bar cart frame and drill a 1/2″ hole in the middle of the bar cart leg bottoms. Make sure to drill the hole a little bit deeper than the length of the spiky metal piece. Then tap the spiky metal piece into the hole with a hammer until the spiky part goes into the wood. Next, place your caster wheel into the metal hole and it should click into place. Repeat for all sides.
- Stain and finish the top tray shelf and bottom shelf of your bar cart and attach to bar cart frame: Angela used one coat of Minwax Dark Walnut and then applied one coat of Annie Sloan White Wax, but finish however you’d prefer.
- Finally, spray paint your round, dowel rods. Angela used Rust-Oleum Oil Rubbed Bronze.
4. Ellie's drink trolley
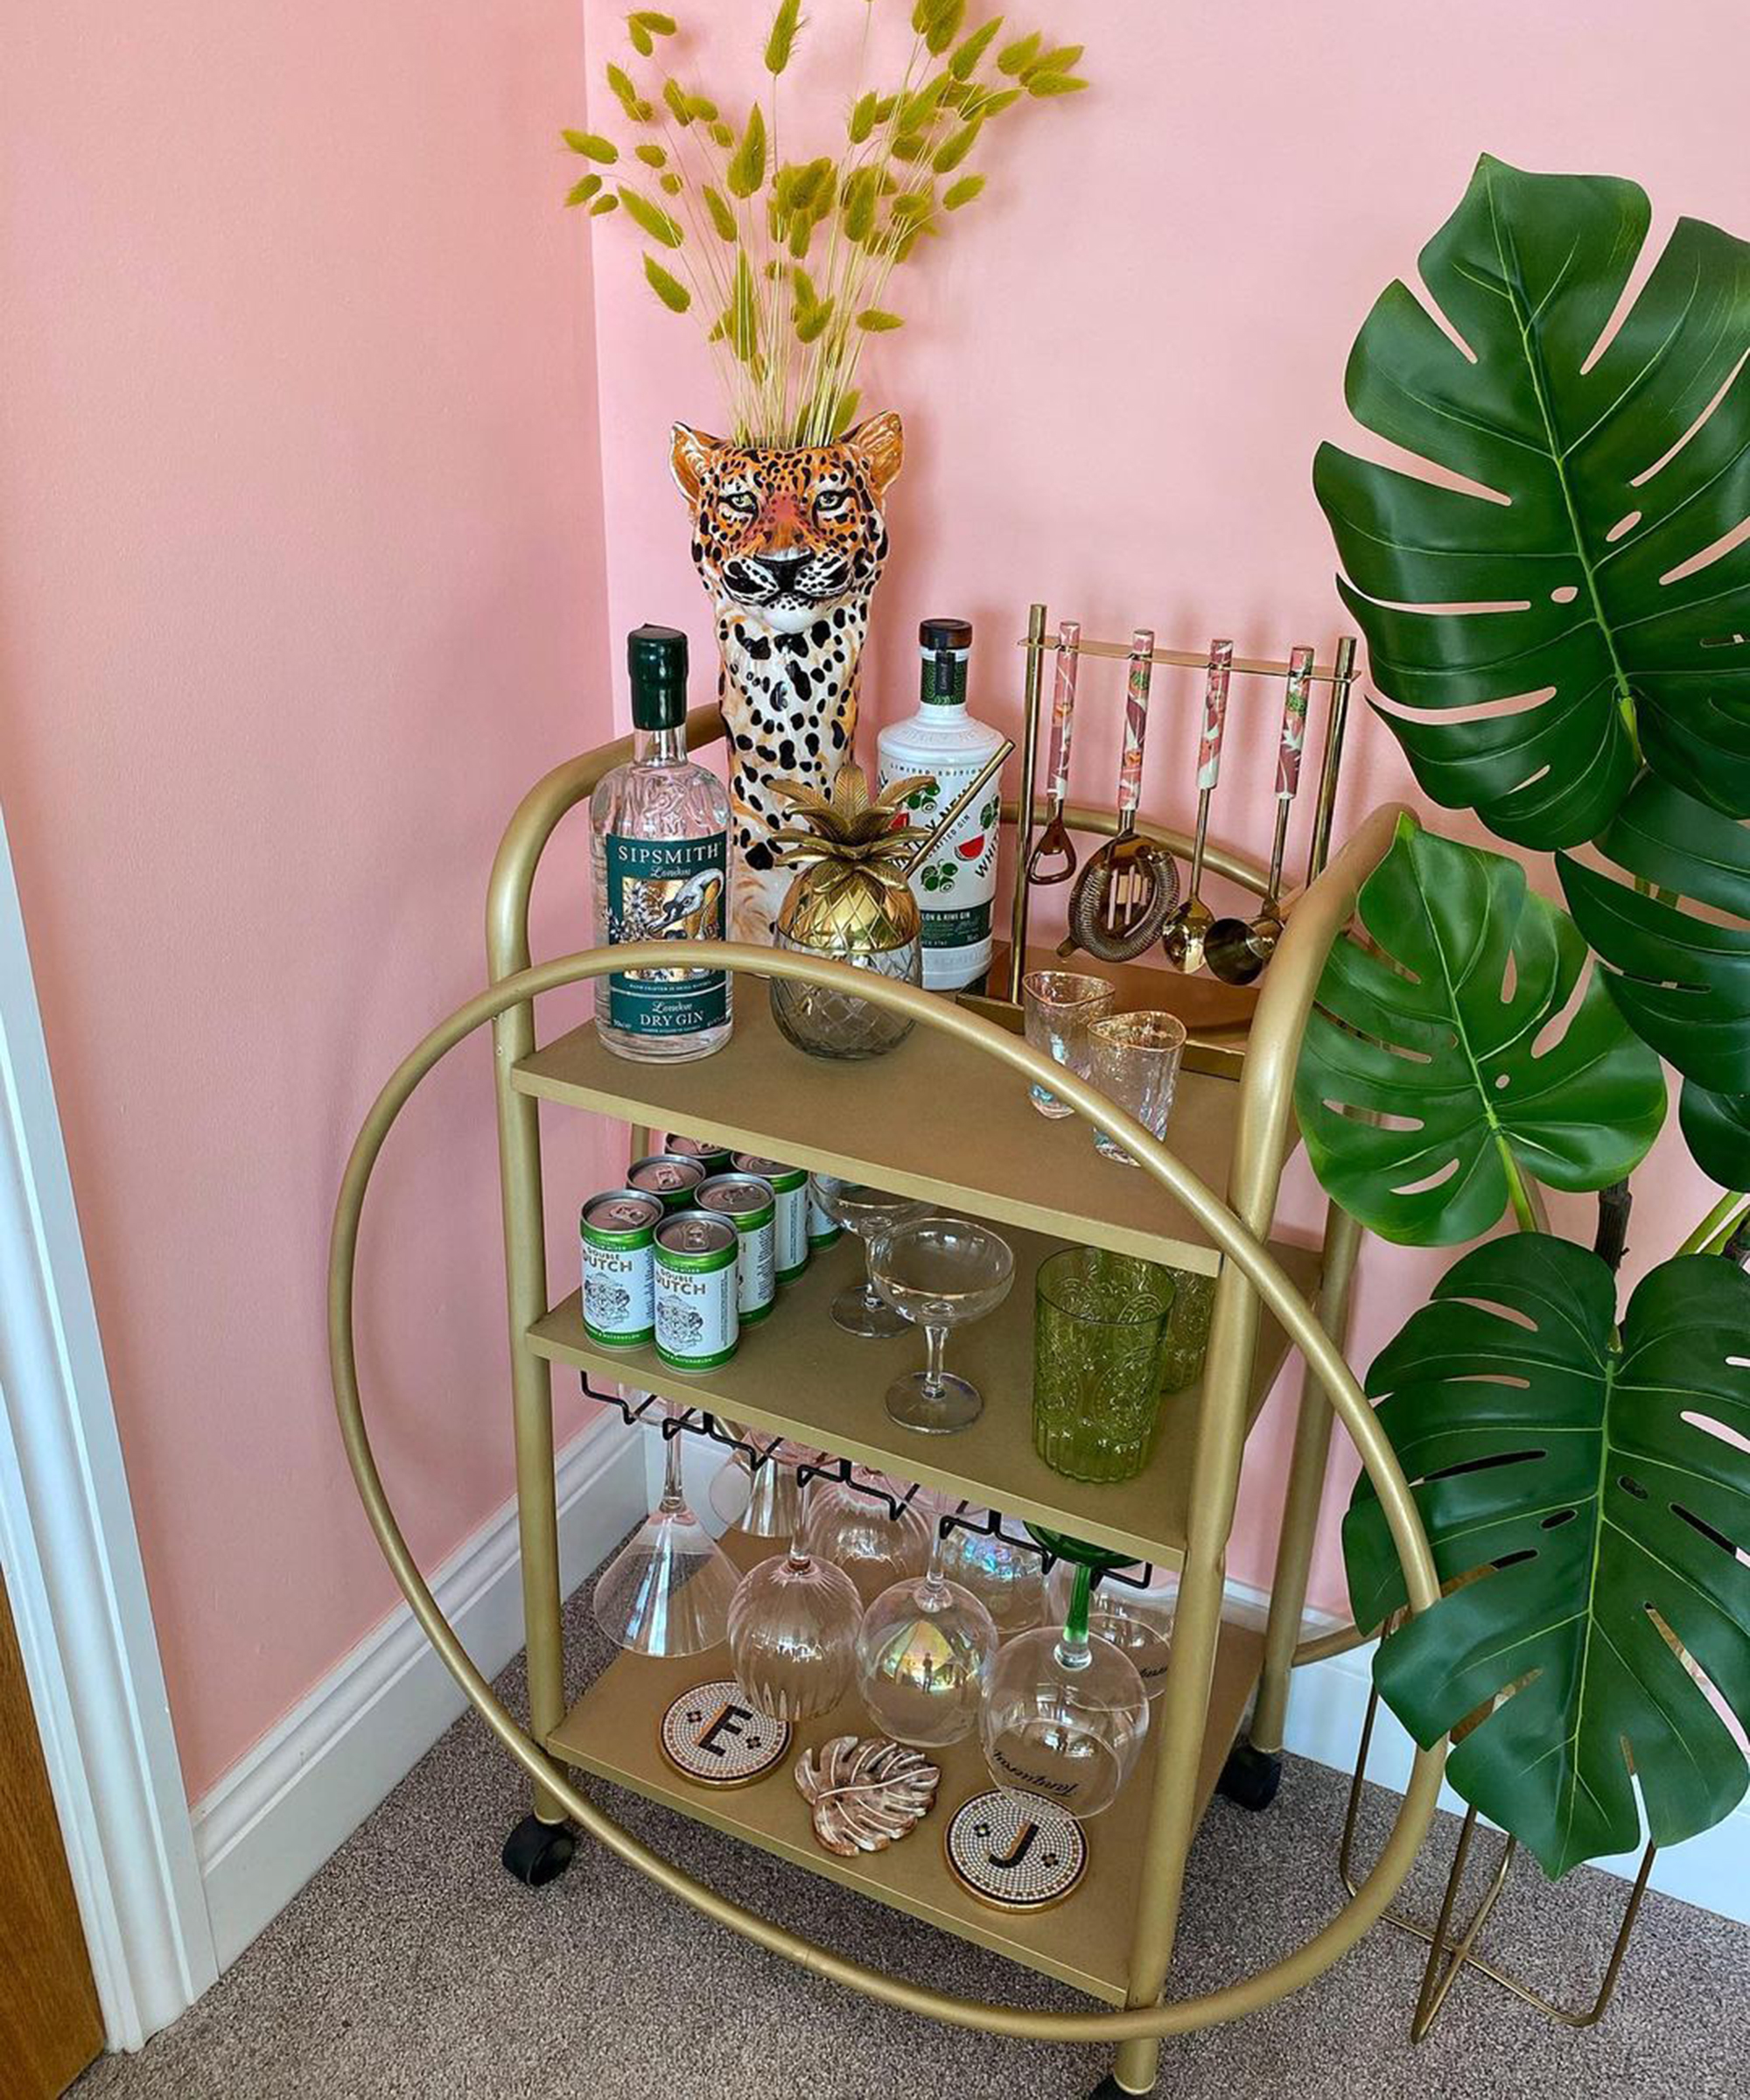
'After talking about it for approx 20 years I have finally got round to completing the DIY drinks trolley (saving myself about £400 on the Oliver Bonas drinks trolley and spraying most of my parent's garden/patio gold in the process),' says Ellie aka @seventreepalmhouse.
'So so happy with how it turned out and of course, I’ve used it as an excuse to buy loads of new bits to go on it... So it will be completely changing from this when everything arrives.'
You will need:
- 1 x thrifted drinks trolley (Ellie got hers from Facebook marketplace)
- 2x hula hoops
- Sandpaper
- Antibacterial wipes
- Sandpaper
- Spray paint primer
- 3 x cans of gold spray paint
- Gorilla glue
- Glasses rack (Ellie got hers from eBay)
- Household cleaner suitable for wood and metal
- Rust-Oleum primer in white
- Aluminium foil (optional)
How to:
- Sand and clean your existing bar cart: Ellie lightly sanded the wood, then cleaned the metal with a household cleaner and used antibacterial wipes to clean the entire trolley.
- Prime the whole thing: Ellie used Rust-Oleum spray primer in white. Leave one coat to dry before applying the next. Ellie covered the wheels in aluminium foil as she wanted the wheels to remain black.
- Prime the hula hoops: Using the same spray surface primer, coat the hoops and allow to dry.
- Spray the hula hoops with gold metallic spray paint: Ellie applied two coats, allowing time between each coat to dry.
- Spray the bar cart with gold metallic spray paint: Ellie applied two coats, allowing time between each coat to dry.
- Screw the glass rack on the bottom of the middle shelf
- Review positioning of the glass rack: Ellie did this by standing the bar cart up and checking that it was straight.
- Attach the hula hoops: Ellie did this by using the Gorilla glue to stick the hula hoops on either side of the trolley. She did this by eye, but you could use measurement materials (ruler/spirit level) to ensure it is level. Once happy with the positioning, use some sort of weight until the glue sets. Ellie used surplus tile samples.
Got all the gear but no idea? Our selection of classic cocktail recipes will turn you into a master mixologist in no time.
5. Tricia Rawling's changing table upcycle
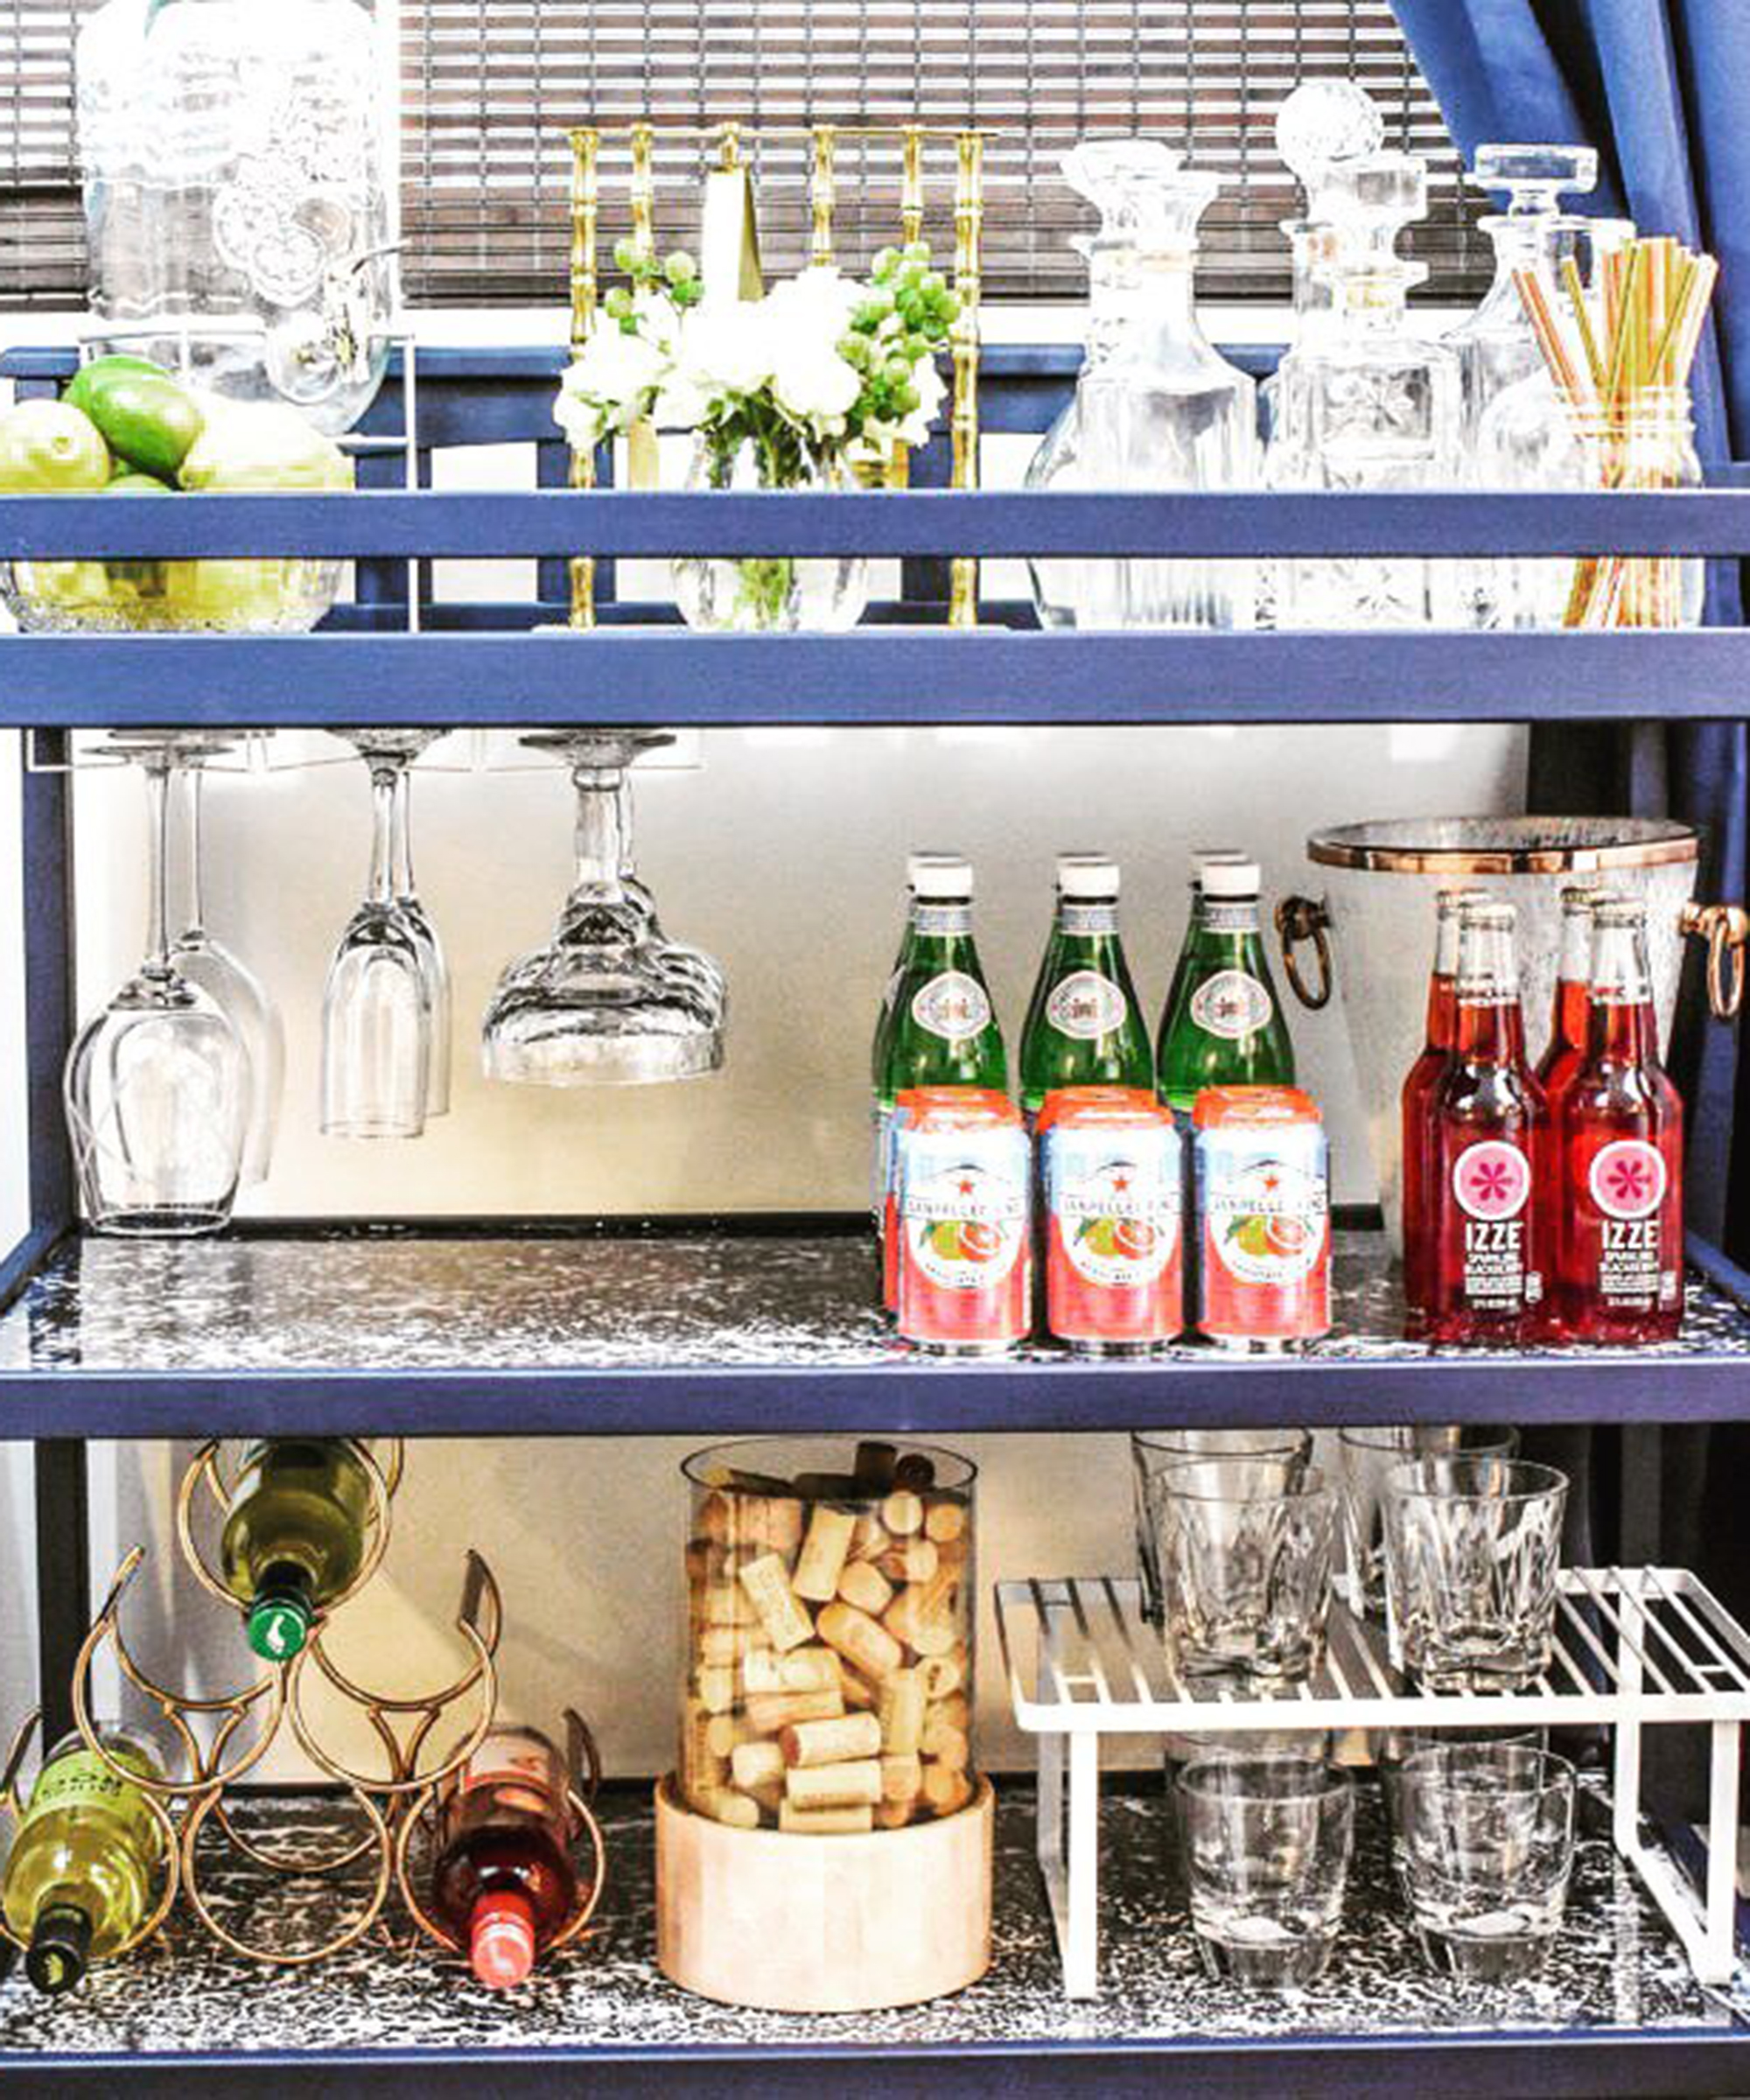
'To get started with your DIY bar cart, you need to actually find your "cart". I use that term loosely because you're not actually going to use a cart for this project, but instead, you're going to use a changing table,' says Rawlings.
'Don't have a baby or spare changing table lying around? No problem. I was able to get mine off of Facebook Marketplace for $20. Take a look on there and I promise you'll find more than your share of options to choose from.'
You will need:
- A secondhand changing table
- Leftover paint in a color of your choice
- Unicorn spit gel stain and glaze (available from Amazon)
- Plastic cup
- Plastic fork
- Farmhouse Glaze Coat in clear (available from Amazon)
How to:
'The best part of making your own bar cart is the fact you can customize it and make it fit any decor. I have a lot of dark blue in my house, so I used some leftover dark blue paint to paint the frame. Next comes the fun part... Splattering the paint.'
'For this project, I used a product called Unicorn Spit. It is a gel stain and glaze which means it can be used on a variety of surfaces to create stunning and unique results. I poured a little of each color I used into a plastic cup, then diluted it with water. The reason for this is because I used a splatter technique to create dots on the surface of the changing table, and diluting the Unicorn spit allowed me to have smaller drops that were more evenly distributed.
'To apply the splatter, I dipped a plastic fork in the cup, then tapped the fork over the changing table surface to create perfectly-sized and spaced dots. I allowed the Unicorn Spit dots to dry for a couple of hours before applying the glaze coat.'
'The Farmhouse Glaze Coat was so easy to use. Mix it together, stir it, then pour it on and let harden. The end result is a beautiful, shiny, clear topcoat. The cure time for the Glaze Cat is 48-72 hours, which means that once you pour it on and smooth it out, you need to let it sit for a couple of days.'
6. Amanda Hendrix's rusty DIY bar cart transformation
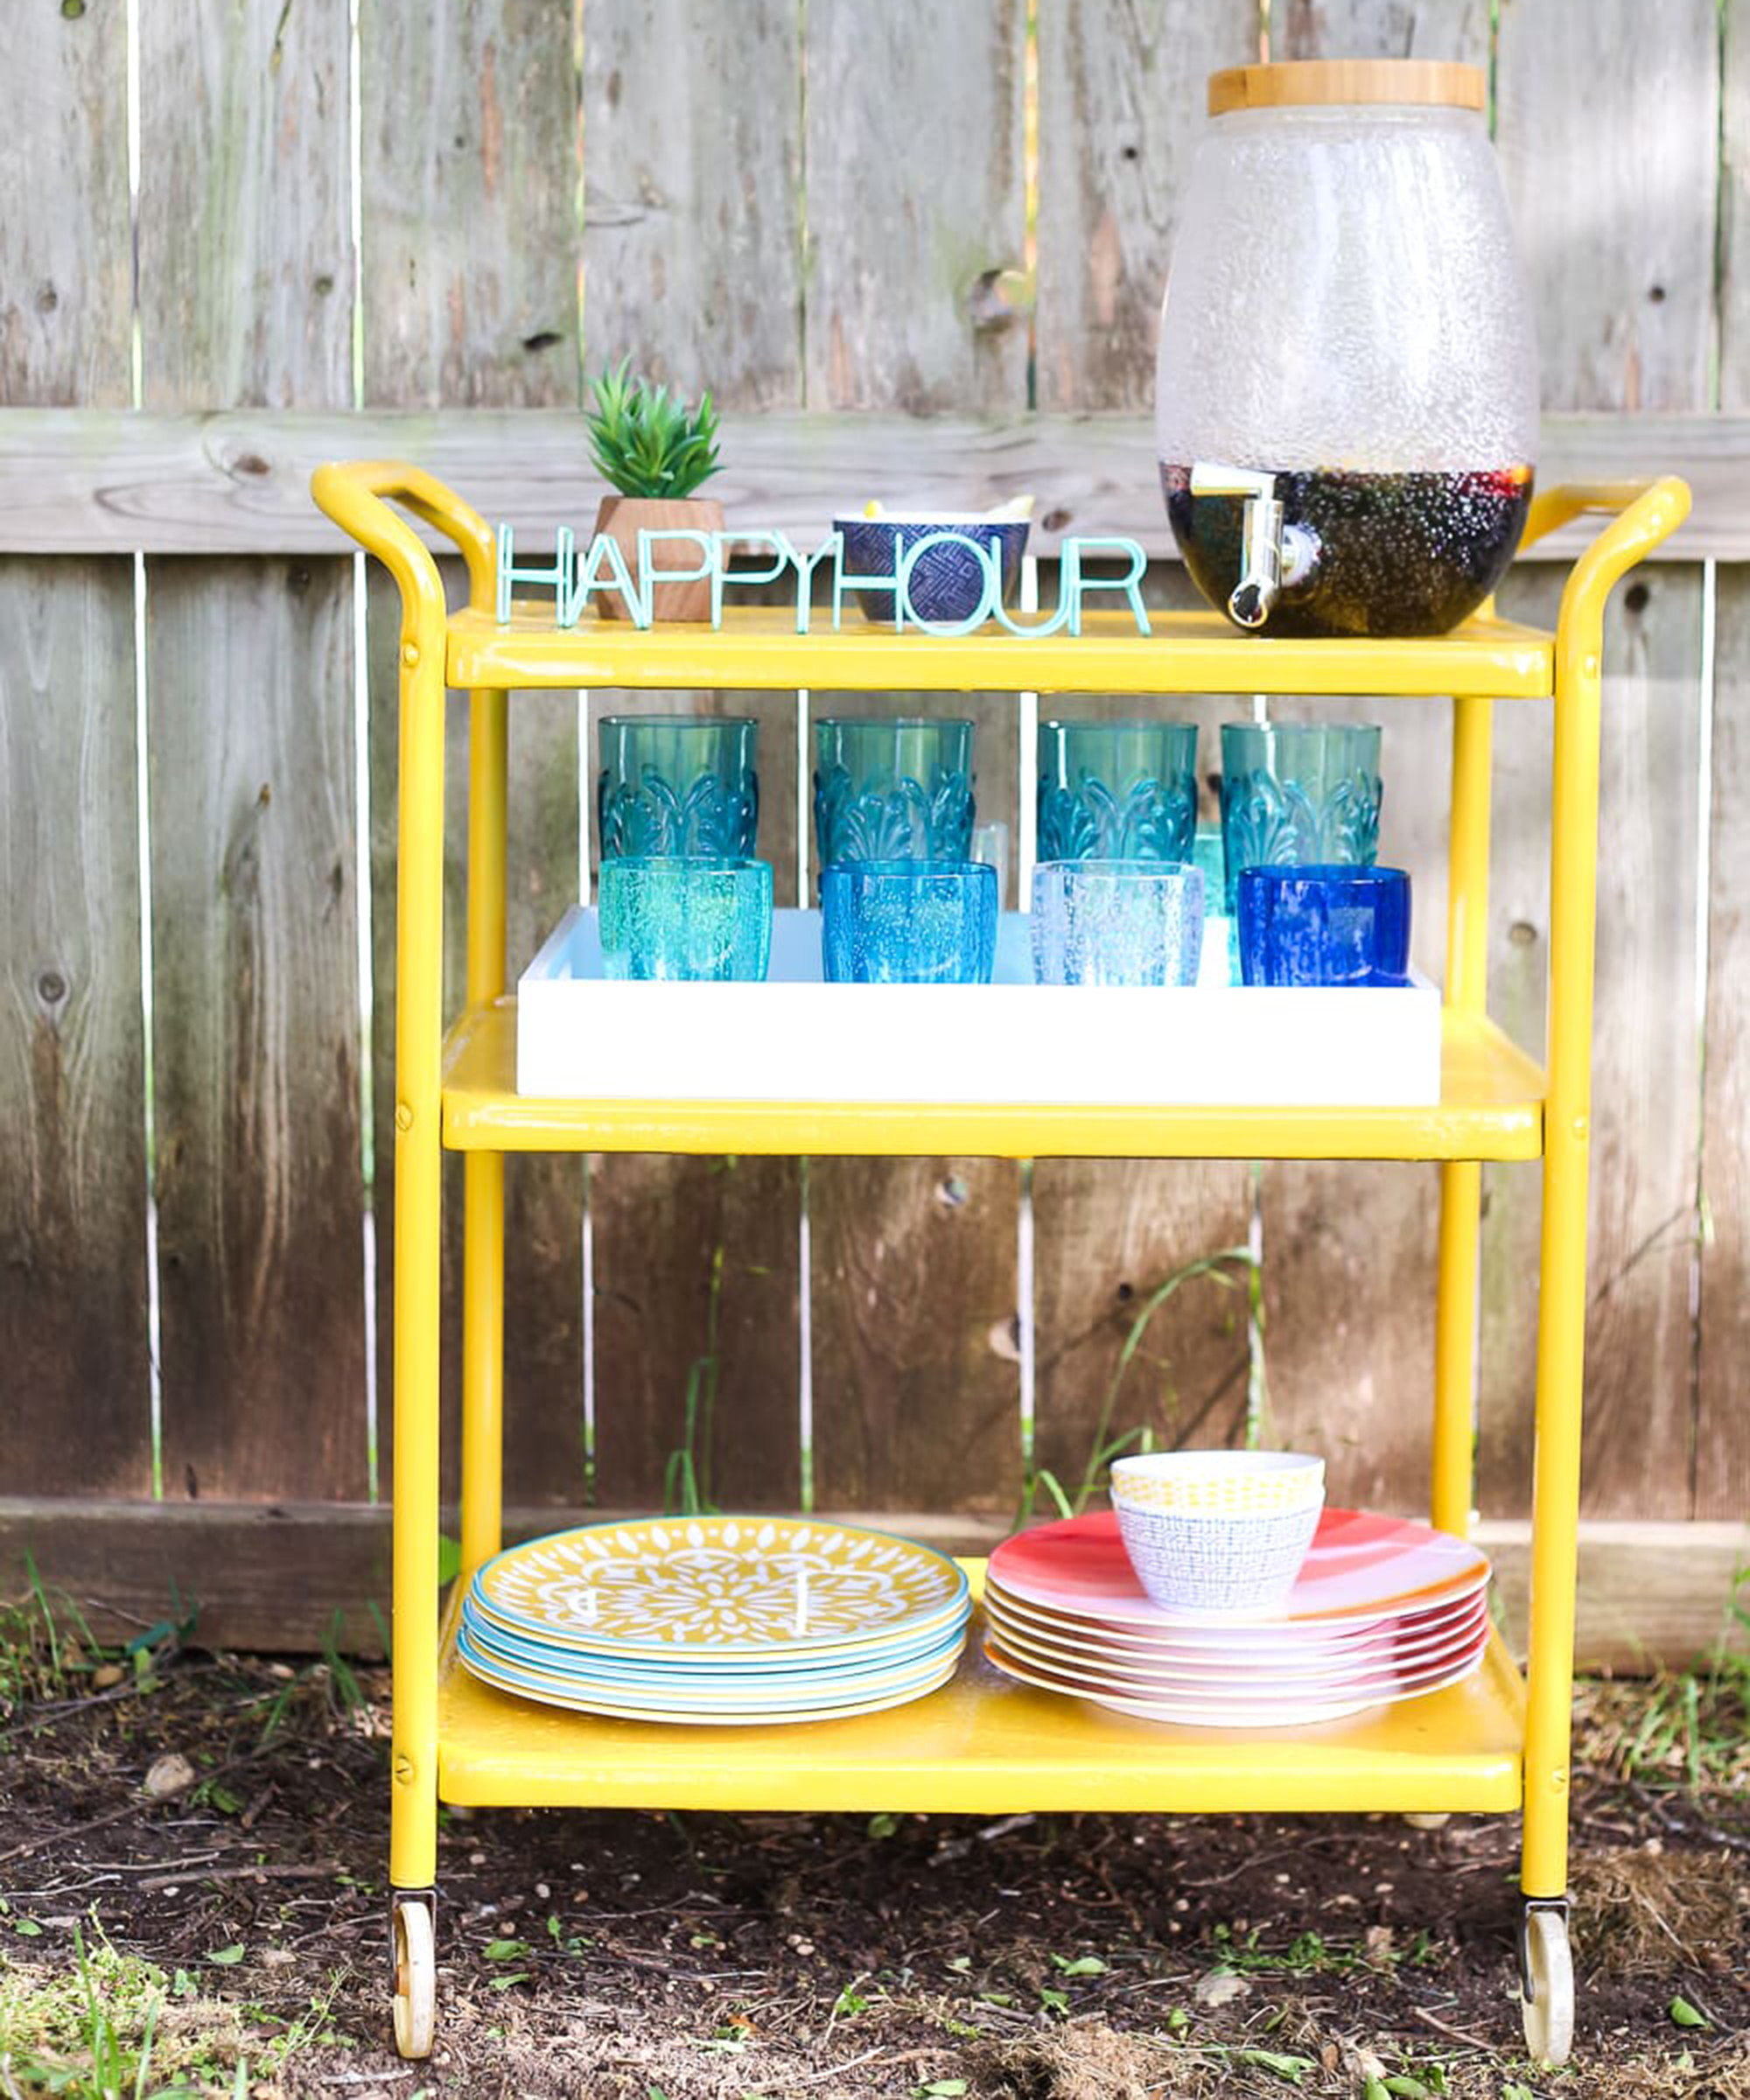
'I took a disgusting, dirty, completely rusty old bar cart…and I’m going to turn it into this, ' says Amanda Hendrix aka Love and Renovations.
'I had to hit up my local flea market to see if I could find something appropriately rusty and in need of love. I looked for something with extra rust because I figured if I was going to try Rust-Oleum's rust-stopping primer out, I’d make sure it really works.'
You will need:
- Rust-Oleum rusty metal primer
- Rust-Oleum protective enamel spray paint in color of your choice (available from Amazon)
- Sandpaper
How to:
- Sand the cart down a bit. The directions on the primer state that you just need to get rid of any loose rust or paint and clean it with soap and water, so I just used a sanding block to lightly get up any areas where there were loose bits and then I cleaned it up as much as I could.
- Apply two coats of Rust-Oleum rusty metal primer, allowing time between each coat to dry.
- Apply two coats of Rust-Oleum Protective Enamel Spray Paint, allowing time between each coat to dry. Work slowly and steadily, about a foot away from whatever you’re painting.
- Slowly move the paint in a back-and-forth motion, going slightly off the edge each time (so you don’t have any paint pooling up on the edges of your piece).
- Overlap your lines slightly to ensure even coverage, and don’t overdo it – it’s better to do multiple thin coats than one thick one.
7. Becky's tea trolley transformation
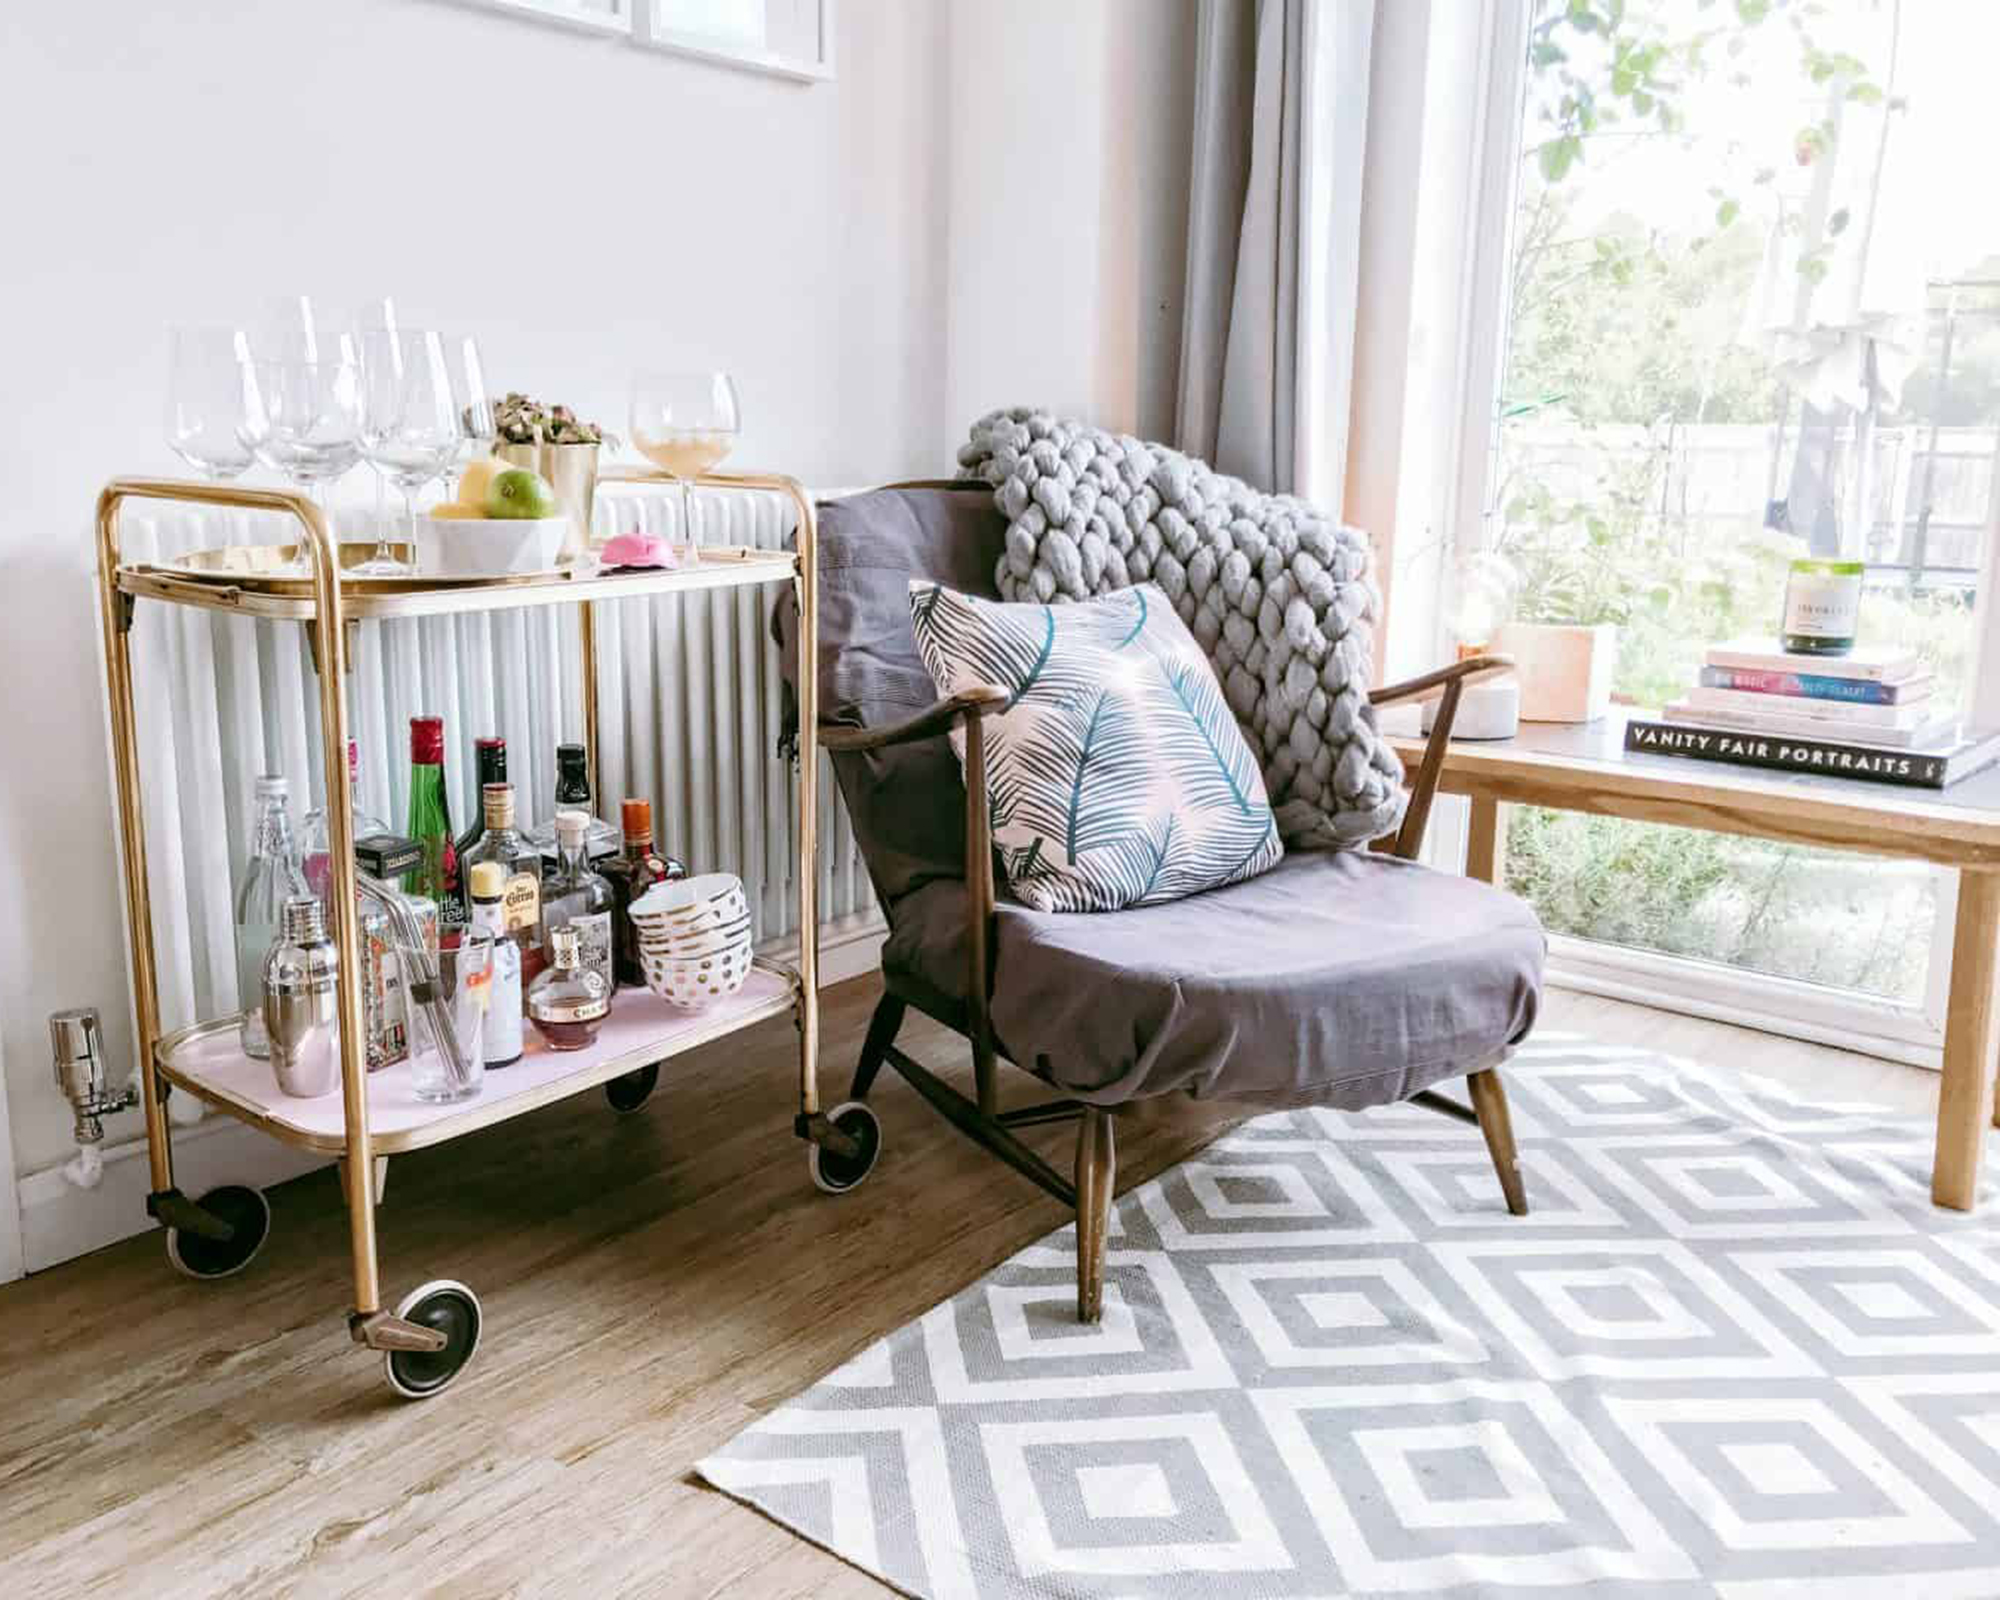
'I have been saving pictures of gorgeous drinks trolleys on my Instagram account for months now. But whenever I looked into buying a drinks trolley, they are all mega-expensive,' says Becky aka @pinkscharming.
'I’d rather rescue something old from landfill than buy a new one anyway. So I’ve been scouring eBay, Gumtree, and my local Facebook selling pages, to see if I could get an old trolley to upcycle.
'And finally, a few weeks ago, I found the one. This old vintage tea trolley looked kind of sad but was only £10, so I snapped it up. I upcycled this old tea trolley into this fab pink and gold drinks trolley quickly and easily, using Frenchic paint.'
'I couldn’t be happier with my upcycled tea trolley bar cart. It cost under £30 for the trolley and paint, and I have loads of paint leftover. Plus it’s the exact shade of blush pink I wanted. It goes so well in our lounge and is the perfect addition to our cozy reading nook.'
You will need:
- A tea trolley
- Frenchic Al Fresco paint in a color of your choice (or mix a combination)
- Hot soapy water solution (mild cleaning solution mixed with warm water)
- Sponge
- Masking tape
- Microfiber cloth or kitchen towel
- Artists' paintbrush
How to:
- Clean your tea trolley using a sponge and the hot soapy water solution and dry with a microfiber cloth or kitchen towel
- Masked off your tray edges before painting.
- Next, you just need to apply very thin layers of paint, Becky did five. She only waited about half an hour between coats (though the recommend 2 hours). Becky mixed her own shade of pale pink, using Al Fresco Dazzle Me! Hottie and white.
- Once dry, remove the masking paint. If any paint has lifted, use the artists' paintbrush to touch up any corners. You need to wait for about two weeks for Al Fresco paint to cure, but then it’s really hard-wearing.
Give your cocktails that professional finish by knowing how to dry orange slices.
8. Medina's DIY bar cart
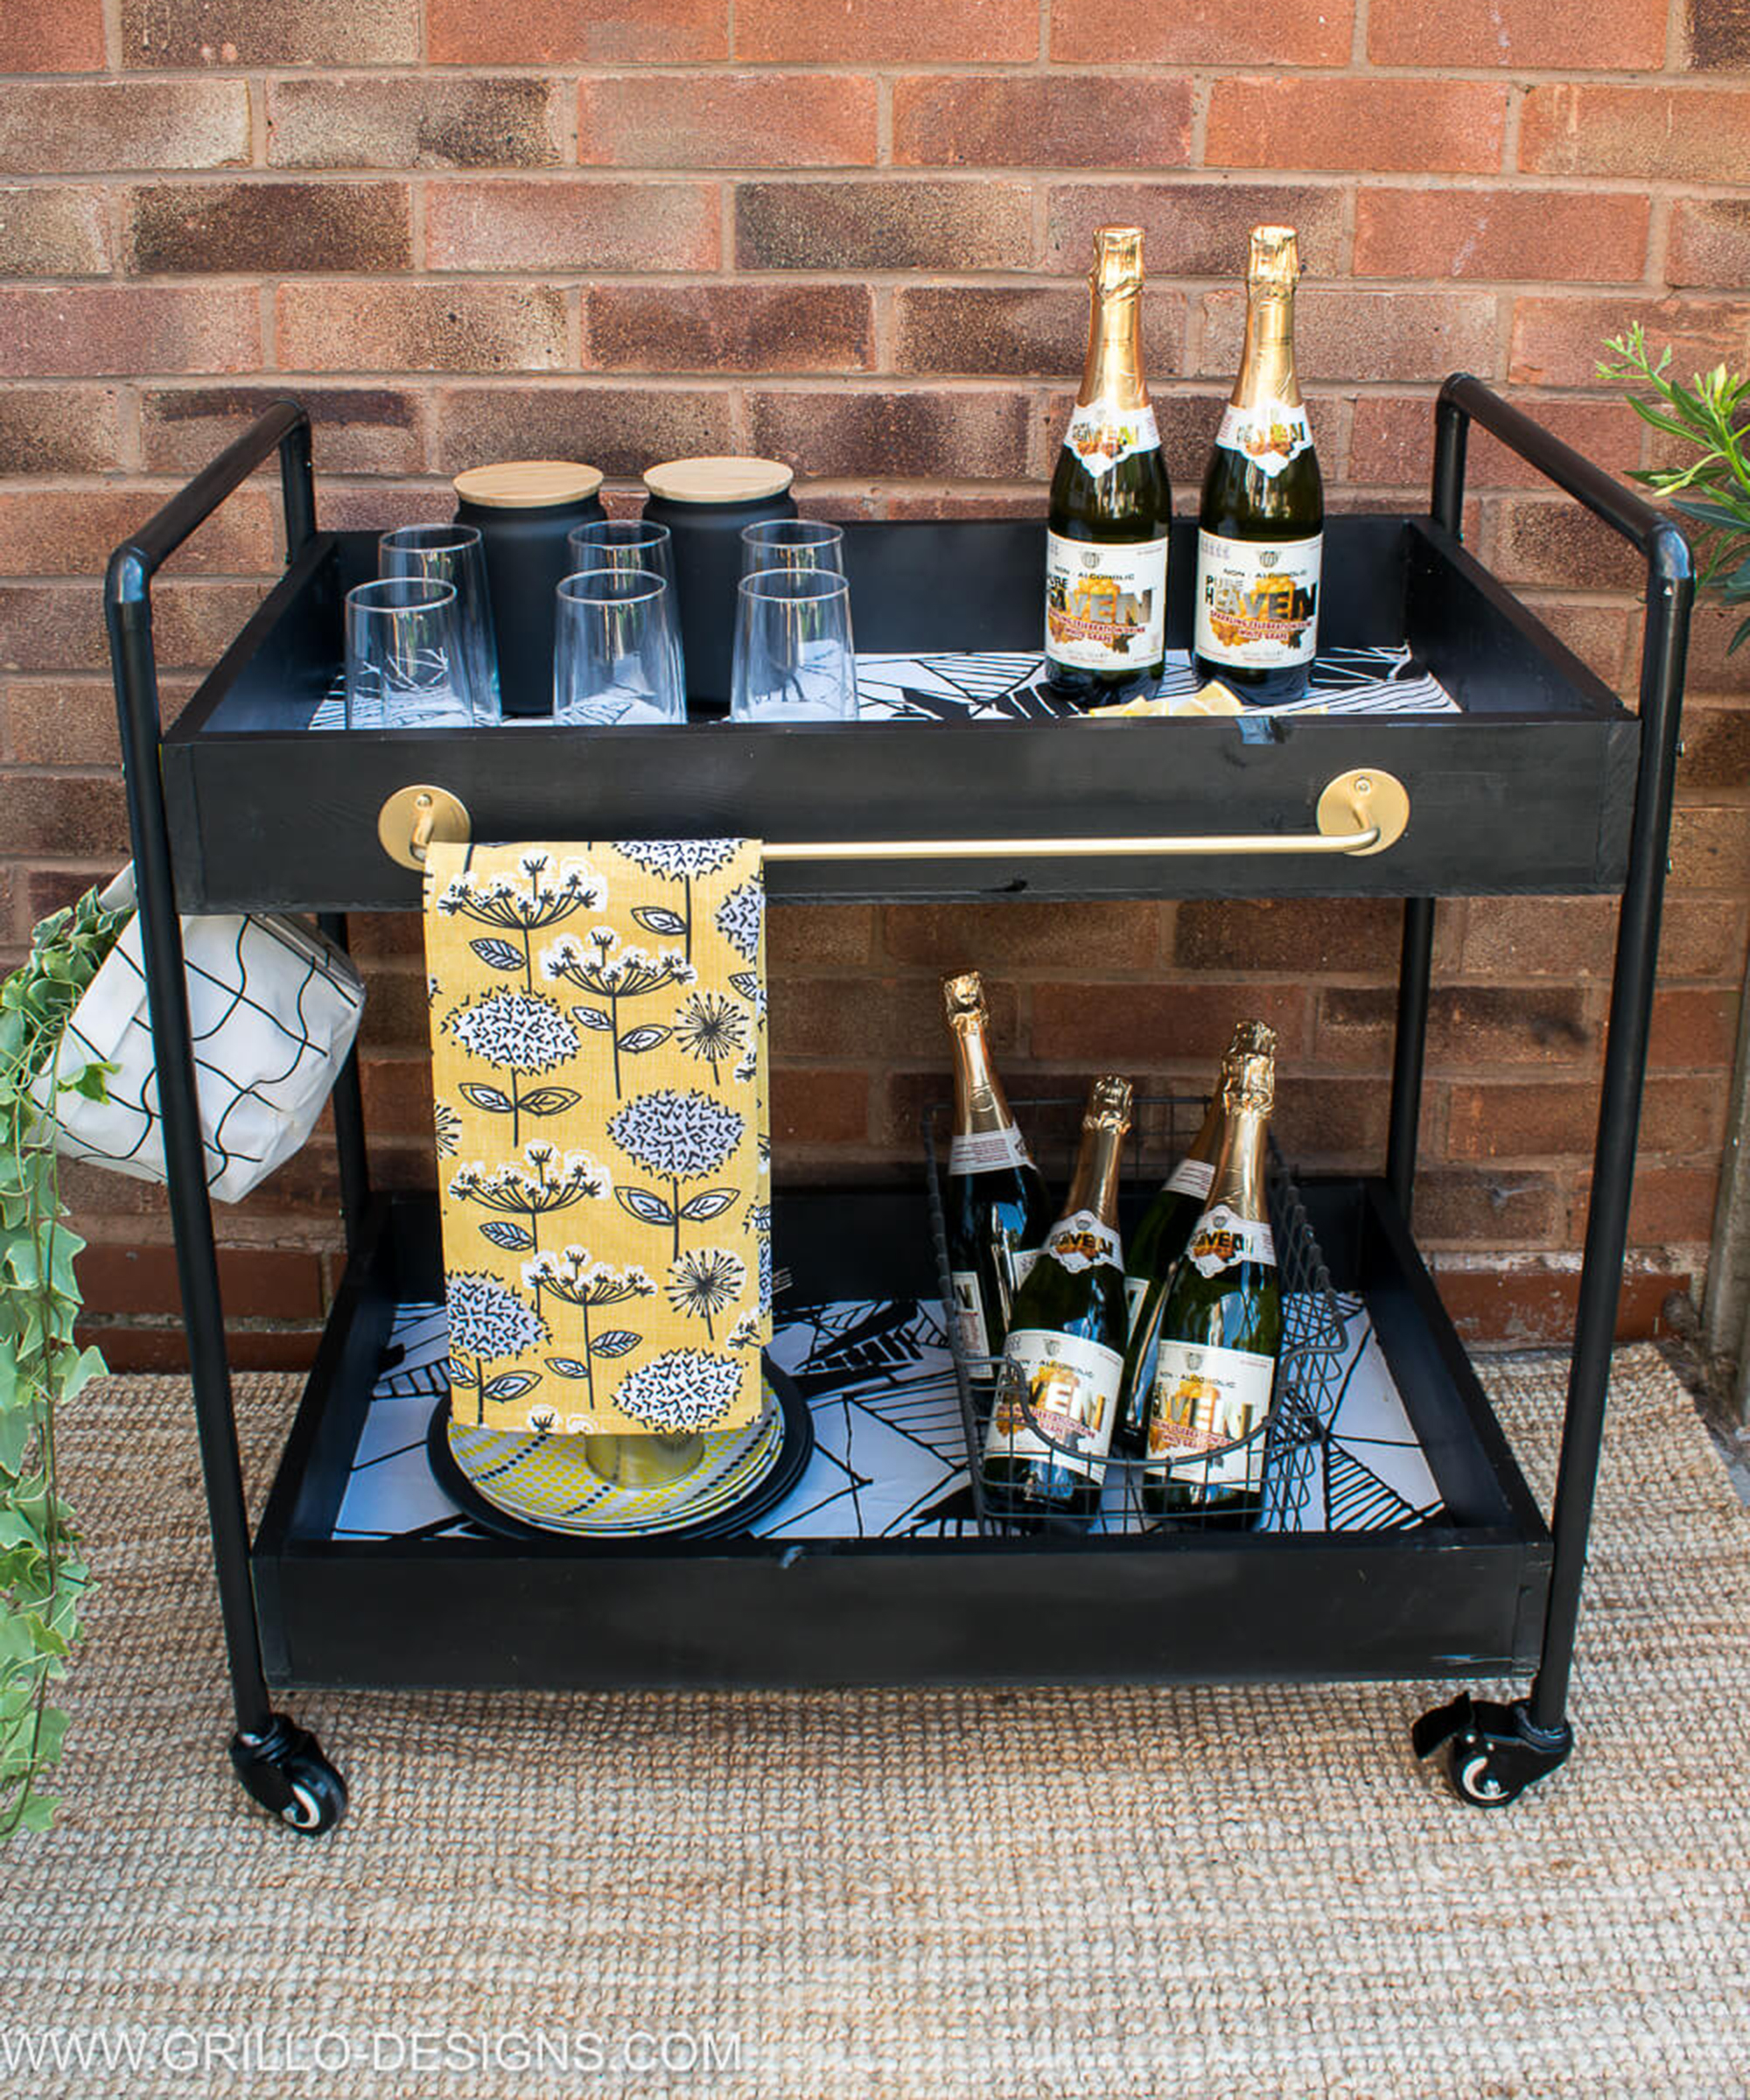
'One of the great things about building your own furniture, is that you have the freedom to decide the exact dimensions, the design, and the materials,' says Medina aka @grillodesigns.
'Let’s say you see something you like in a store, but the size is all wrong, the price a little shocking, or the style just a touch too generic. Well…. you don’t have to walk away feeling too disheartened because you can just build it yourself – exactly the way you want it.'
'I’m still pretty much a beginner when it comes to woodworking and building (and also still very much have my heart in my throat whenever I have to use a power tool of any kind), but I’m learning every day.'
You will need:
- 2 x copper pipes (2m x 22mm)
- 4 x copper pipe corners (22mm)
- Rust-Oleum Primer spray paint
- Rust-Oleum Hammered Black spray paint (available from Target)
- Rust-Oleum clear lacquer (available from Amazon)
- Rust-Oleum gold spray paint (available from Amazon)
- 2 x 2.4m timber wood
- MDF wood
- 8mm Screws
- 4 x stem caster wheels
- Super glue
- Wood glue
- Duct tape
- Wallpaper sample (optional)
- Mitre saw
- Sanding machine
- Pipe cutter 3-22m
- Power drill
- Clamps (optional)
- Jigsaw
- Handles and bar cart accessories (optional)
How to:
- Build the wooden trays: Measure and cut your timber wood to the desired lengths with a mitre saw (use treated timber wood if you plan to keep this bar cart permanently outside). You should have 4 longer-sized planks (75cm) for the lengths of each tray and 4 smaller pieces for the sides (44cm). Give all the pieces of wood a quick sanding with your sander. Apply wood glue to the edges of the wood (note we didn't use screws here to connect the box together as we were going to be screwing them directly to the copper frame). connect all the wood together to make a rectangular-shaped box. If you have clamps to hold everything in place, even better. Leave the wood glue to dry for at least 4 hours
- Create the base: Place the rectangle box on top of the wood and draw an outline. Cut with a jigsaw. Secure the bade in place with screws (or heavy-duty nails)
- Build the metal frame from the copper pipes: To make one side of the frame, you should end up with 2 x long length pipes (75cm) and one smaller pipe (40cm) Connect these together with the copper corners to make a U shape. Applying superglue to the inside of the pipe corners will help to make the frame even more secure.
- Next using a sharpie and a ruler, mark out the position of your holes on the frame (this will hold the boxes you’ve just built - use the height of your boxes as a rough guide on how to space your holes. The height of the boxes Medina made was 10cm). You need to make sure the holes are in the exact same position on both of the metal frames to ensure everything is straight and level.
- Drill holes where you have marked with your power drill. Place a piece of wood underneath to avoid surface damage. Also, watch your fingers, this part can be slightly awkward as the pipe is a little slippery.
- Paint the copper frame and boxes: Medina chose Rust-Oleum spray paint primer in white, spraying on thin even coats. Allow to dry.
- Apply the top coat: Medina used Rust-Oleum Hammered Black Paint. Medina also painted the metal pipe frames too – and left them outdoors to dry.
- Lacquer your cart: Finally, to protect both the painted wood and metal frames, I applied 2 coats of Rust-Oleum Lacquerwith a brush (they also do a spray paint version of this). It dries quite quickly and leaves a matt finish.
- Wallpaper your drawer bases: For a little added texture, Medina applied wallpaper to the bottoms of the drawers, but this is totally optional.
- Attach the castor wheels: Medina's wheels were slightly smaller than the 22m width of the copper pipes so she wrapped each of the wheel stems in duct tape for a more secure fit. Apply glue to the end of the pipe and stick directly onto the base of the castor wheel.
- Assemble the bar cart: pre-drill holes into the side of your trays and then screw them directly to the holes you previously made in the frames.
- Add on accessories: I spray painted a metal IKEA rail and some hooks with Rust-Oleum Gold spray paint and attached to the sides of the top tray.
Whether you're team flute, or team coupe, give your guests five star hospitality with our pick of the best champagne glasses.
9. Sarah's upcycled diaper changing table
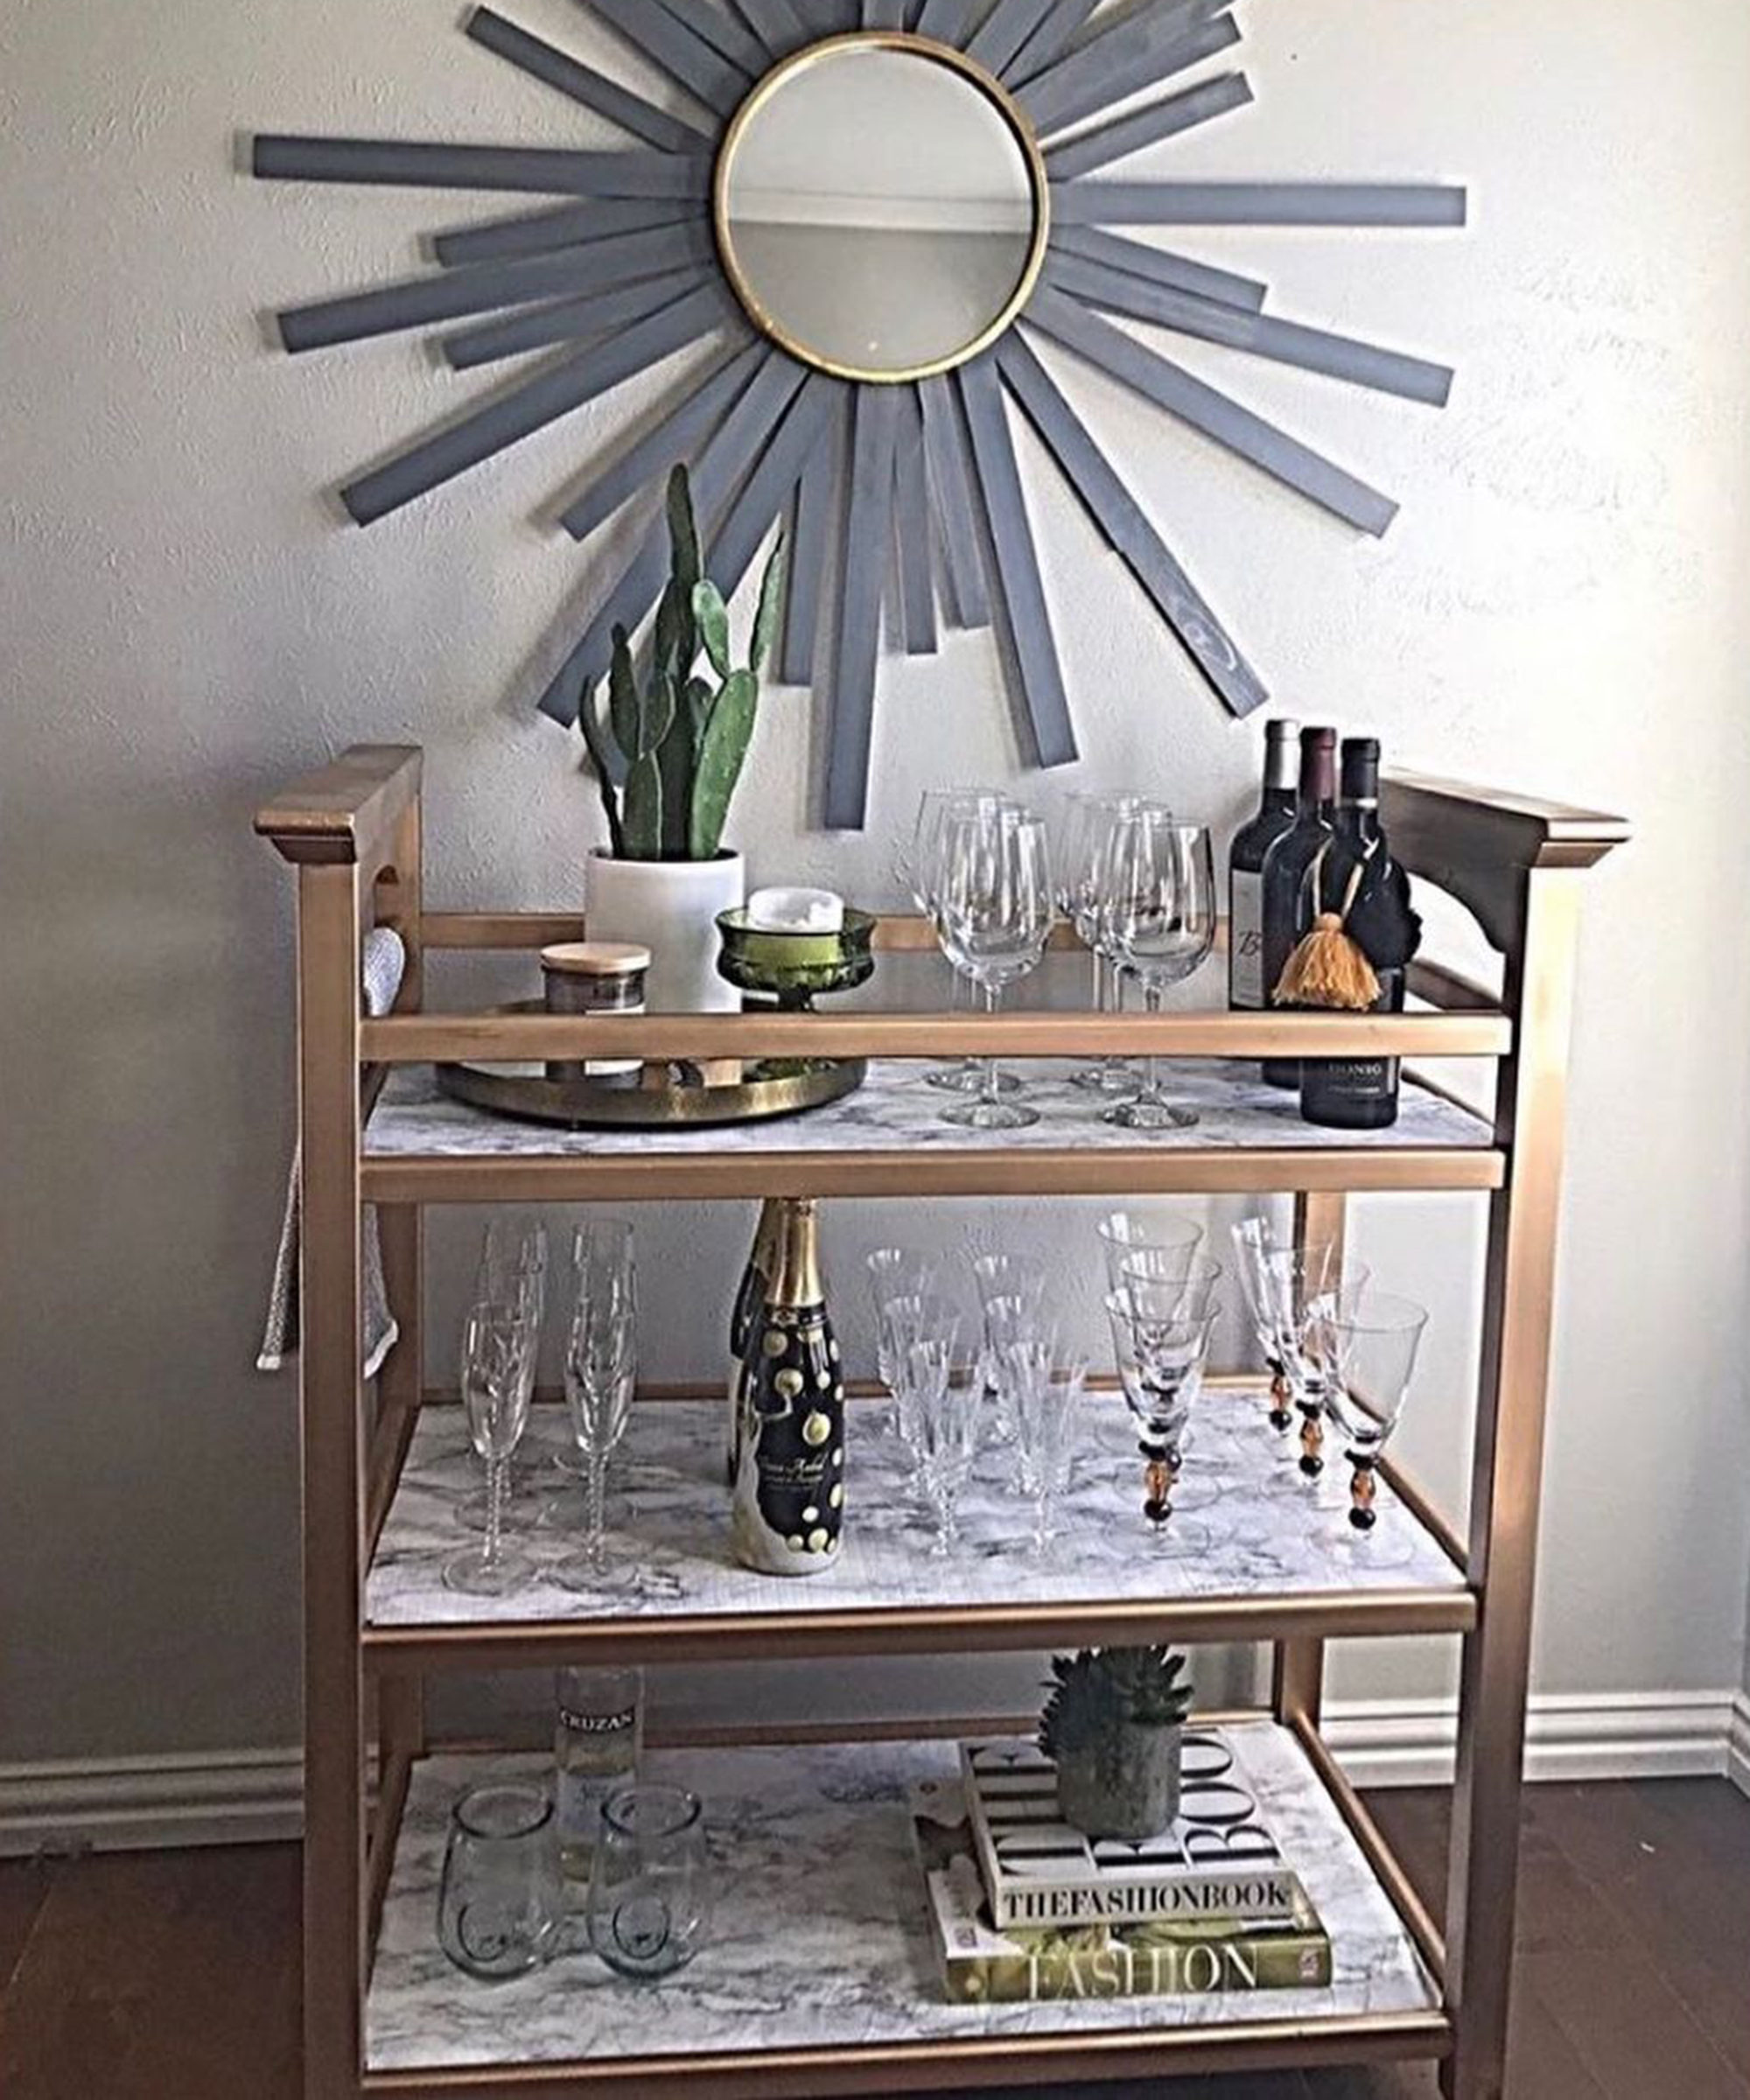
'This was a Graco changing table before I got a hold of it,' says Sarah Teresinki aka @redeux_style, upcycler and sustainable stylist.
'One of my fave upcycling projects I’ve done for the home that I use all the time. I took a craigslist diaper changing table and reworked it into a metallic gold bar cart with faux marble shelves.'
You will need:
- Thrifted or old changing table
- Screwdriver
- Allen key
- Sandpaper to lightly sand before painting
- Paint spray
- Scissors
- X-acto knife - cut in-store queue times and buy direct from Amazon
- 1 roll of peel and stick wallpaper or contact paper
How to:
- Start with any changing table, preferably one with wheels.
- Use the screwdriver to remove all hardware and baby safety straps. Use an Allen wrench to tighten all joints of the changing table.
- Lightly hand sand the diaper changing table before painting
- Use painters' tape to cover wheels if it has wheels. Spray paint or brush paint with your color of choice, let dry overnight. When painting, apply two paint coats and allow 30 minutes in between coats to dry.
- Cut strips of peel and stick wallpaper or contact paper the length of each shelf. Usually, there are three shelves. Most papers are wider than a standard diaper changing table shelf so you will have to do some trimming on the edges and corners.
- Peel off the back of the paper and cover the entire shelf with the sticky side down and press into place. Use an X-acto knife to trim all the edges and corners for a perfect fit.
- Customize and load with all of your favorite bar goodies. Remember the thrift store is an amazing place to get beautiful glassware.
Feel free to experiment with different spray paint colors and contact paper patterns. Here's another design that Sarah created:
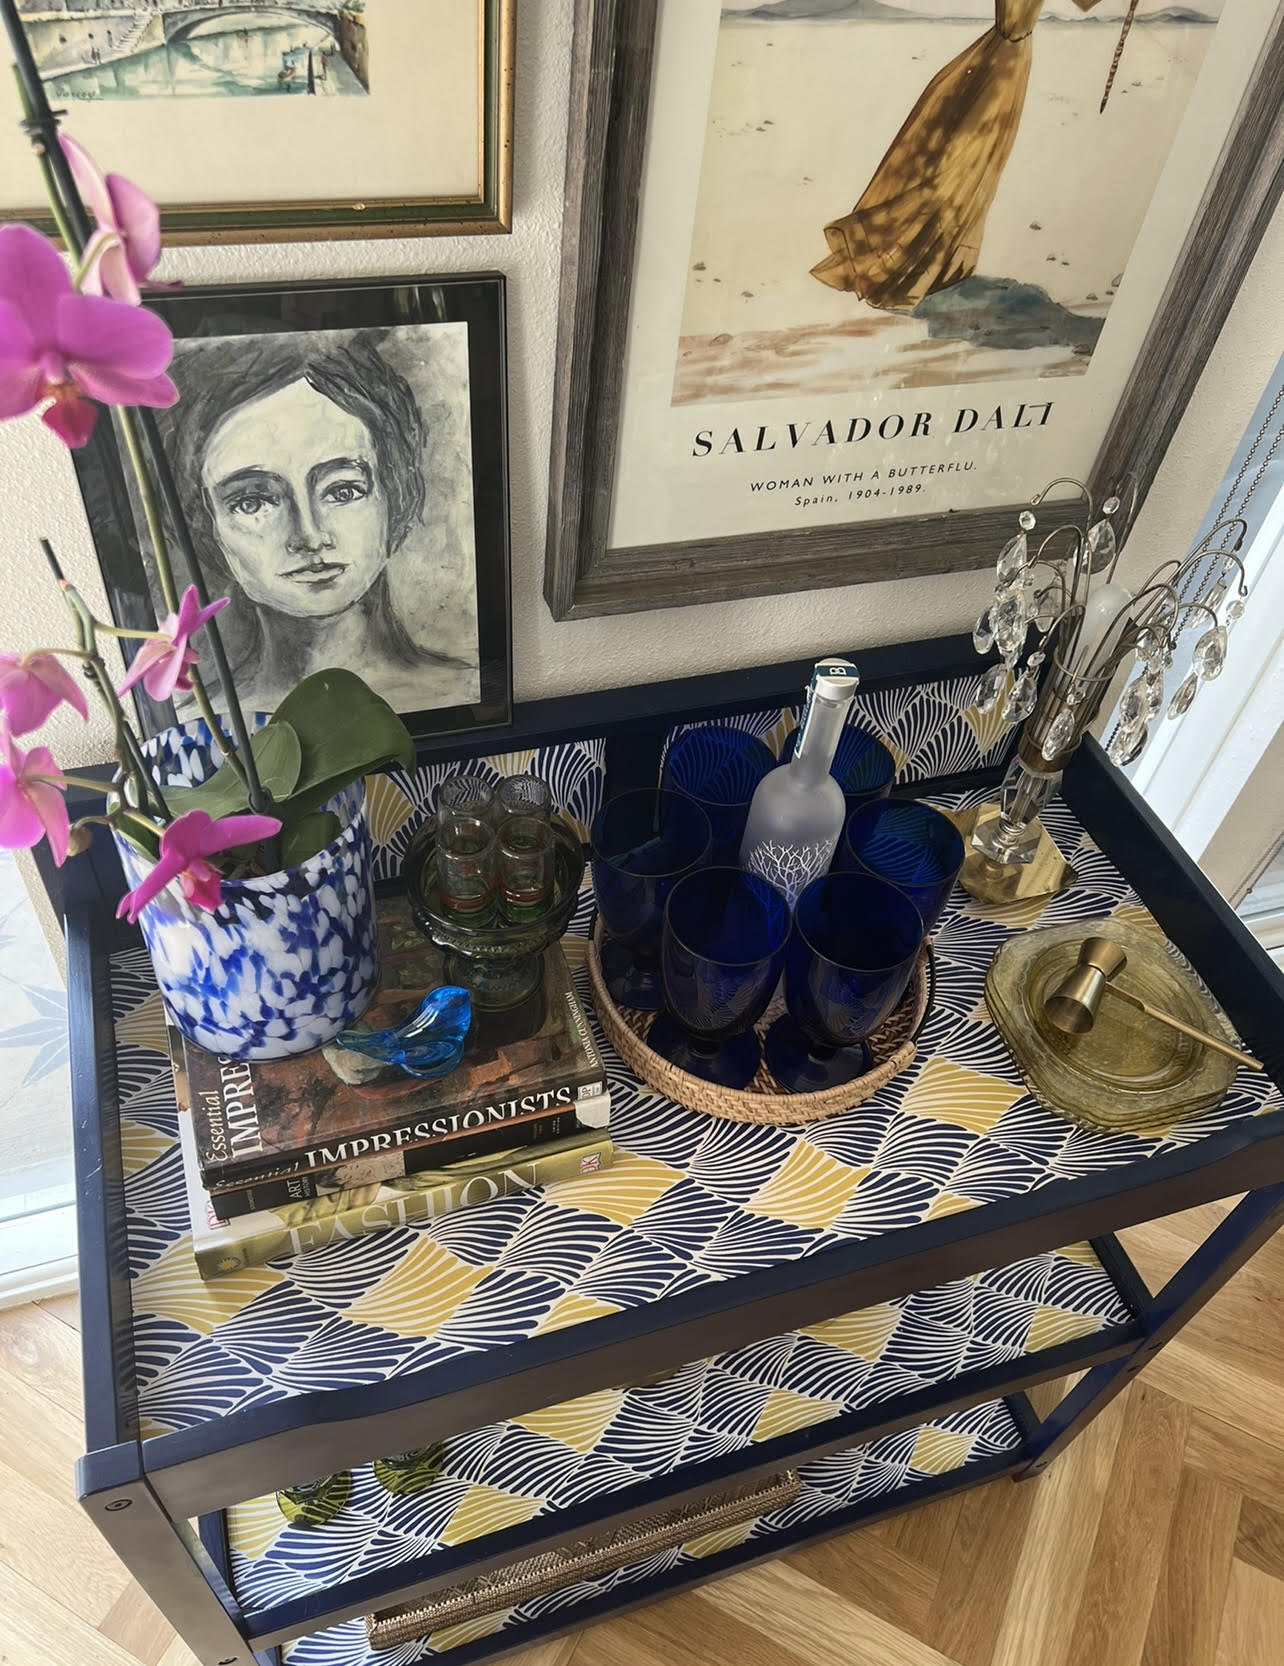
10. Bre's DIY dresser-to-drinks bar cart
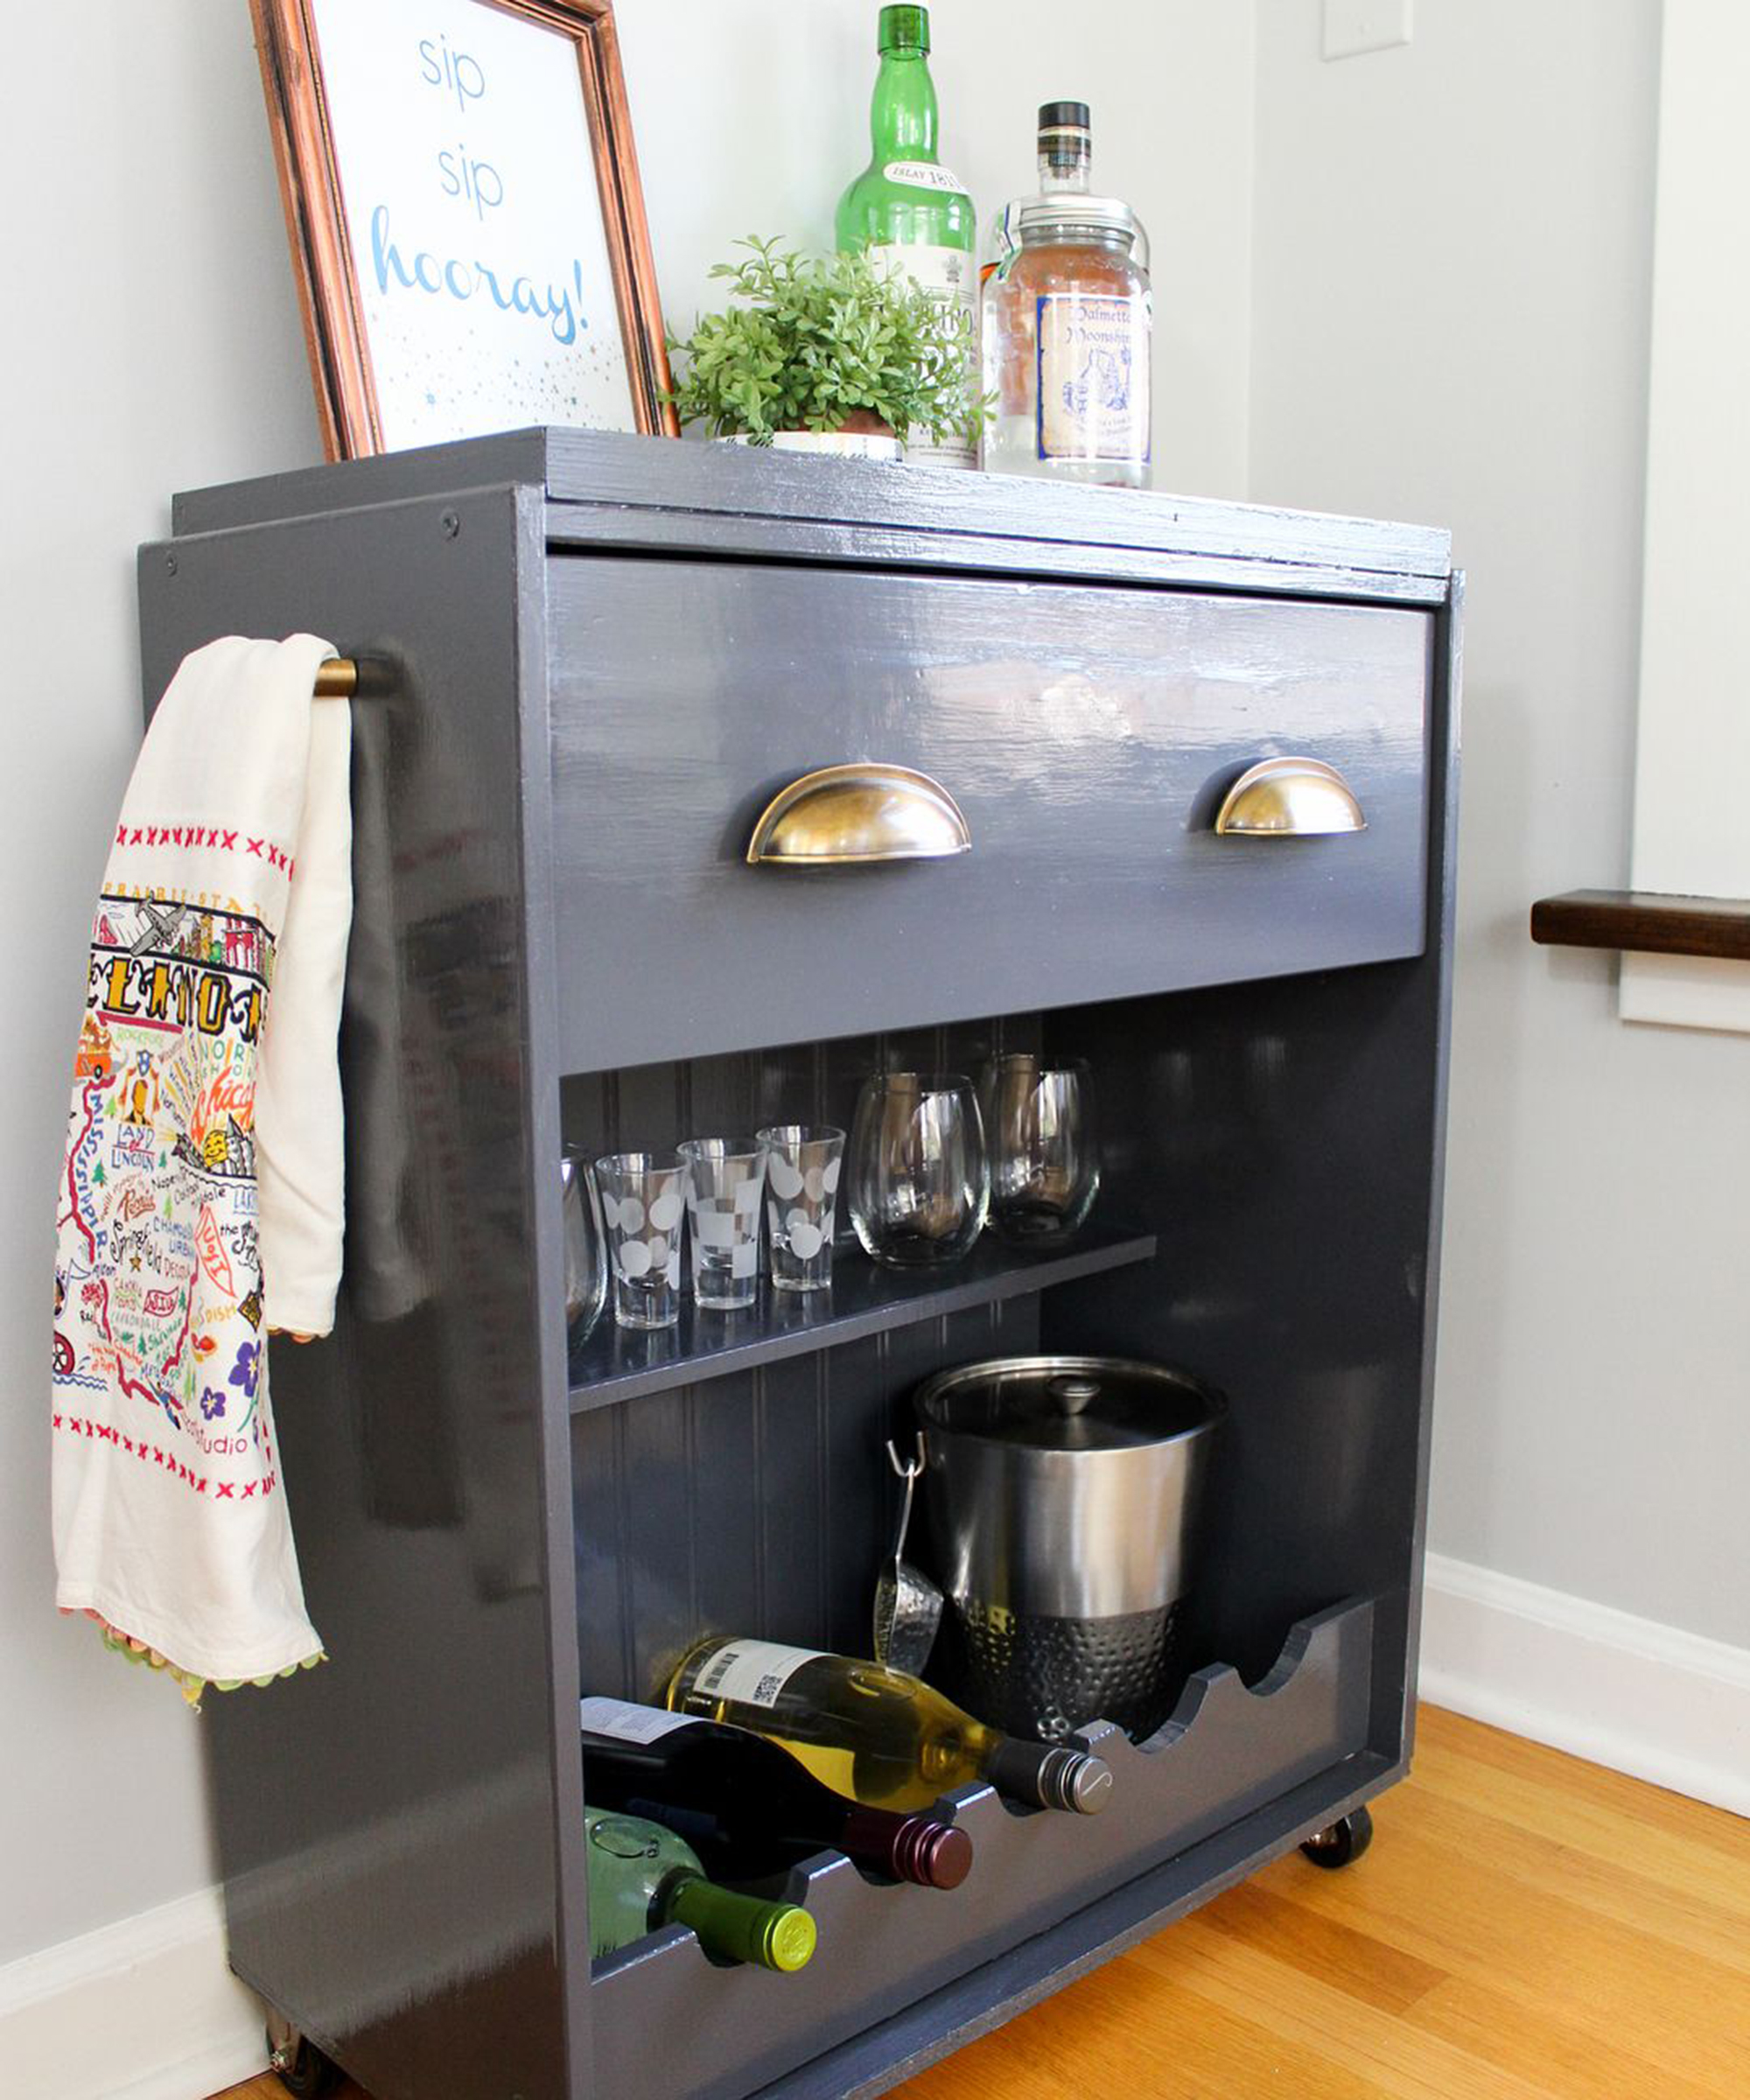
'This IKEA bar cart hack will have you saying “sip, sip hooray!”' says Bre aka @averagebutinspired.
'The IKEA Rast is SO plain that it’s the perfect piece to hack into a bar cart with ample storage for everything you need in a bar cart The drawer is especially handy for storing things, too.'
You will need:
- Rast dresser (available from Ikea)
- Wood filler (paintable and stainable)
- Putty knife
- Nails
- Screws
- Hammer
- Drill
- Wood glue
- Clamps
- Miter box
- Miter saw (Bre used the Ryobi miter saw)
- Circular saw
- Jigsaw
- Furniture paint
- Primer
- Paintbrushes
- Beadboard
- 3x 1″ x 36″ square dowels
- Precut section of 1/2″ thick birch plywood
- Four casters
- 2 x 3″ narrow cup pull (available from Hickory Hardware Williamsburg at Amazon)
- 2 x 3″ drawer pulls (available from Hickory Hardware Williamsburg)
How to:
- Assemble the majority of the Rast dresser: assemble the majority of the dresser, according to Ikea's instructions, but leave off the back particleboard, the bottom two drawers, and the bottom lip (that goes under the bottom drawer).
- Fill holes: next, use wood filler to fill in the preexisting hardware holes in the drawer and along the inside of the dresser (where the bottom two drawers would have been).
- Create the wine bottle holder: using the jigsaw, cut semi-circles out of the bottom lip of the dresser to create the wine bottle holder.
- Fit the wine bottle holder: Place the bottle holder onto the bottom of the dresser, right in its designated spot.
- Cut the bar cart backboard and bottom
- Prepare the back and bottom of the bar cart: cut the beadboard (for the back of the bar cart), and birch plywood (for the bottom of the bar cart), to size.
- Sand and prime: prime everything with a coat of oil-based primer. Depending on the paint you choose, you may not need oil-based primer, so you might want to skip this step.
- Attach the backboard and the bar cart bottom: Once the primer has dried, nail the beadboard into place for the back of the bar cart, and screw the bottom onto the cart.
- Create the bar cart top tray: Measure out a tray top trim. You can either hand saw the square dowels in the miter box or use the Ryobi miter saw.
- Secure the dowels: glue the dowels to the top of the dresser/bar cart with a thin layer of wood glue and clamp (and weigh) them down to make sure they’d really stick.
- Drill holes: drilled holes for my your new hardware in the drawer and on the left and right side of the dresser/bar cart, drill holes for your casters on the bottom.
- Paint the bar cart: give the dresser/bar cart two coats of furniture paint and allow it to dry. You may choose to apply a coat of topcoat.
- Add the hardware and casters to the bar cart: after letting it thoroughly dry, pop in your new hardware and casters.
Pop it like it's hot with our expert guide on how to open Champagne properly.
What is the point of a bar cart?
'The perfect solution for your home entertaining needs, a home bar cart is a fun and functional furniture piece to add to your home decor,' says Kristy Ojala, digital editorial content manager, Bed, Bath and Beyond.
'Beyond delivering drinks to guests, a rolling cart can serve a variety of uses in your home. Use it to add extra workspace to a small kitchen, or as a display space for photos, flowers and plants in your living room. You can also turn it into a towel holder in the bathroom or a nightstand at your bedside. The possibilities are endless.'
'For a more traditional furniture piece, home bars will transform your living area, family room or basement into the entertaining epicenter of your home. Load it up with bar tools and accessories like jiggers, shakers, bottle openers, corkscrews and stemware.'

Hi, I'm the former acting head ecommerce editor at Real Homes. Prior to working for the Future plc family, I've worked on a number of consumer events including the Ideal Home Show, Grand Designs Live, and Good Homes Magazine. With a first class degree from Keele University, and a plethora of experience in digital marketing, editorial, and social media, I have an eye for what should be in your shopping basket and have gone through the internal customer advisor accreditation process.