Our house came with a kitchen straight out of 1967 – green, shag, carpeted floors and all. As we focused on repairing all our home’s mechanical issues, we knew a full kitchen, gut remodel was likely a decade off.
Even though I didn’t immediately have a clear vision for our more conservative remodel, we worked to reuse everything possible. The best part of updating an old kitchen is the ability to experiment, without the fear of ruining anything pricey or new. Try, play, learn a few things and try again.
If you're stuck with a dated kitchen and don't have the budget for a full house renovation, here are five ways I updated my old kitchen without taking on a gut renovation.
Article continues below 
Our kitchen when we moved in
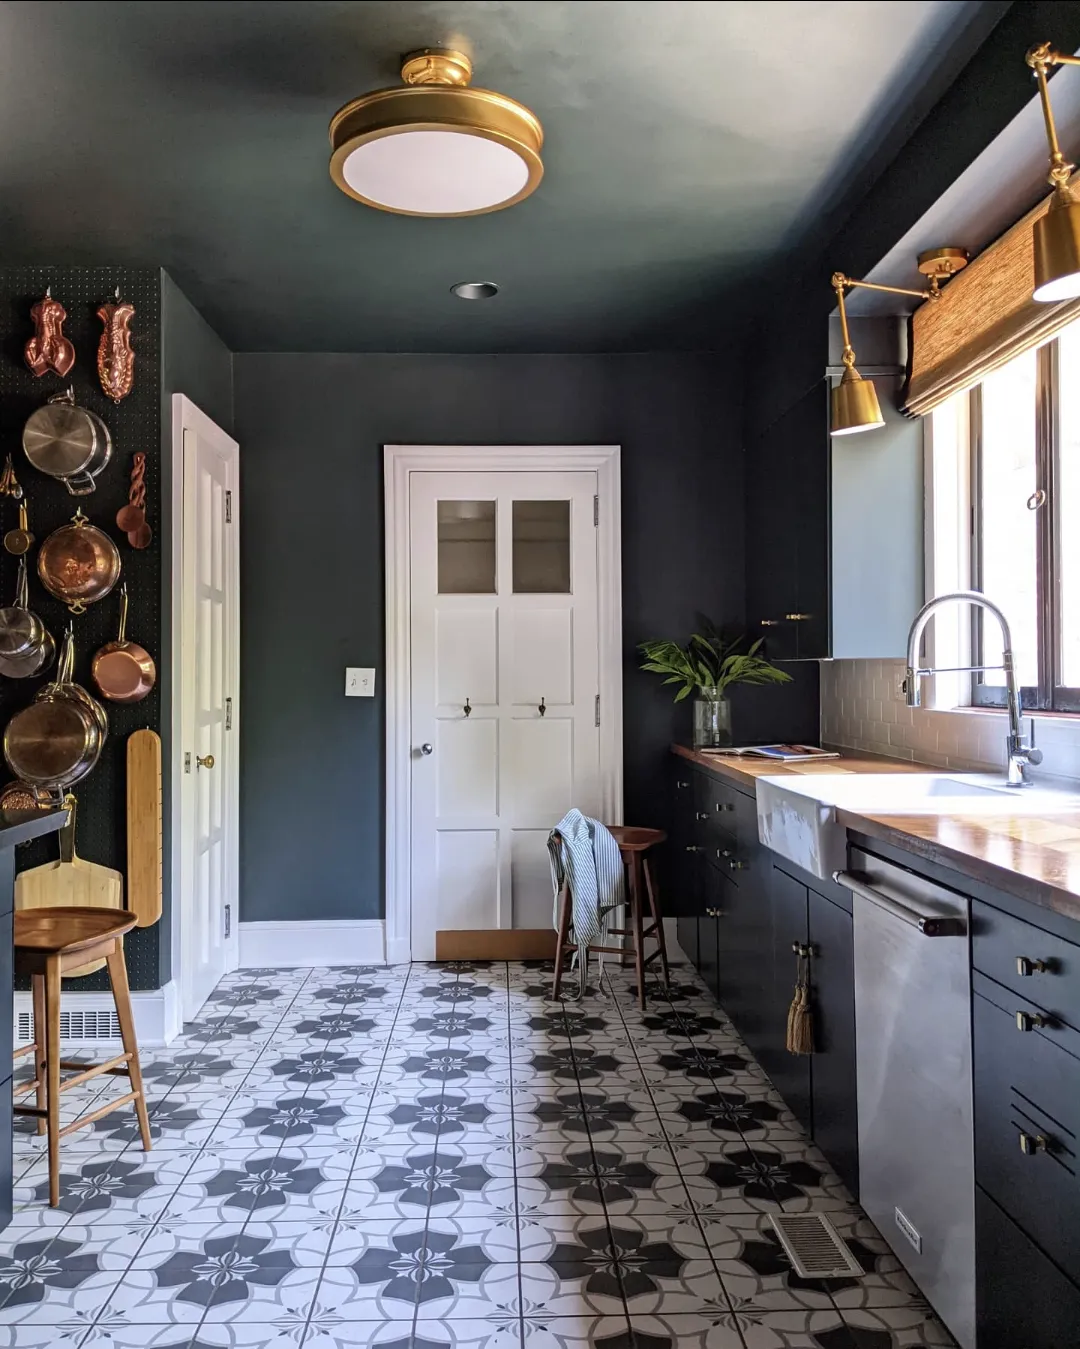
1. Paint. Paint. Paint.
Painting the cabinets, walls and ceiling all one color fools the eye and helps everything blend together. Try an unexpected color. Using an unusual shade will breathe life into your dated space.
I tried a few paint colors before landing on Benjamin Moore's Blackforest Green. Dark, earthy, and inky, it keeps all the flaws in the shadows. Gapping cabinet fronts, lumps and bumps, and those pesky bulkheads fade away. The best part, to me, is that I can repaint the whole thing in a few years when I’m in the mood for something new.
- Want to tackle this project yourself? Here's our tutorial on how to paint kitchen cabinets.
2. Disguise, don't ditch, old appliances

Our refrigerator before it got a makeover

And post-makeover!
New appliances, such as the best fridge freezers, can easily take a large chunk of your kitchen makeover budget. If yours are still running, but give away your kitchen’s age, consider a little makeover.
Our thirty-year-old refrigerator became a decorative feature instead of an eye sore with just a bit of wallpaper. Or slap some paint on your old fridge, instead. You can even get as wild as your imagination, and try painted stripes like blogger At Home with Ashley.
Covering a geriatric but serviceable dishwasher in stainless steel contact paper can quickly update your appliance, or you can build wood panels to blend with your cabinets.
3. Swap your countertops
You may not want to install expensive stone onto old cabinets or in a space you'll renovate eventually, but there are many lower budget countertop options that will still freshen the whole kitchen vibe.
We had budget-friendly Ikea herringbone butcher block installed on the perimeter cabinets. Our center island is stainless steel, crafted at a local metal fabricator for $250 and installed on a double plywood base. I added smooth brass corner covers for a bit of panache and kiddo head protection. Stainless steel countertops can handle hot pans directly from the stovetop, are incredibly hygienic, and easily wipe clean of every kids project and science experiment.
- Want more inspo? Check out 65 kitchen ideas to inspire your makeover
4. Add custom touches

Anything custom looks expensive. Even simple materials like peg board and leftover butcher block, used alternatively, can add beauty and utility to a kitchen.
An awkward, bumped-in wall in our kitchen became a peg board storage feature. I love having all my cookware at arm’s reach, and it makes the unusual wall feel intentional.
For our sweet breakfast nook, we had custom benches cut from our leftover butcher block countertops, mounted to hair pin legs purchased on Amazon. We hung bench cushions from hooks on the wall, creating a soft place to lean. The space was completed with a simple table that includes a few DIY, decorative accents.
5. Update light fixtures and hardware
Changing out lights and hardware can go a long way in elevating up your kitchen style factor on a budget. We converted the recessed lights over the sink into arm sconces. (Here's a how-to.) A ceiling fan and dated breakfast nook chandelier were switched to modern, brass fixtures. The worn, original cabinet hardware was removed to make room for sleek and sturdy, mixed-material handles and pulls.
It's hard to believe our kitchen is the same space just a few years after we moved in!
About the expert:
Ruth Jackson is an Iowa-based DIYer, furniture flipper, certified interior decorator, and lover of all things vintage. She's currently renovating her family's 1930s colonial home, which she documents on Instagram at @miracleonthirtyfourth.