DIY plant stands – 14 pretty planters to display houseplants, herbs and flowers
These DIY plant stands are the perfect finishing touch to bring the outside in. Add a bespoke biophilic element to your space with these inspiring ideas.

As we spend more time in our homes, the need for DIY plant stands (quite literally) has grown. It may be our obsession with the outdoor-in biophilic trend, or perhaps because much of our time over the past few years has previously been spent stuck indoors.
Houseplants can last for years if fed and watered well with ample access to sunshine. But instead of housing your new BFFs in the plastic pot they came in, upgrade their accommodation with the best outdoor plant pots and a brand-new plant display made by you!
What's more, these DIY plant stand ideas can suit your interior spaces. Maybe you want to compliment an industrial scheme or reinforce that relaxed farmhouse chic feel. These 'grassroots' designs have been crafted by DIY enthusiasts with a few spare hours.
DIY plant stands
The benefits of houseplants span much further than their aesthetic appeal. They can boost your mood, heal skin ailments and burns, and even purify your air.
1. Sophie's macrame plant stand
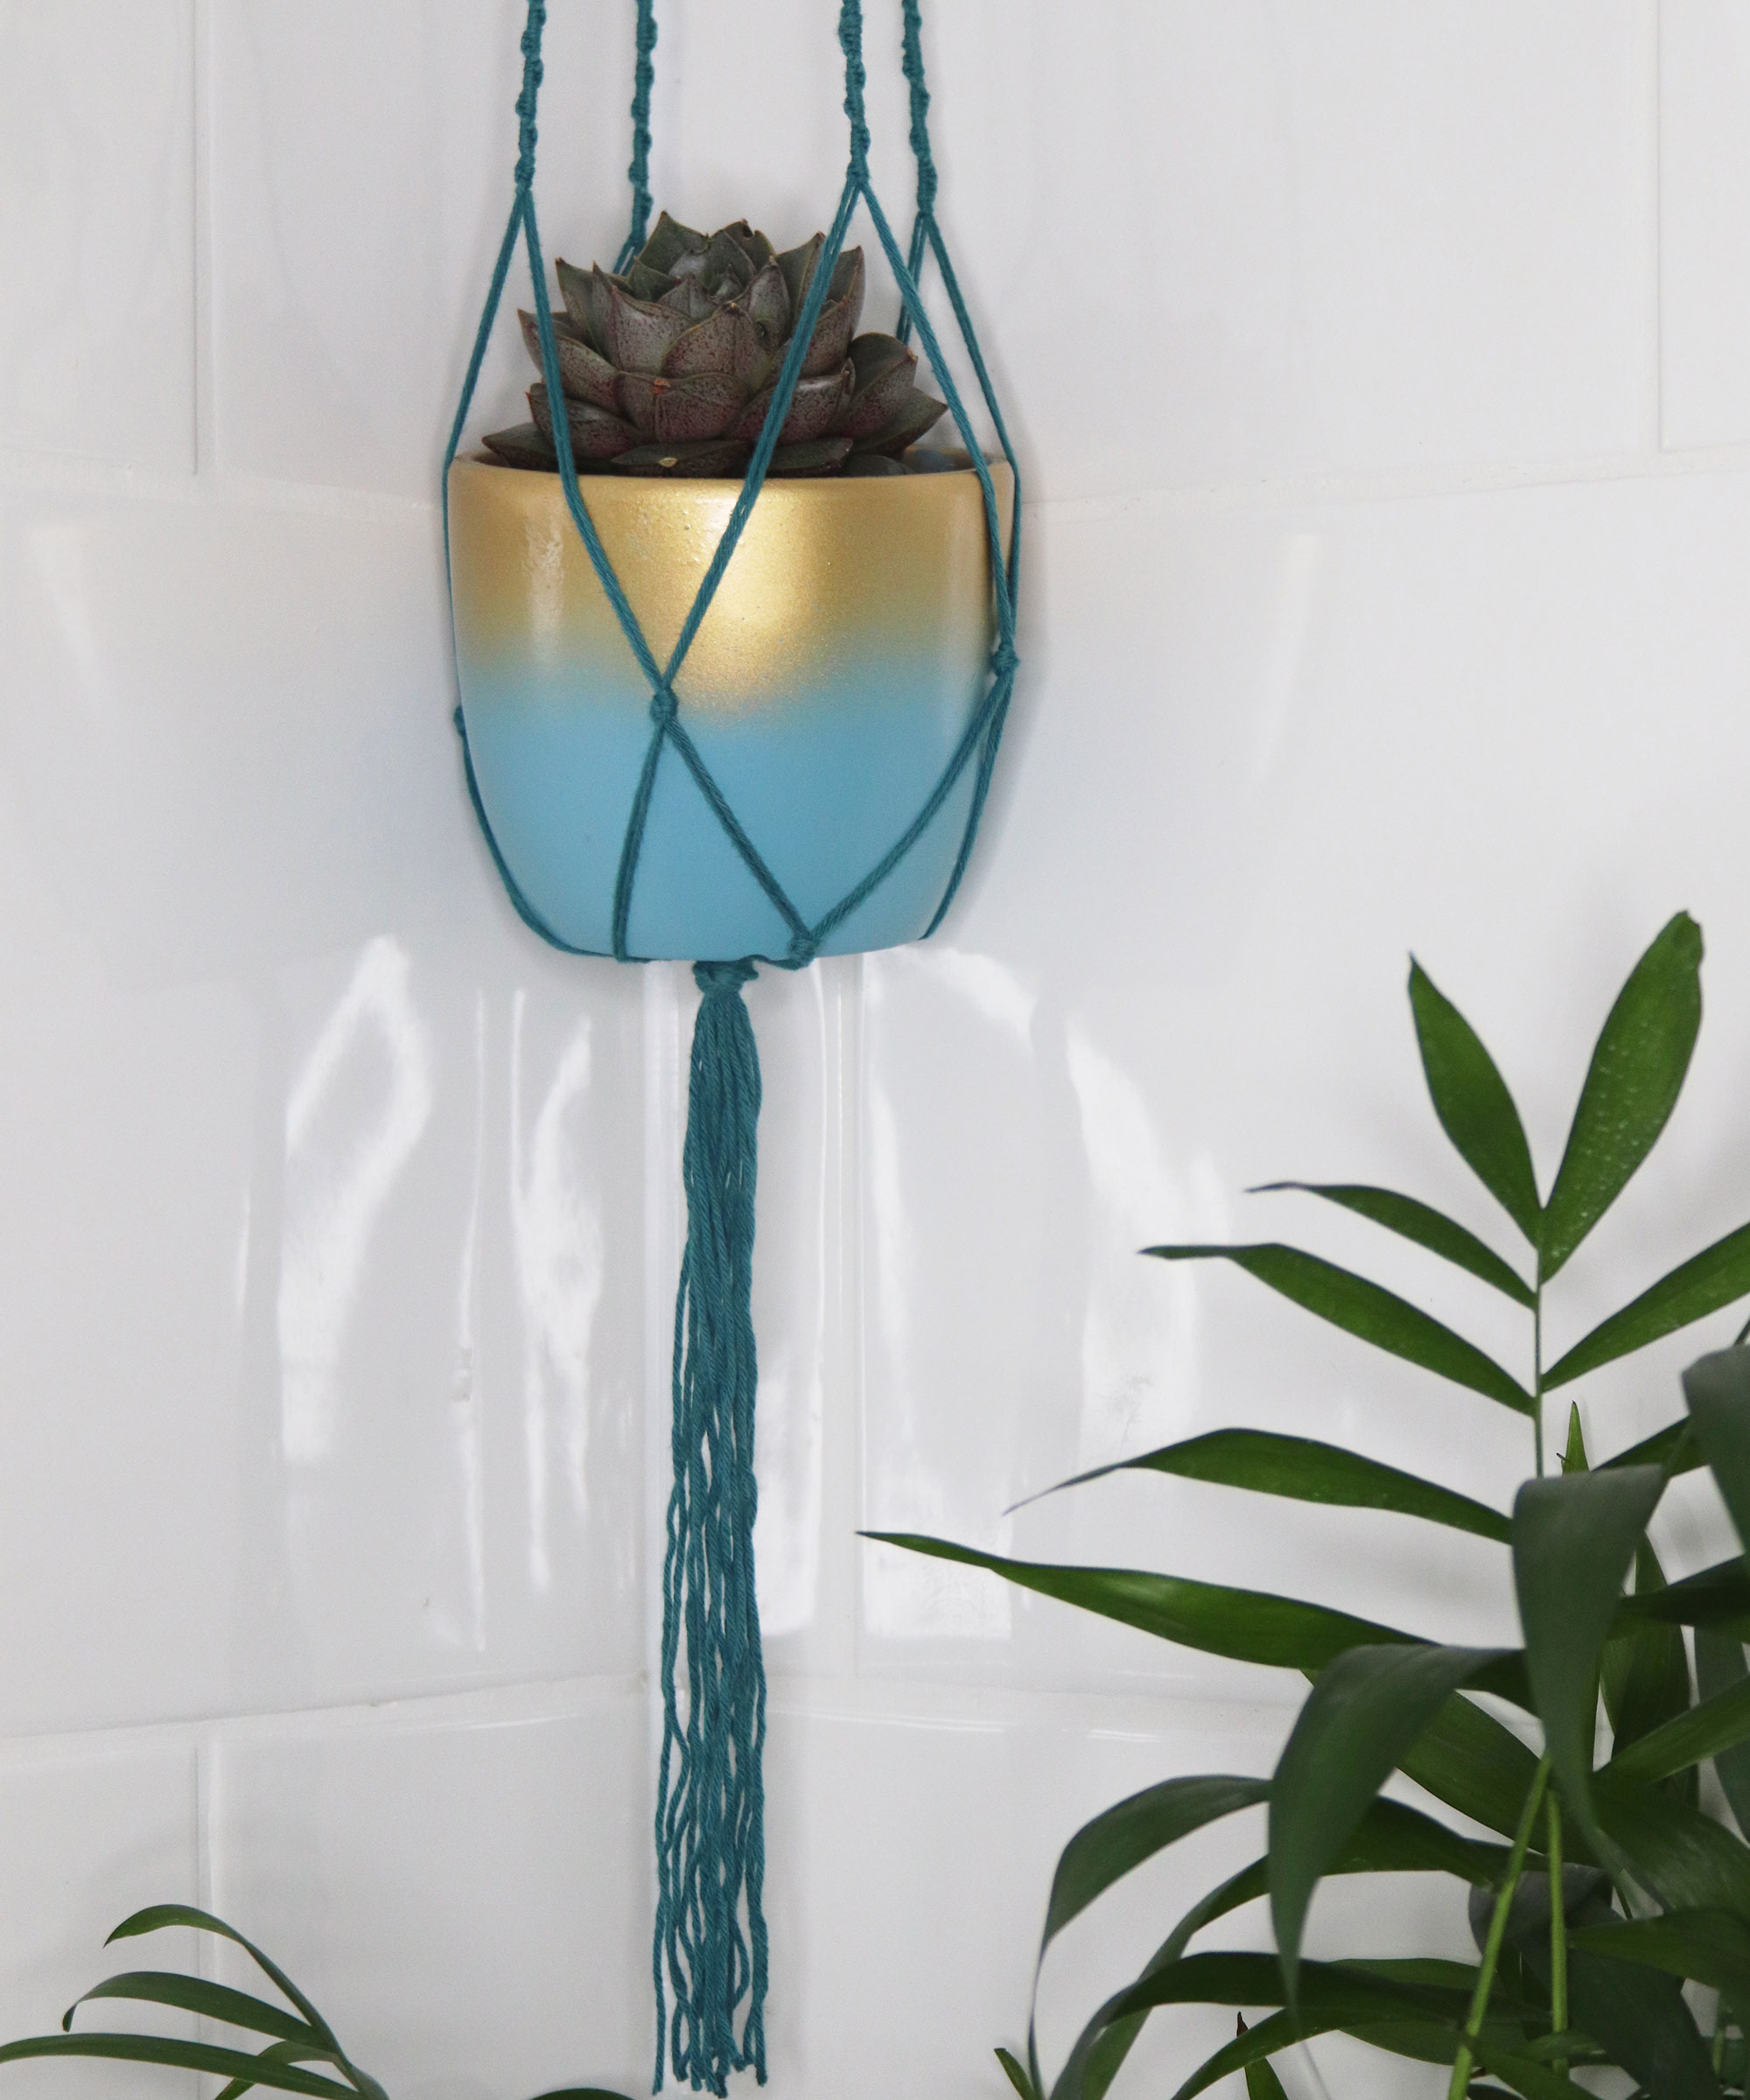
Intricate macramé work will look great both inside and outside your home, and it isn't as tricky as you might first think to make yourself. In this project, craft designer Sophie Tarrant shows you how to create an ombré effect macramé DIY plant stand using Rust-Oleum paints to really show off your best indoor plants.
Don't feel inclined to stick to Tarrant's choice of color scheme. Why not try teal and chrome, orange and bronze, or another combination that'll suit your interior scheme.
You will need:
- Rust-Oleum Matt Finish Surface Primer Spray Paint
- Rust-Oleum Chalky Finish Garden Furniture Paint
- Rust-Oleum Metallic Spray Paint
- Rust-Oleum Crystal Clear Protective Coat Spray
- Plant pot
- Twine
- Wipe your plant pot all over with a clean dry cloth to make sure it doesn't have any dust on it, then lay it on a protected surface. Spray with two thin layers of Rust-Oleum Surface Primer, allowing to dry in-between.
- Carefully apply two thin layers of Rust-Oleum Chalky Finish Garden Furniture Paint all over the pot, allowing it to dry in-between each coat. With the plant pot stood upright, carefully color the top of it with Rust-Oleum Metallic Spray Paint, applying it in quick light sprays to create an ombré effect. Once dry, apply two coats of Rust-Oleum Crystal Clear Protective Coat Spray all over the outside of the pot.
- Use lengths of cotton twine to create your macramé hanger. Cut eight 6m lengths of twine, then double them over to create 16 3m lengths with a loop at the top. Thread the loop through a metal ring, then back through itself, to create a larks head knot. Hang the loop from a door handle or a hook to make the macramé process easier.
- Separate the 16 lengths of twine into four sets of four, and begin to knot each set together however you like – we used a spiral knot. Once you've worked on each set for around 25cm, stop, leave the next 15cm free, then tie one big regular knot in each set to secure them.
- Start tying spiral knots again and work for another 15cm, then take two strings from one set and two strings from the set next to it, and tie them together. Repeat, until they are knotted the whole way around. Leave another 5cm free, then do the same, knotting two strings from one set with two strings from the next, until you've worked on them all once more. Leave around 3cm of twine free, then tie all of the strands together in one big knot.
- Finally, hang your metal loop from a hook and carefully place your planter into the macramé hanger to hold it securely. To finish, trim the tail at the end of the hanger to make sure all the threads are the same length.
We've more on how to macrame if you are new to this technique, or just need a refresher course.
2. Luke Arthur Wells' Terracotta pot transformation
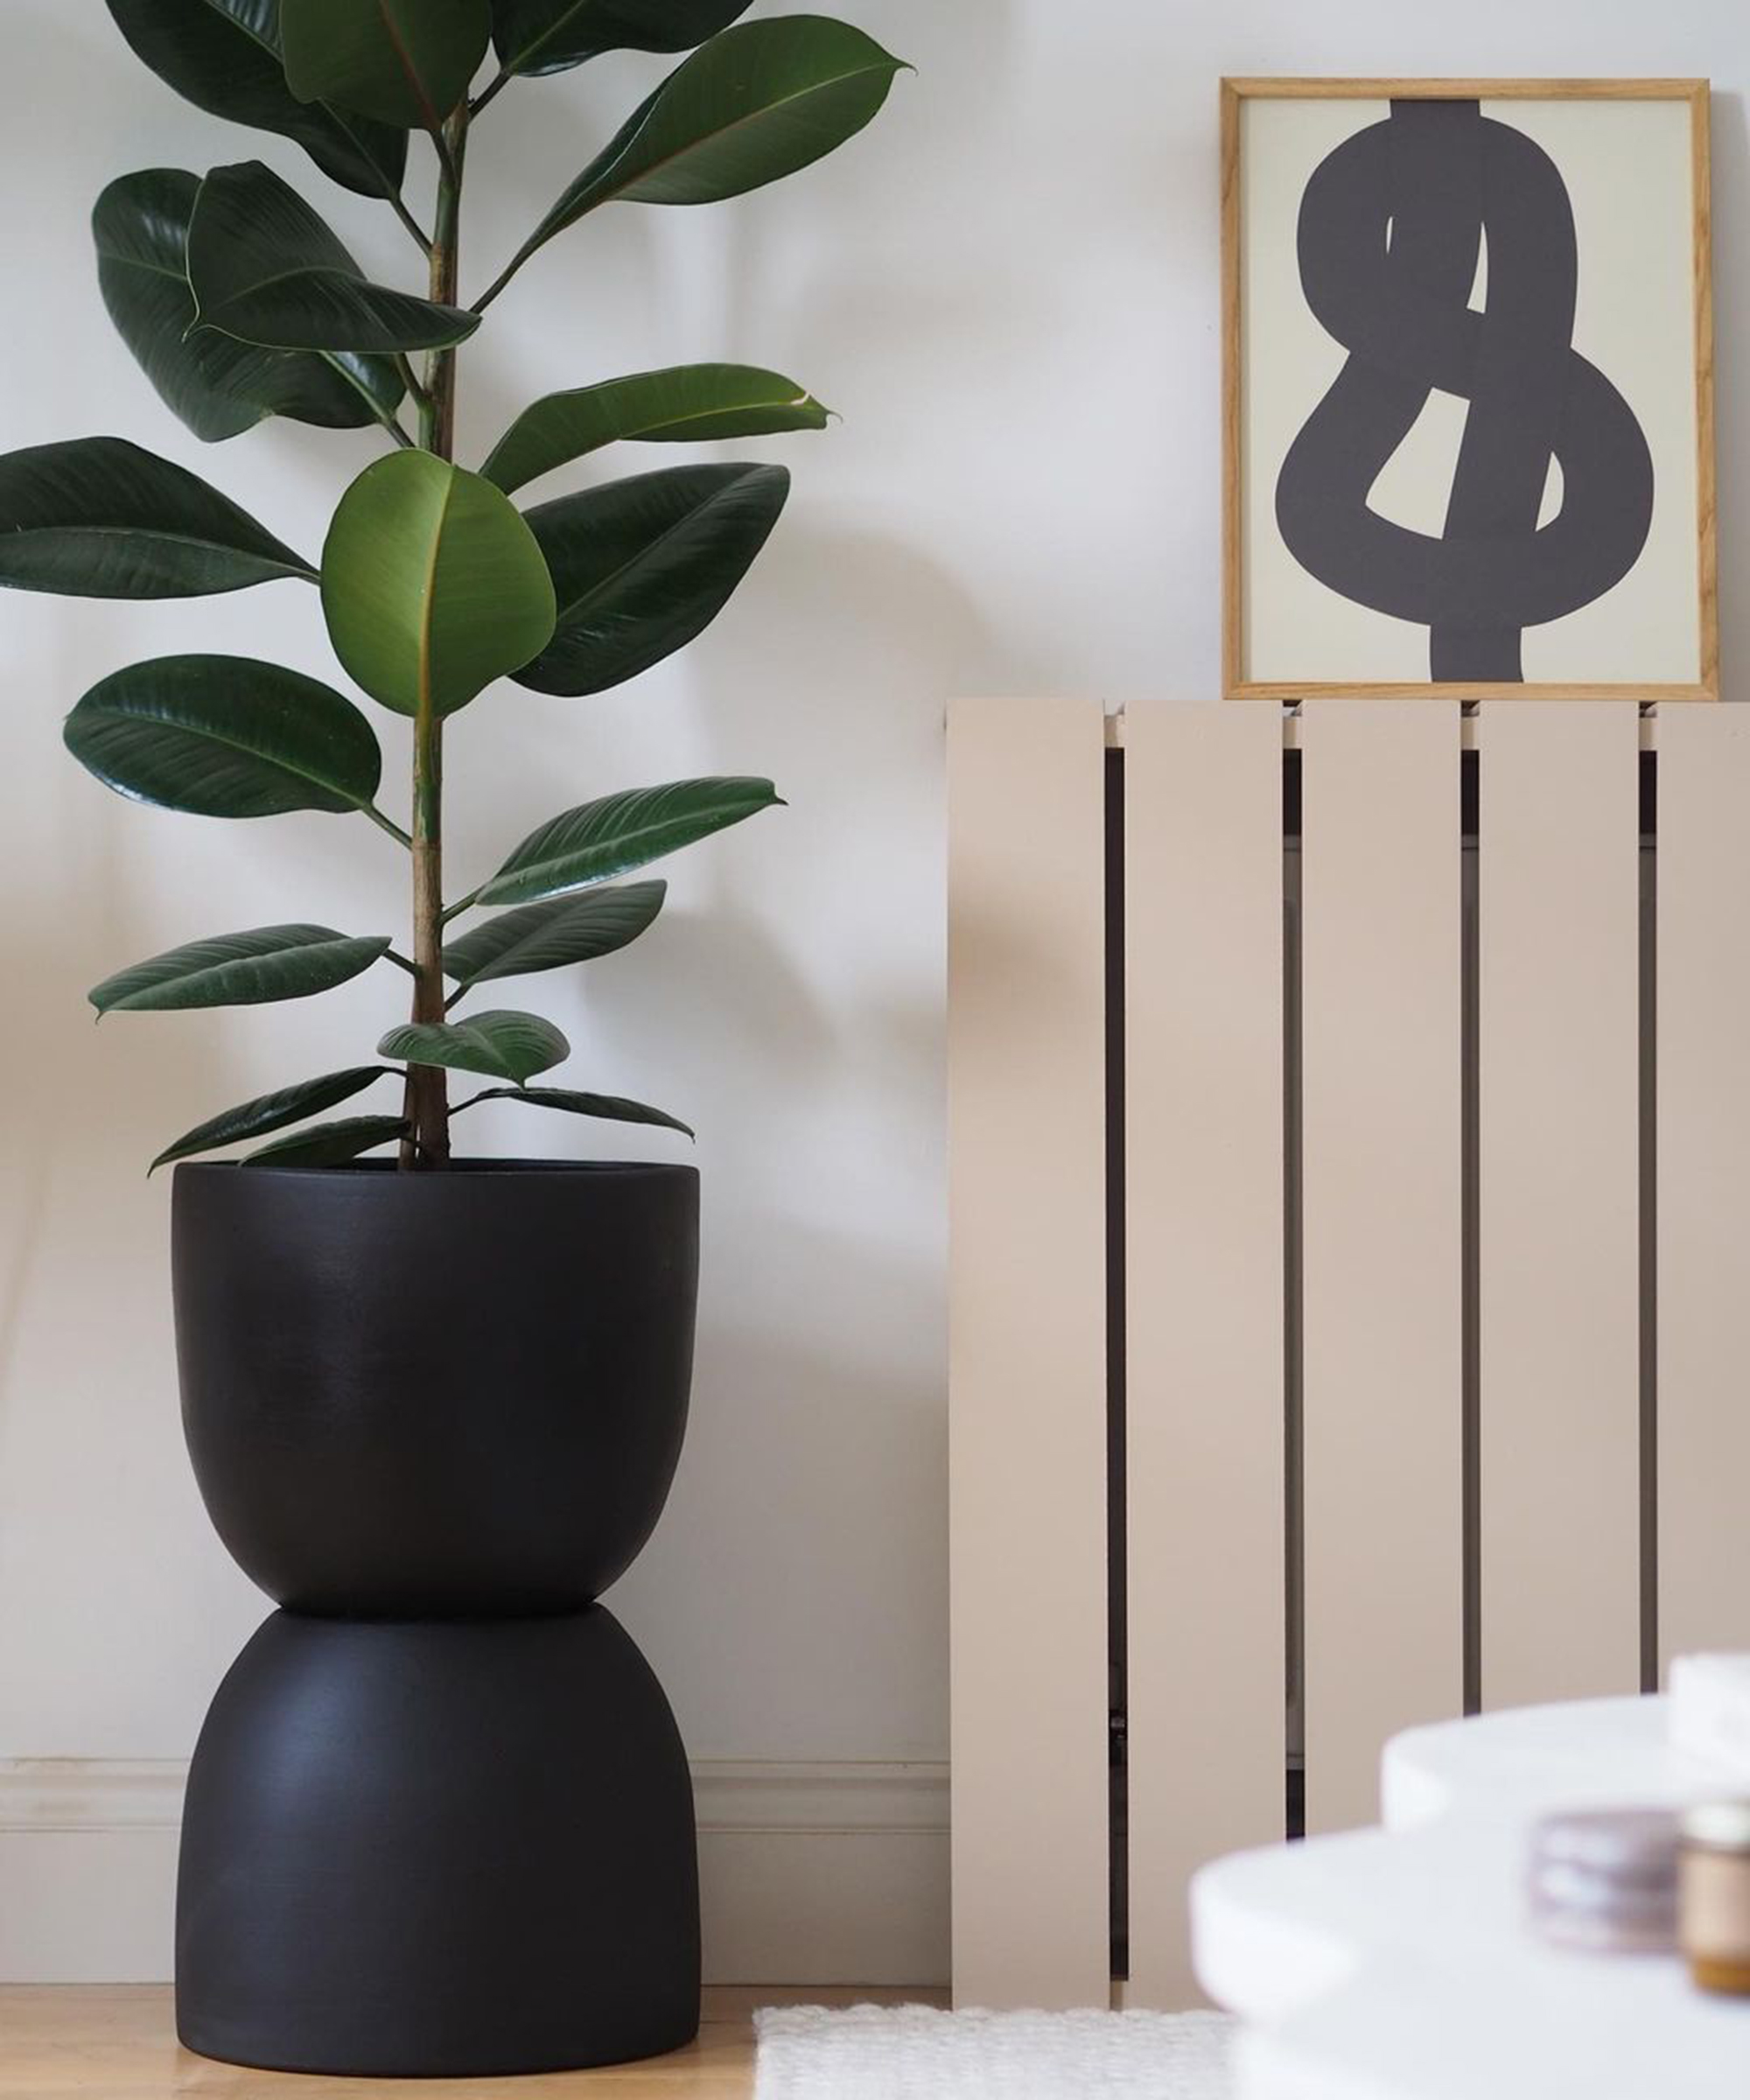
'Since good big plant pots are both hard to find and pretty expensive, I thought I'd have a crack at a DIY one based off one of my favorites from Ferm Living.' says Luke Arthur Wells, Interior stylist, blogger, and home DIYer.
Get small space home decor ideas, celeb inspiration, DIY tips and more, straight to your inbox!
'I managed to find terracotta pots at Homebase that have a good silhouette when stacked and literally just glued them together and painted them. There are a few extra steps to take, like blocking the hole so water doesn't come through.'
You will need:
- 2 x large Terracotta pots
- Gripfill Xtra (or similar gap filling adhesive like these on Amazon)
- Masking tape
- Bathroom sealant
- Masonry paint (tester size pot)
- Paintbrush
How to:
- Cover the drainage holes on the planters using masking tape.
- Using bathroom sealant, seal the drainage holes and allow to cure for 24 hours
- Turning one upside down, use the Gripfill Xtra to glue the planters together to form an hourglass shape.
- Use the masonry paint and paintbrush, paint the planters with two coats of paint and allow the planter to dry.
3. Rachelle's wire basket planter
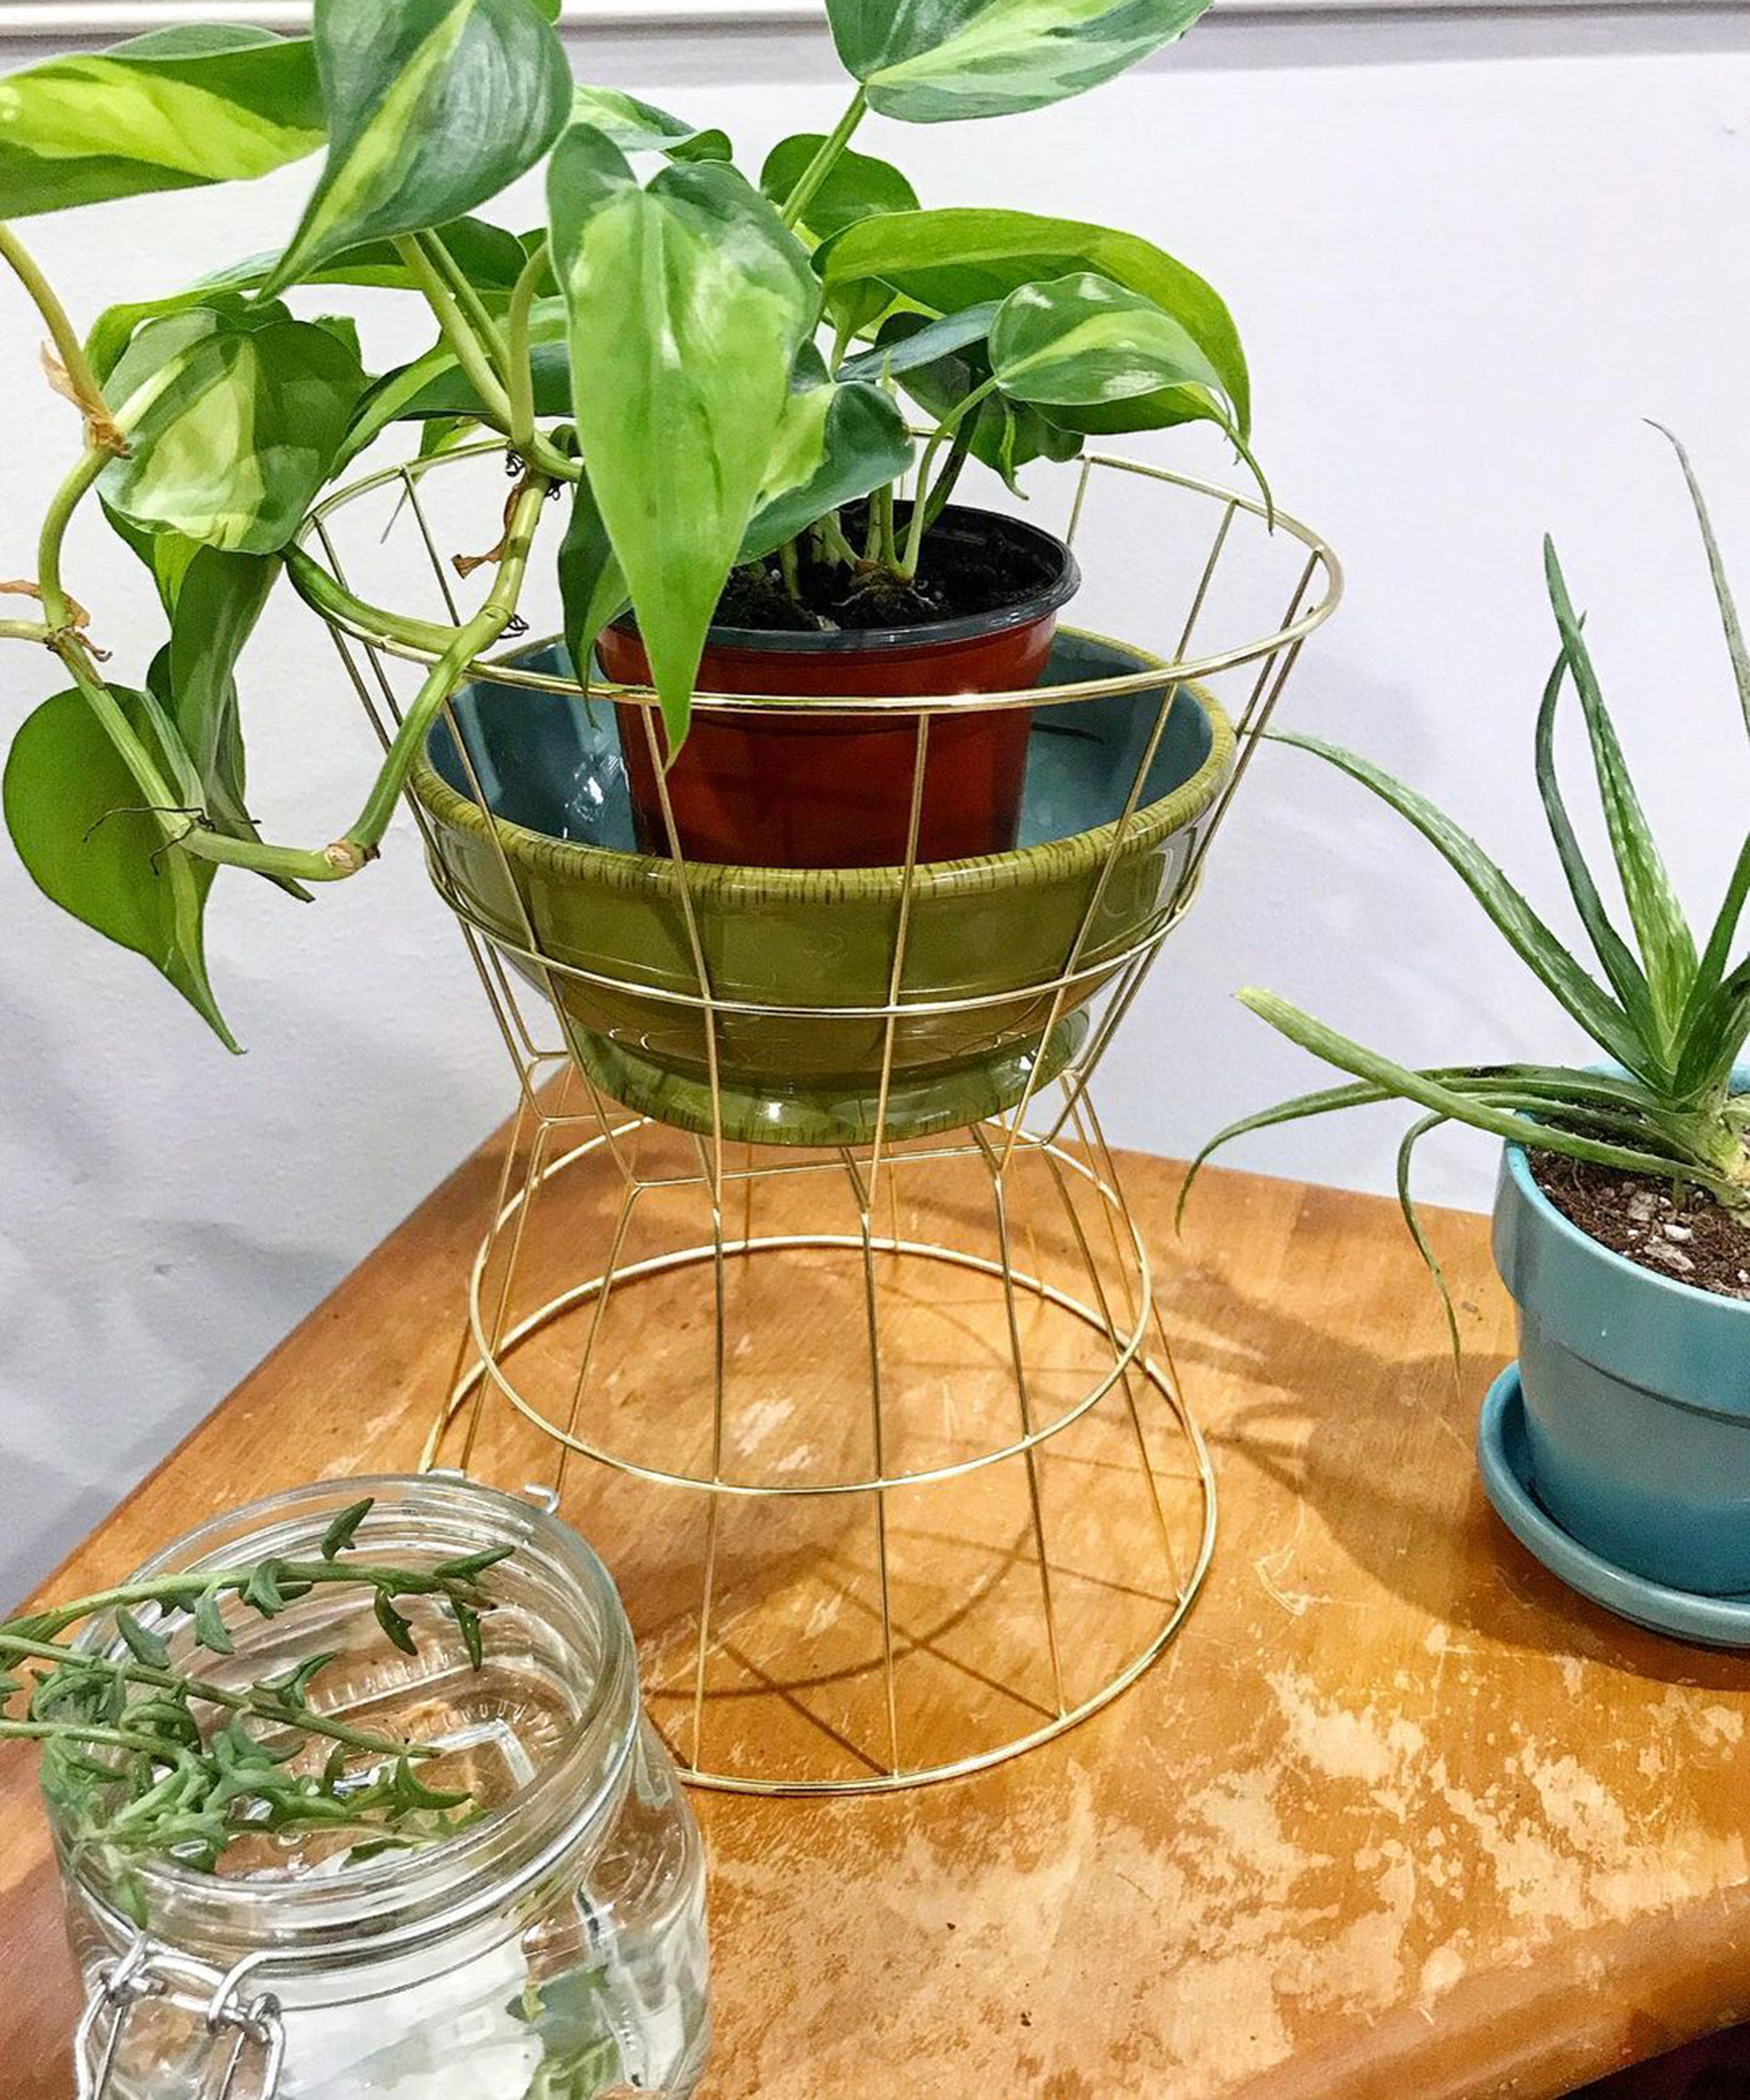
Metal wire is one of those materials that isn't going anywhere. From chrome or carbon-coated for industrial vibes to brass and copper for a more glam feel, it's a versatile material that can be used to create DIY plant stands. If you're not particularly artistic, this idea is so simple to recreate – as there's no wire bending required, just some baskets from Dollar Tree.
You will need:
- 2 x wire baskets
- Adhesive (such as Gorilla glue from Amazon)
- Your choice of plant pot
'The quickest DIY I’ve ever done,' says Rachelle, aka @plantnerdunplugged, a self-confessed plant nerd, e-commerce owner, and front-end developer.
'Two baskets. Attach the bottoms together. Done. I have to find the right pot for it but this works for now. I needed some height differentiation on my plants. Clean and simple.'
4. Laura's Boho-inspired planter
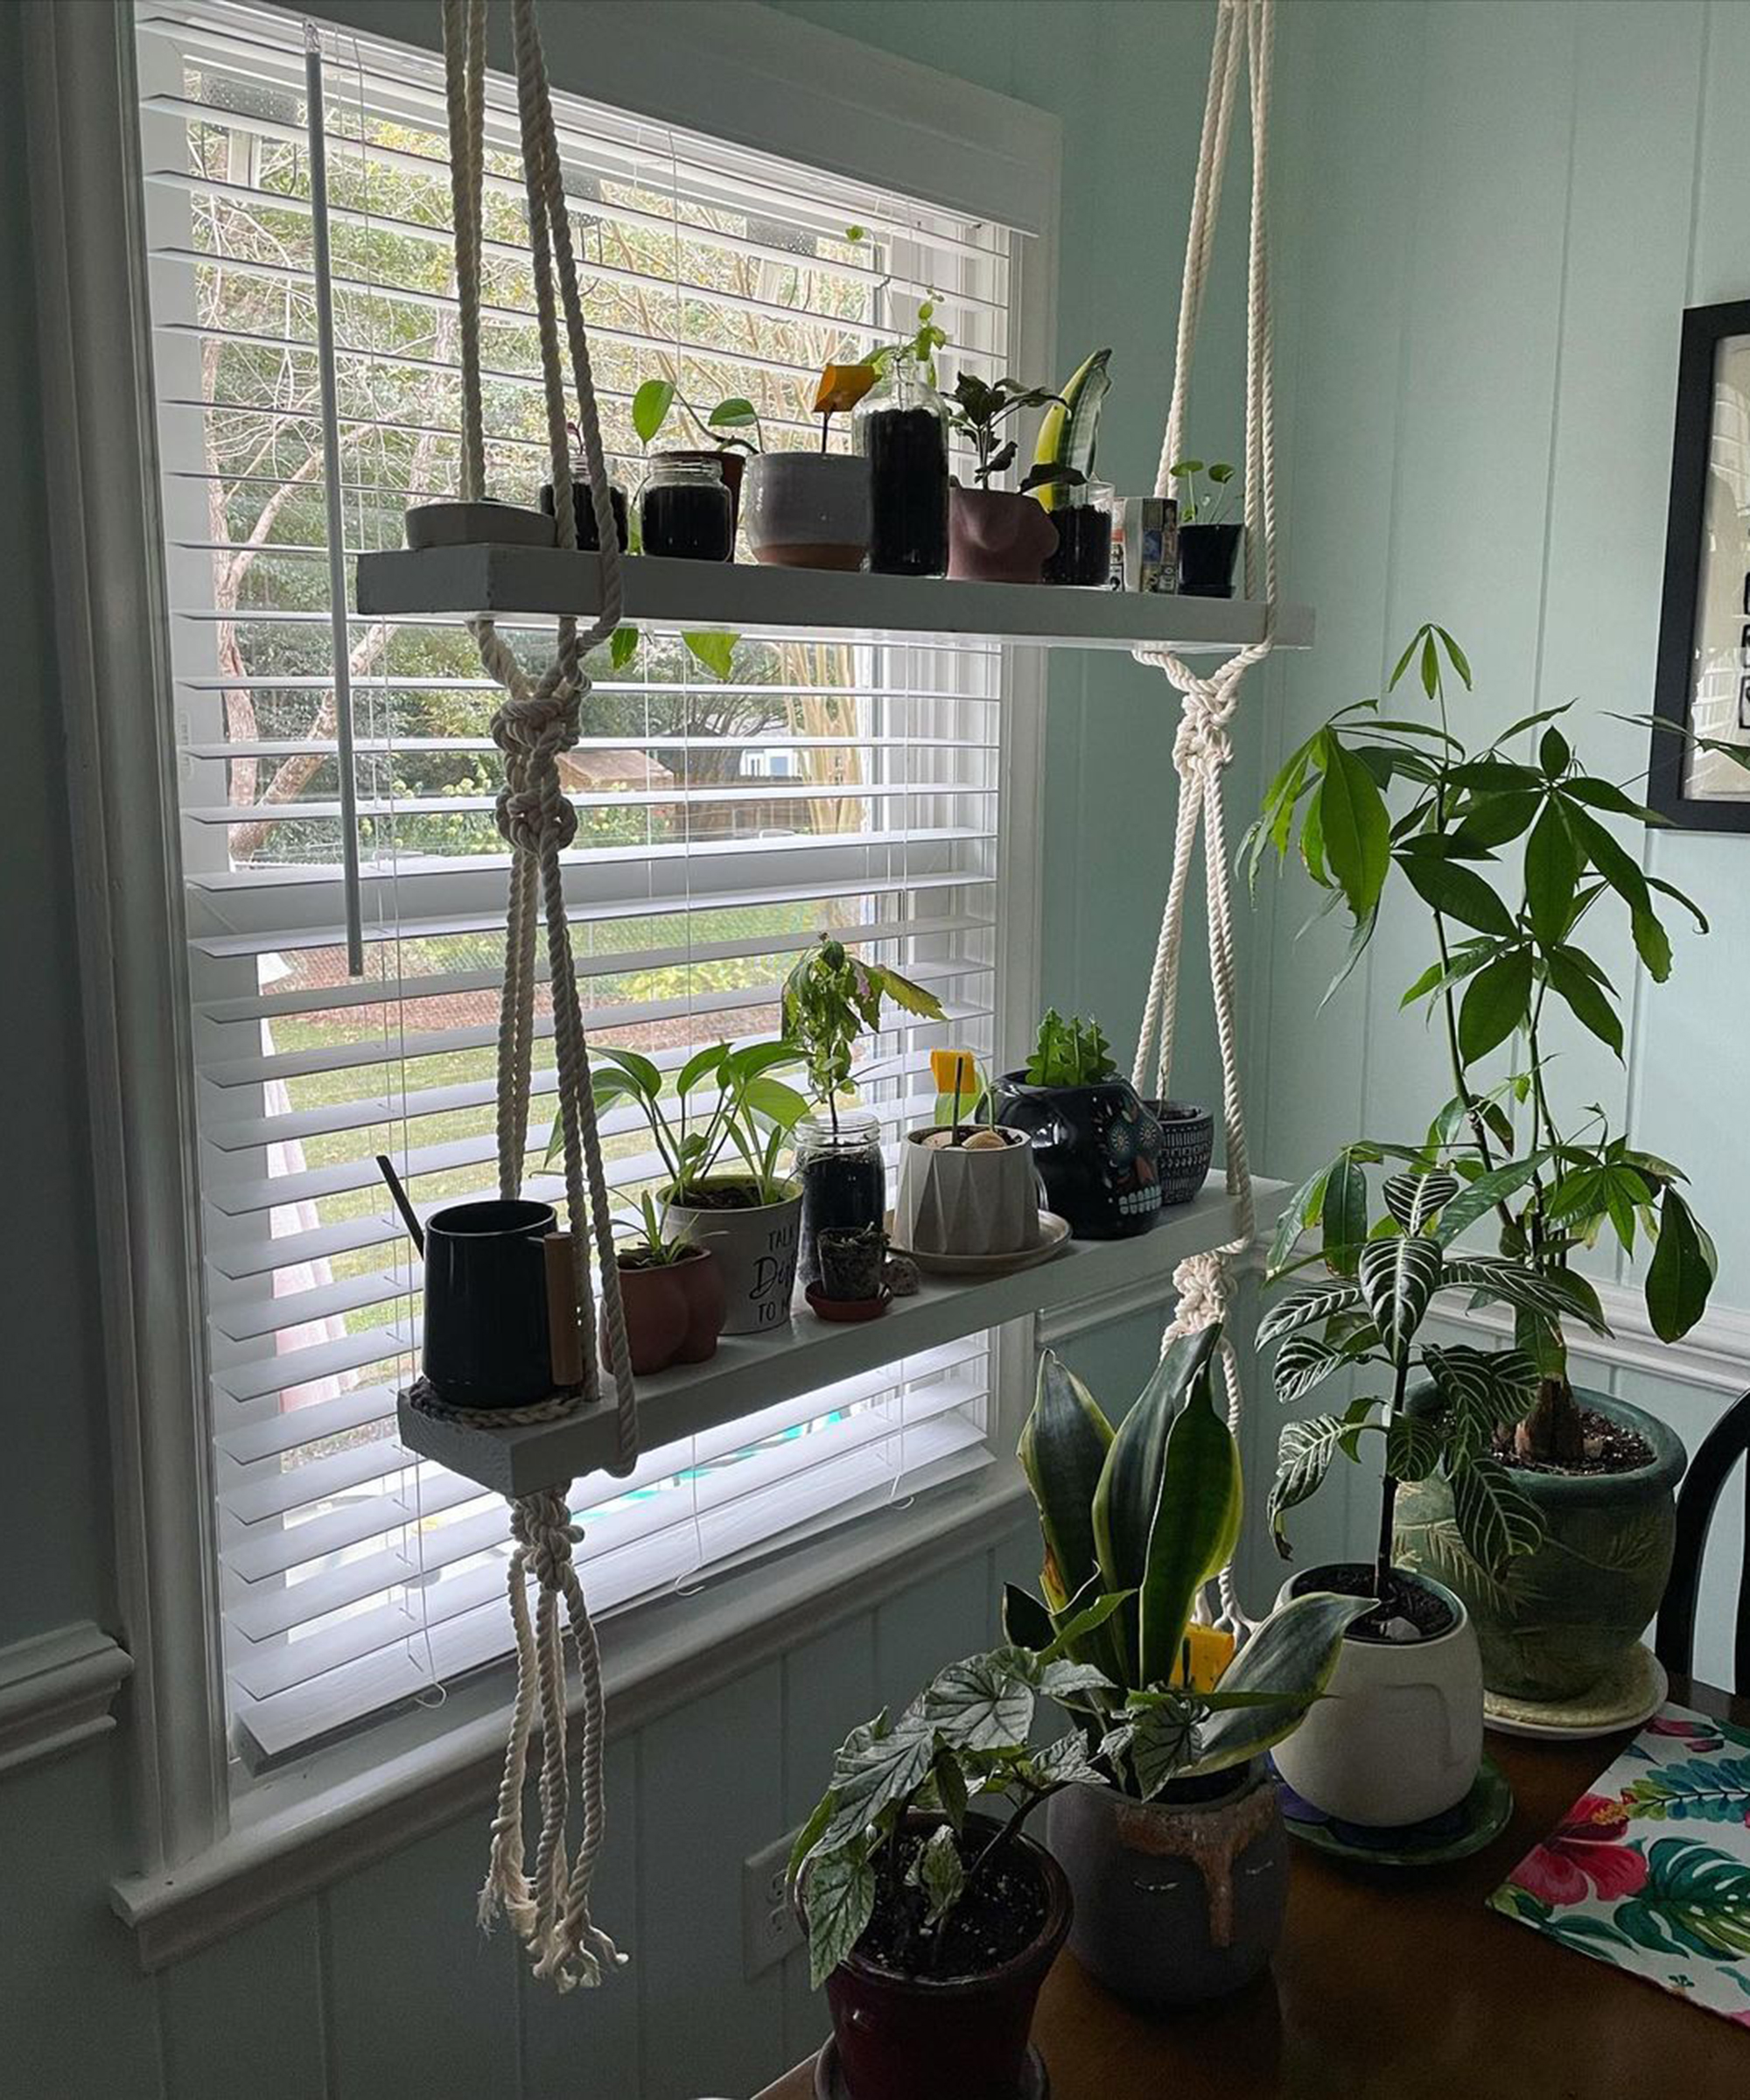
Swings are just for your garden or your backyard. Create a seventies-inspired macrame DIY plant stand and position this next to your window so your plants can soak up the sunlight.
You will need:
- 2x6 planks
- Measuring tape
- Circular saw
- Electric sander
- Drill
- High-gloss white paint
- Studfinder
- One entire ream of cotton macrame rope (you can find macrame rope on Amazon)
- Scissors
- Painters’ tape (to keep ends tight enough to pull through drilled holes)
- Needle-nosed pliers
- Spirit level
'This is the best sunspot in the house, but it also happens to be my kitchen table,' says Laura aka @timshelcrafts.
'So now all my little babies have stadium seating and four adult humans can freely sit at the table once again. All for about $14.'
'I found the studs in the ceiling and measured the length I wanted for the boards and how far apart the holes should be to align with the studs. I cut the boards to length, drilled holes for the macrame ropes, sanded it all down, and painted with high-gloss paint (as it’s more water- and dirt- repellent.)'
'I drilled the hooks into the ceiling studs, hung the ropes on o-rings, tied in the first shelf using a square macrame knot, tied in the second one, adjusted the knots so the shelves were level, and that’s about it! Very basic macrame skills and pretty rudimentary drilling, sanding, cutting is all it took!'
5. Courtney's cool tomato cage plant stands

Tomato cages aren't just for growing juicy red fruits you pop in your salads, sandwiches, and sauces – they also make thrifty DIY plant stands. Here, Courtney Lawrence aka @courtneylawrencestudio used one of these cylindrical metal structures to home her houseplant. We love the combination of brass and wicker basket.
You will need:
- Tomato cage(s) – you can browse a selection at Amazon
- Metallic spray paint
- Gloves and goggles (recommended)
- Wire cutters (optional)
- Cut off the pointed ends with wire cutters, or if you don't have wire cutters, bend the ends until they fall off.
- Spray paint the cages in any color of your choice and allow to dry.
- Sit your plant pot in the center of the structure.
6. Lily Ardor's wood grain plant stands
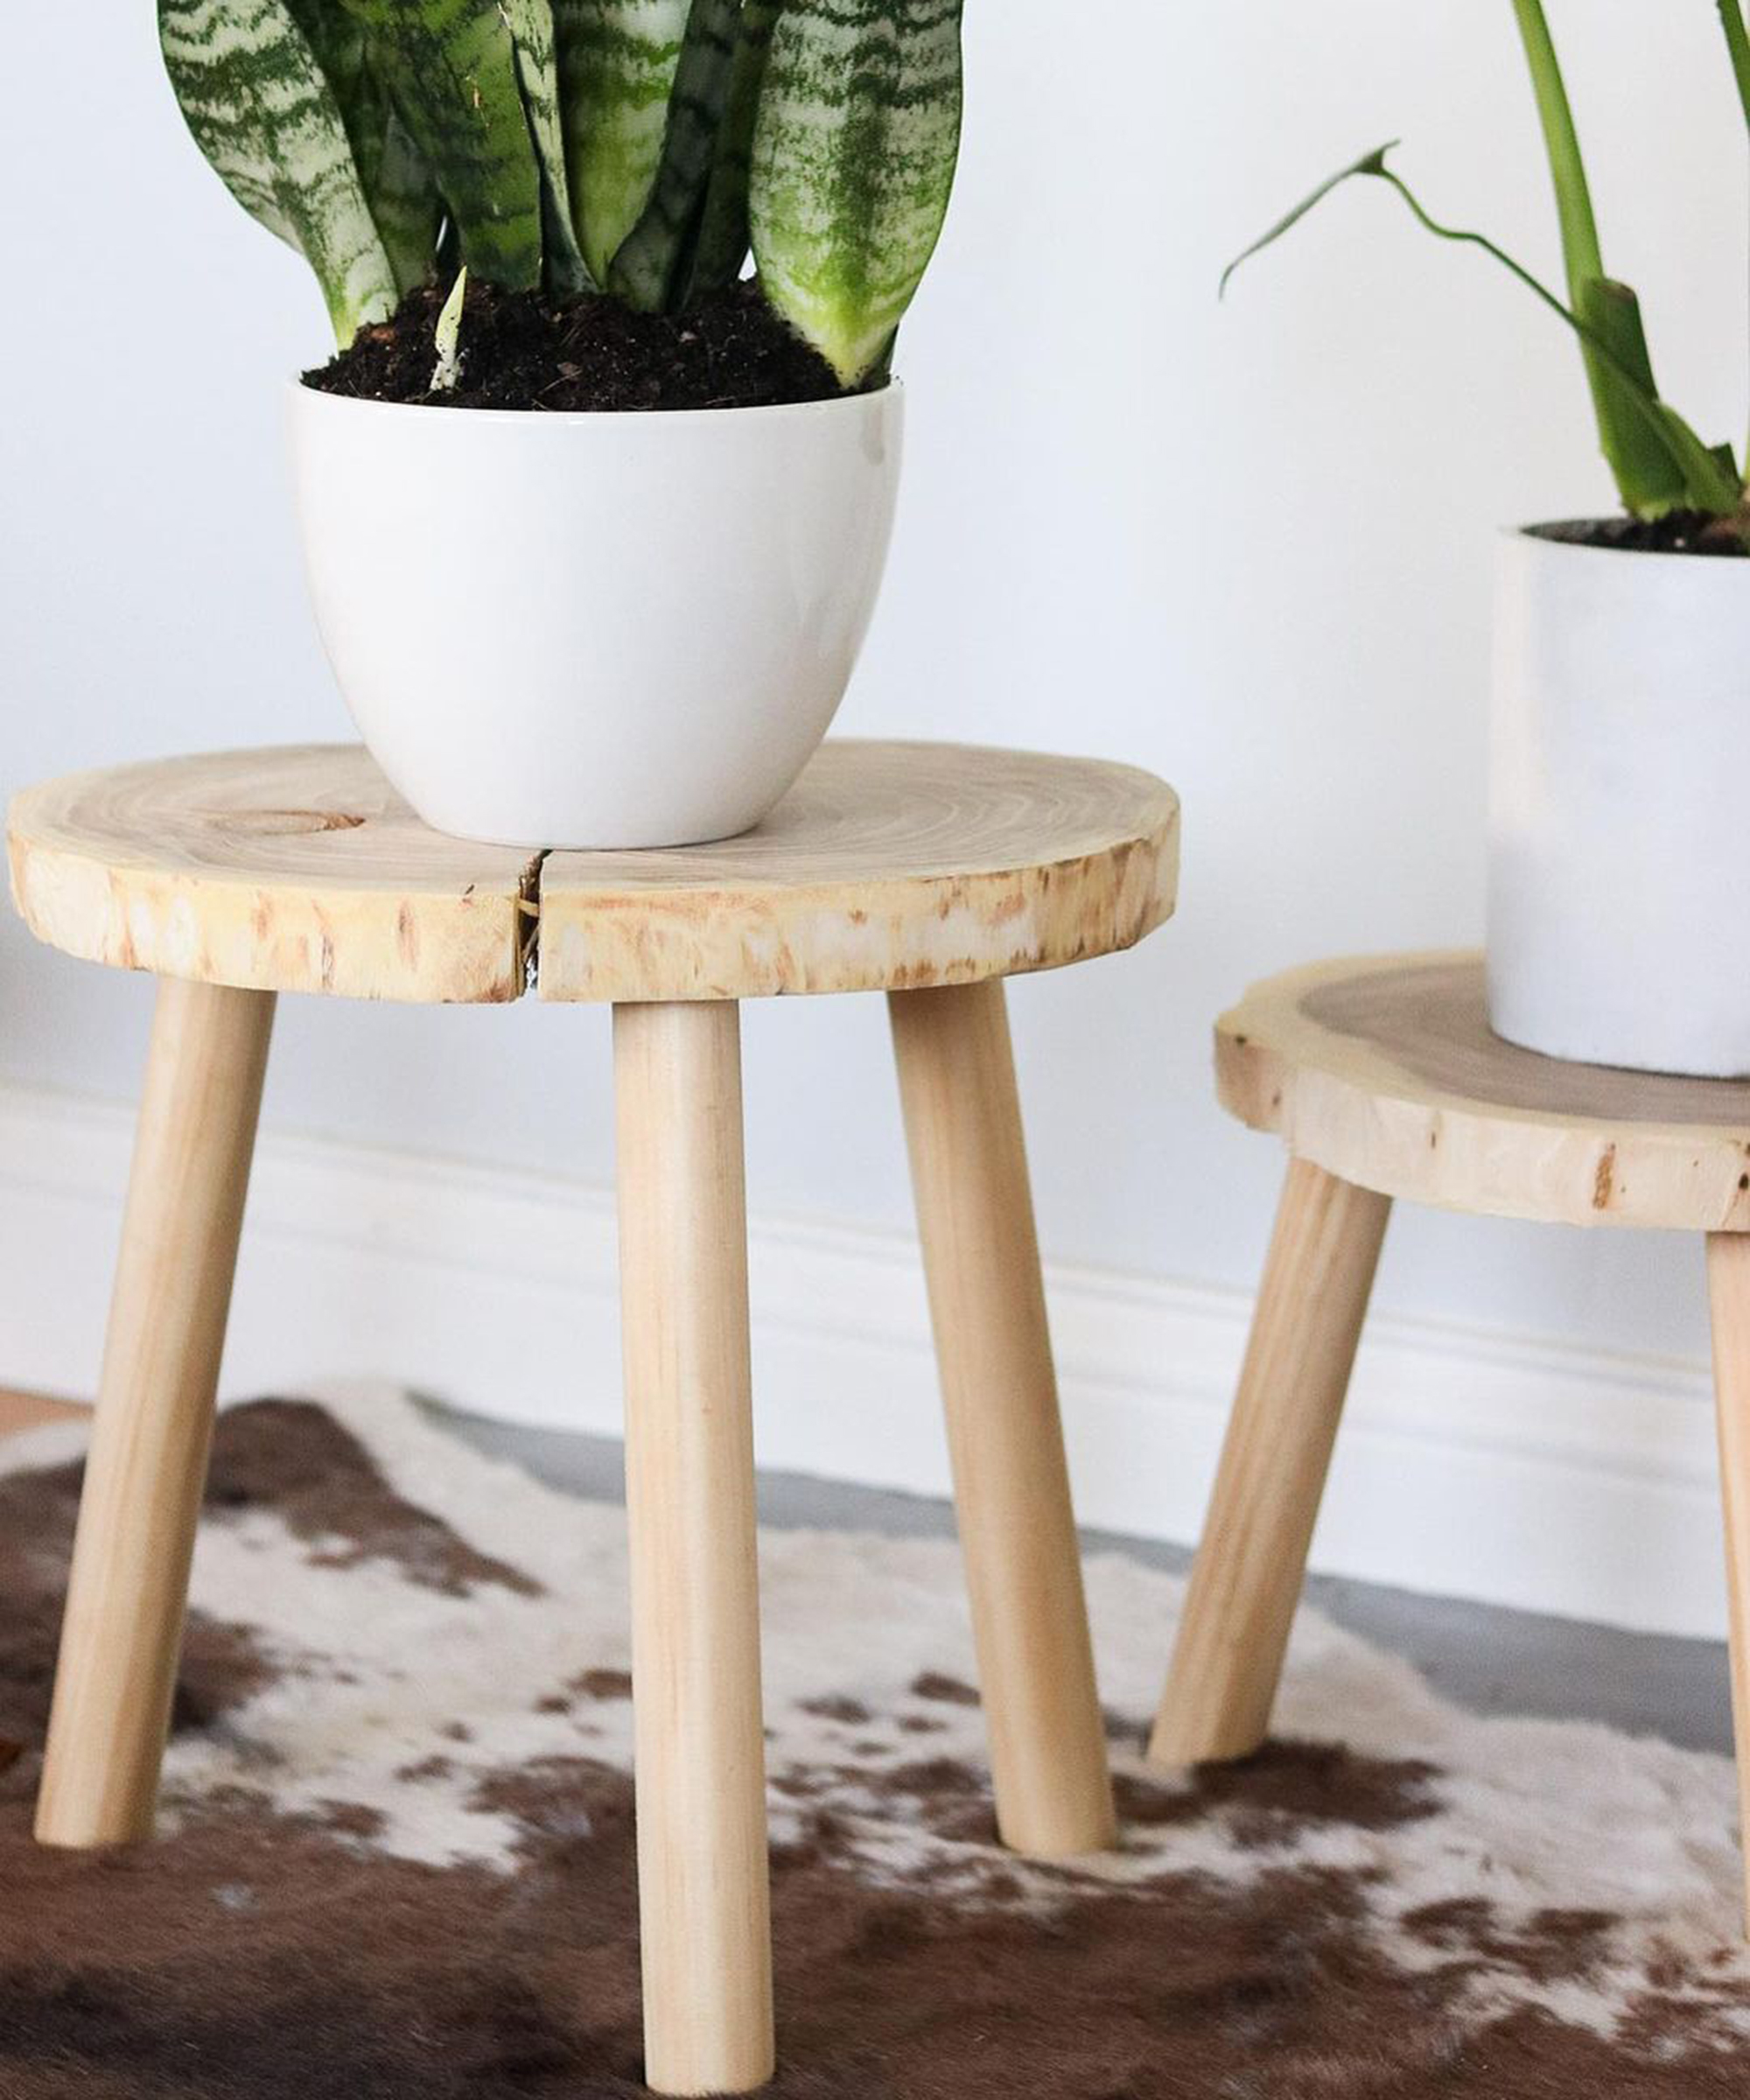
This super cute DIY plant stand by Lily Ardor aka @lilyador is so easy to make! It costs around $7 and takes under 30 minutes.
She says: 'I tend to my plants more during the summertime and having them stand on random buckets and stumps has gotten kind of annoying! That’s why I finally decided to make some plant stands. I wanted something that would show off wood's natural textures and hoped it would look good enough to maybe mimic Anthropologie home decor.'
You will need:
- 1 1/4 inches in thickness dowel (cut to size for the legs)
- 3" by 3" Metal T-plate (preferably heavy-duty)
- Flathead screwdriver
- Hammer
- Longer and shorter screws
- Sandpaper
- A marker
- 1x3 or yardstick (to help draw the line on the dowel)
- Wood slice (available at craft stores)
- A driver and impact drill
- Miter saw
- Remove the bark from your wood slice. To do this, use a flat head screwdriver and a hammer to chip away all the rough edges. You can leave some bark visible or remove it all completely. Then lightly sand the edges and the top.
- Cut your dowels to size. There are a few options here. You can make the legs on your plant stand angle out or stand straight. To cut your dowel down to size for straight legs you simply need to mark and cut however, for the angled legs there’s a bit more work - explained on Lily's blog.
- Attach your T-plate to the legs. Once you have your dowel cut down to size you should see a slight angle when holding the legs a certain way. Find the highest point of the angle and mark it with a marker. Then, pre-drill a hole in the dowel. Try and drill as straight as possible (not at an angle). Following that attach the T plate onto the dowel. Before moving on to the next step make sure your dowel is secured on tightly and your screw is as flush with the surface as possible.
- Attach the legs to your plant stand: Once you’ve attached T plates to all the legs lay them onto your wood slice. Make sure the little marks you made earlier are facing in towards each other. This step will ensure that the legs on your plant stand are angling out.
7. Sophie Tarrant's terrazzo plant stand
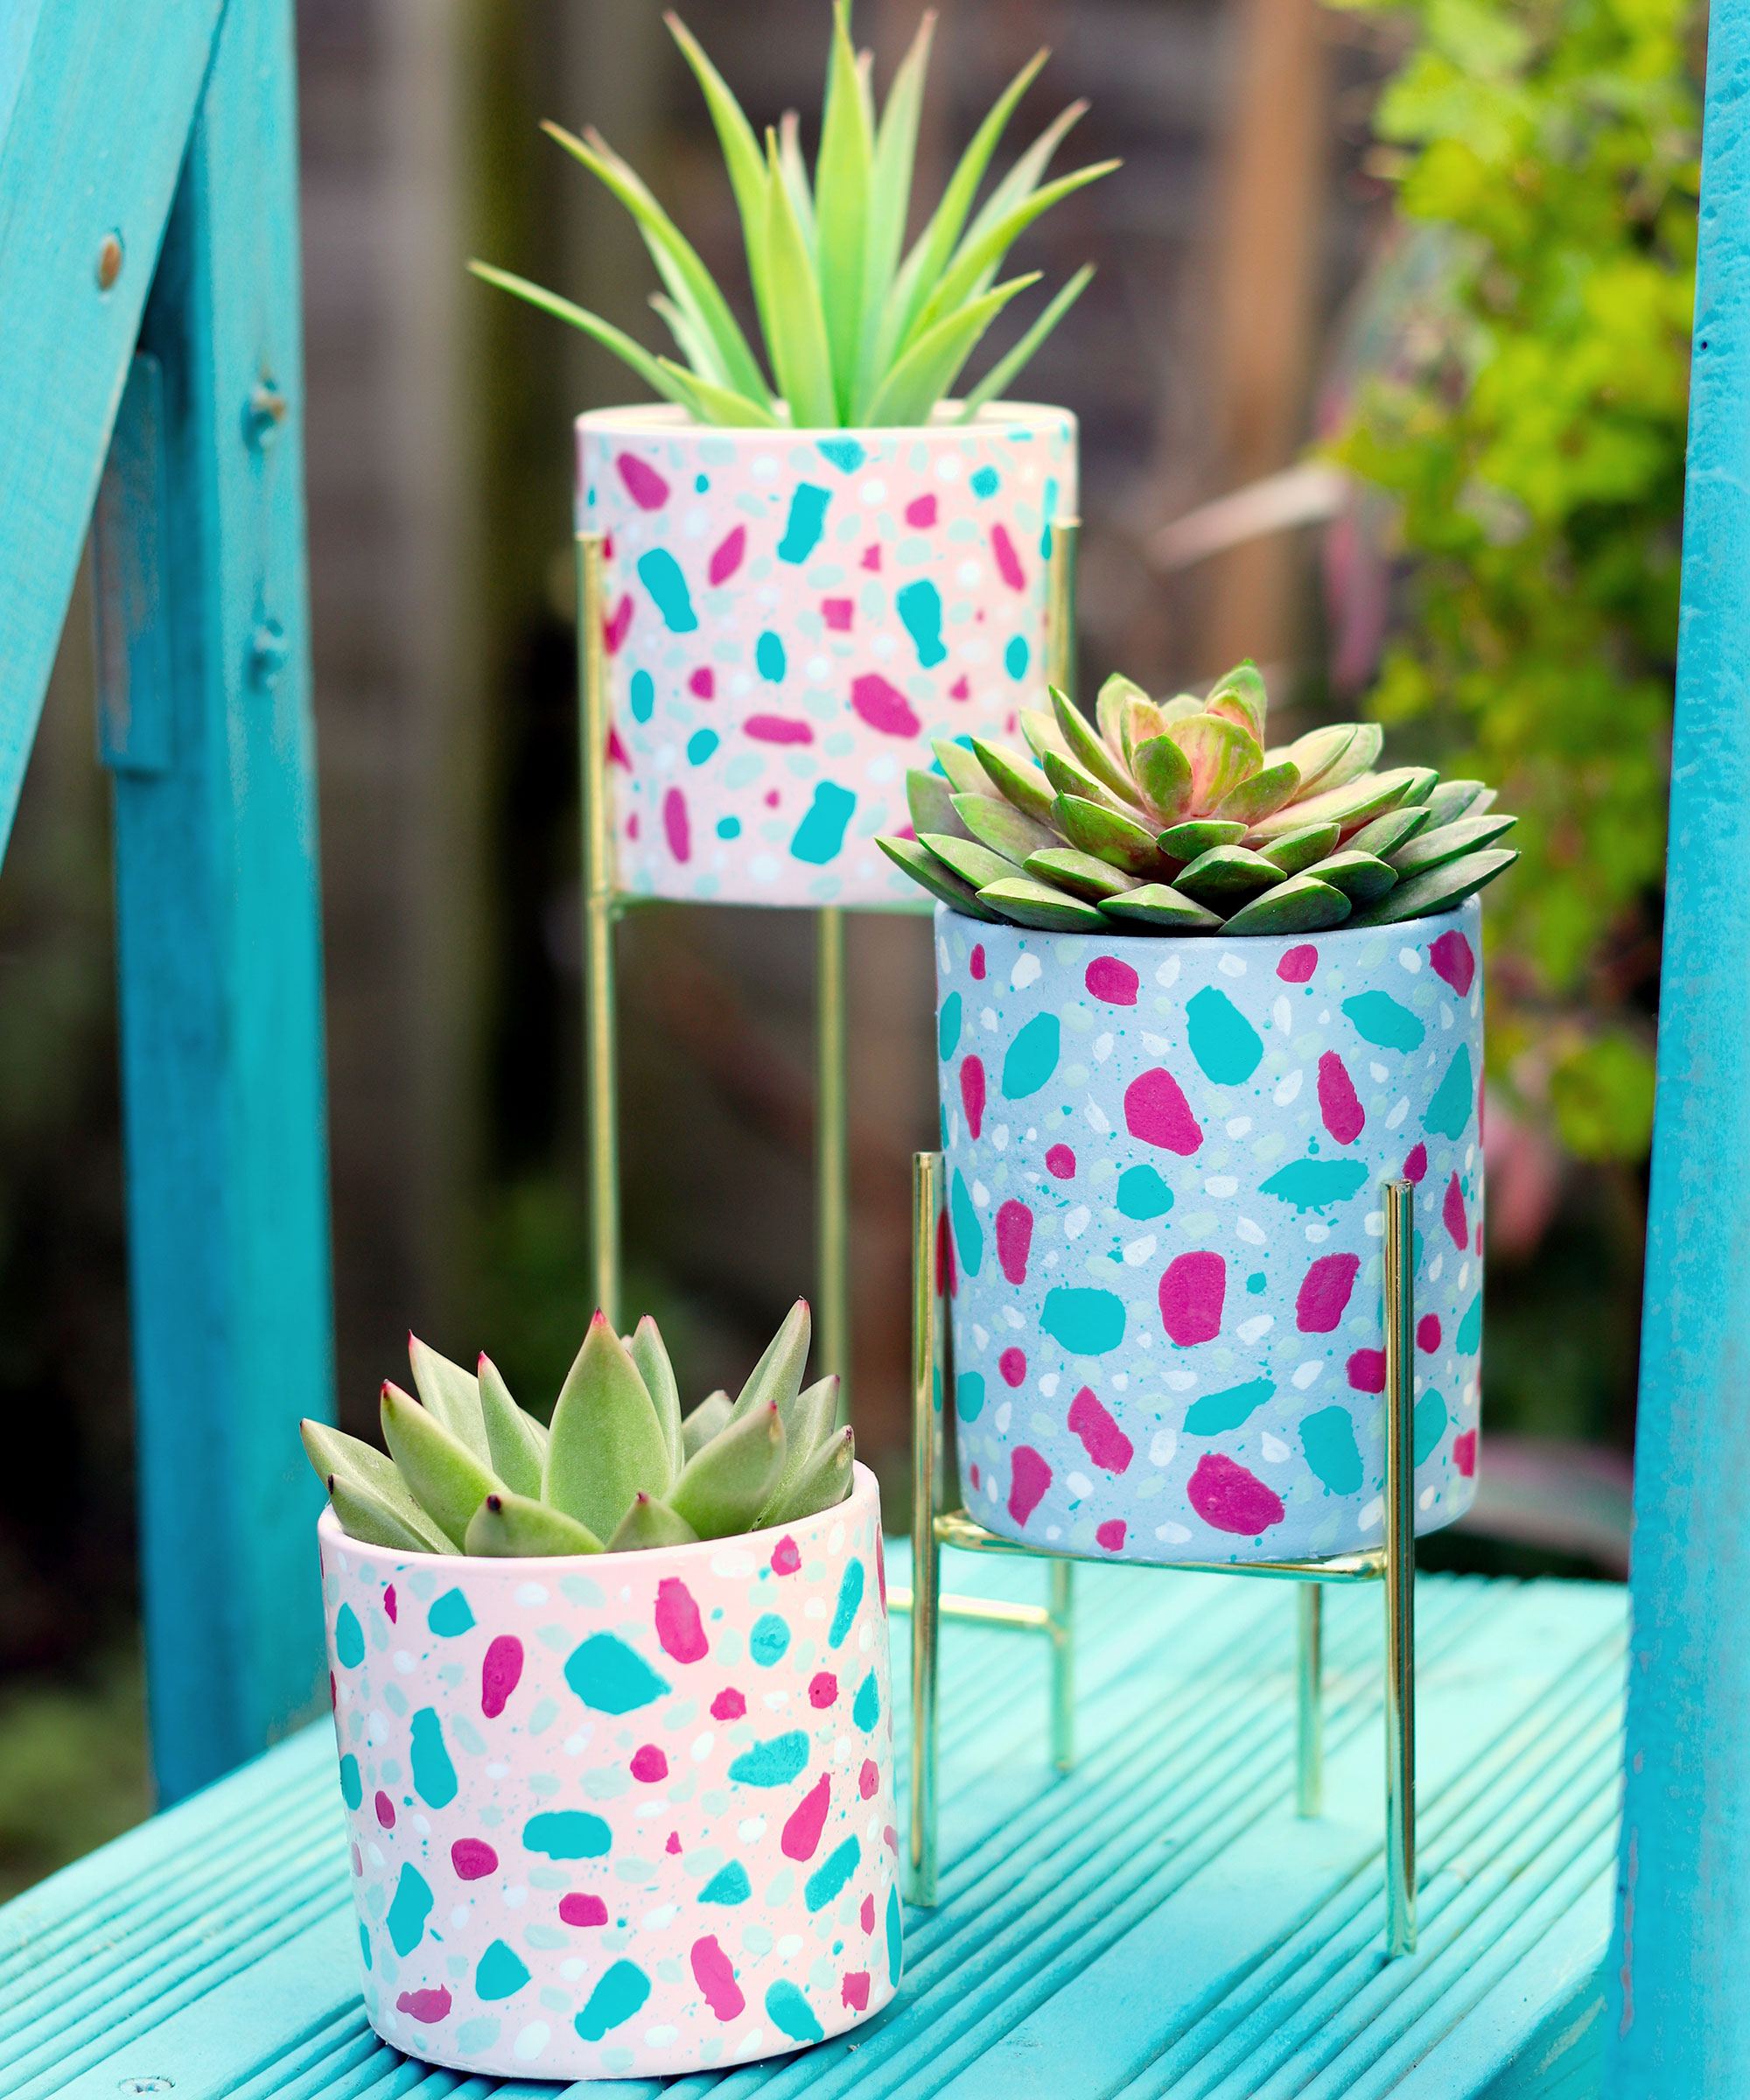
Terrazzo print has been at the top of the interior trend lists for a while now and is an easy way to add a pop of color to your décor. In this project, craft designer Sophie Tarrant shows us how to create this colorful effect at home using Rust-Oleum paints.
You will need:
- Rust-Oleum Matt Finish Surface Primer Spray Paint in white
- Rust-Oleum Chalky Finish Furniture Paint in China Rose
- Rust-Oleum Painter’s Touch Brush Paint in Aqua Blue, Baby Pink, Duck Egg and White
- Rust-Oleum Crystal Clear Protective Coat Spray in Gloss
- Wipe your plant pot all over with a clean dry cloth to make sure it doesn't have any
- dust on it, then lay it on a protected surface. Spray with two thin layers of Rust-Oleum Surface Primer, allowing to dry in-between.
- Once the primer is dry, apply two thin layers of Chalky Finish Furniture Paint all over the pot, again allowing it to dry in-between each coat.
- Take a dry, stiff-bristled paintbrush and dip the tip into a small pot of Painter’s Touch Brush Paint. Use your finger to draw back the bristles and flick small specks of paint all over the plant pot, then leave to dry.
- Use a fresh, smaller paintbrush and several different colors of Painter’s Touch Brush Paint to add a variety of differently shaped and sized colored blobs across the plant pot to mimic a terrazzo design. Don't worry about making them match, in fact, the more random they are, the better.
- Finish off by adding two light coats of Rust-Oleum Crystal Clear Protective Coat Spray to protect your plant pot from knocks and bumps, leaving it to dry between each one.
8. Lily Ardor's black and faux marble DIY plant stand
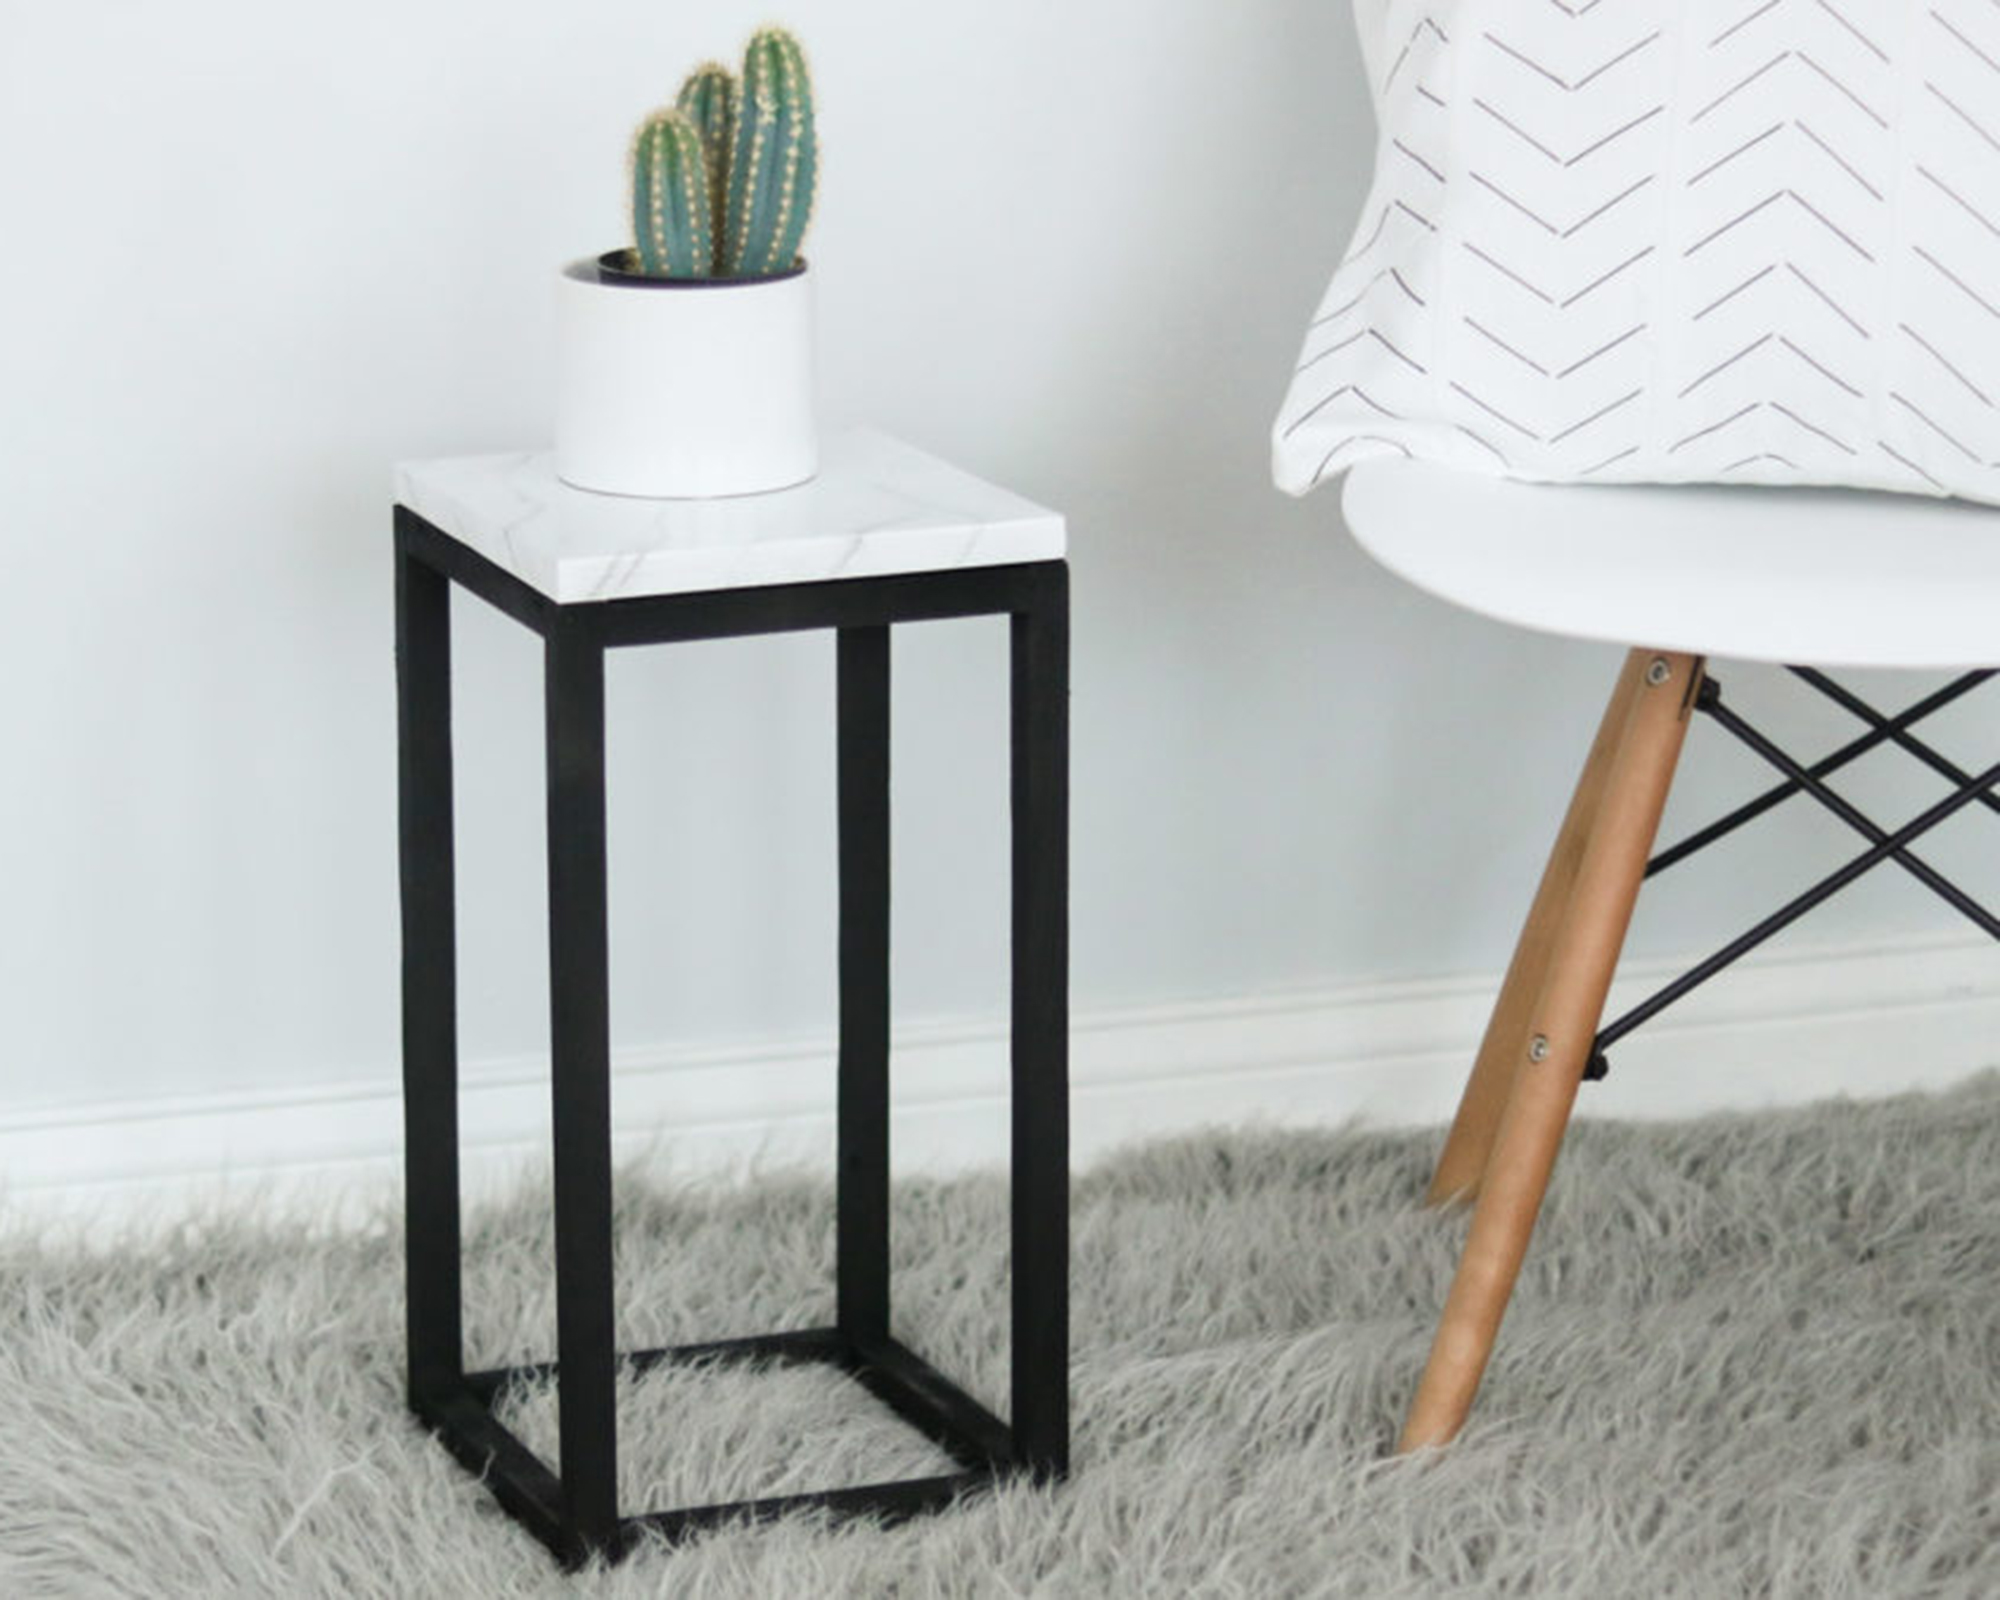
'For this plant stand I wanted something modern and simple,' explains Ardor.
'I had so many ideas like maybe giving it handles or having an 'X' on the bottom. Those were all crossed off the list and I decided to keep it simple by just making a framed box with a marble top.'
You will need:
- 8x 7.5 inch in length dowels (3/4 inch thickness)
- 4x 17 inch in length dowels (3/4 inch thickness)
- 1x wood square 3/4 thickness
- Sponge
- Grey , black and white acrylic paint
- White spray paint (clear coat optional)
- Feather and brush
- Brad nailer
- Wood glue
- Start by connecting your dowels with glue to make two rectangle shapes.
- Let the glue set a little, then secure them with your brad nailer.
- Using your acrylic paint, paint the dowels black and allow them to dry.
- Spray the top of your wood square white, and allow it to dry.
- To create the faux-marble look, you’ll need a feather and some diluted gray paint. Dip your feather into the paint and drag a messy line across the surface making sure the lines all kind of go in one direction.
- Following that, take a clean sponge to apply a dab of white acrylic paint and a bit of water. Dab into the lines to blur them out. Make sure to keep it well blended. Then take some very diluted black paint and use a fine brush to bring out the darkest parts of your lines. Use a damp sponge to blur it out a bit as well. Work in little sections since the black will dry pretty quickly and you still want to be able to slightly blur it out.
- Using the wood glue, secure the wooden square to the base.
Watch Lily's full video tutorial on YouTube.
9. Paula's woven plant stands
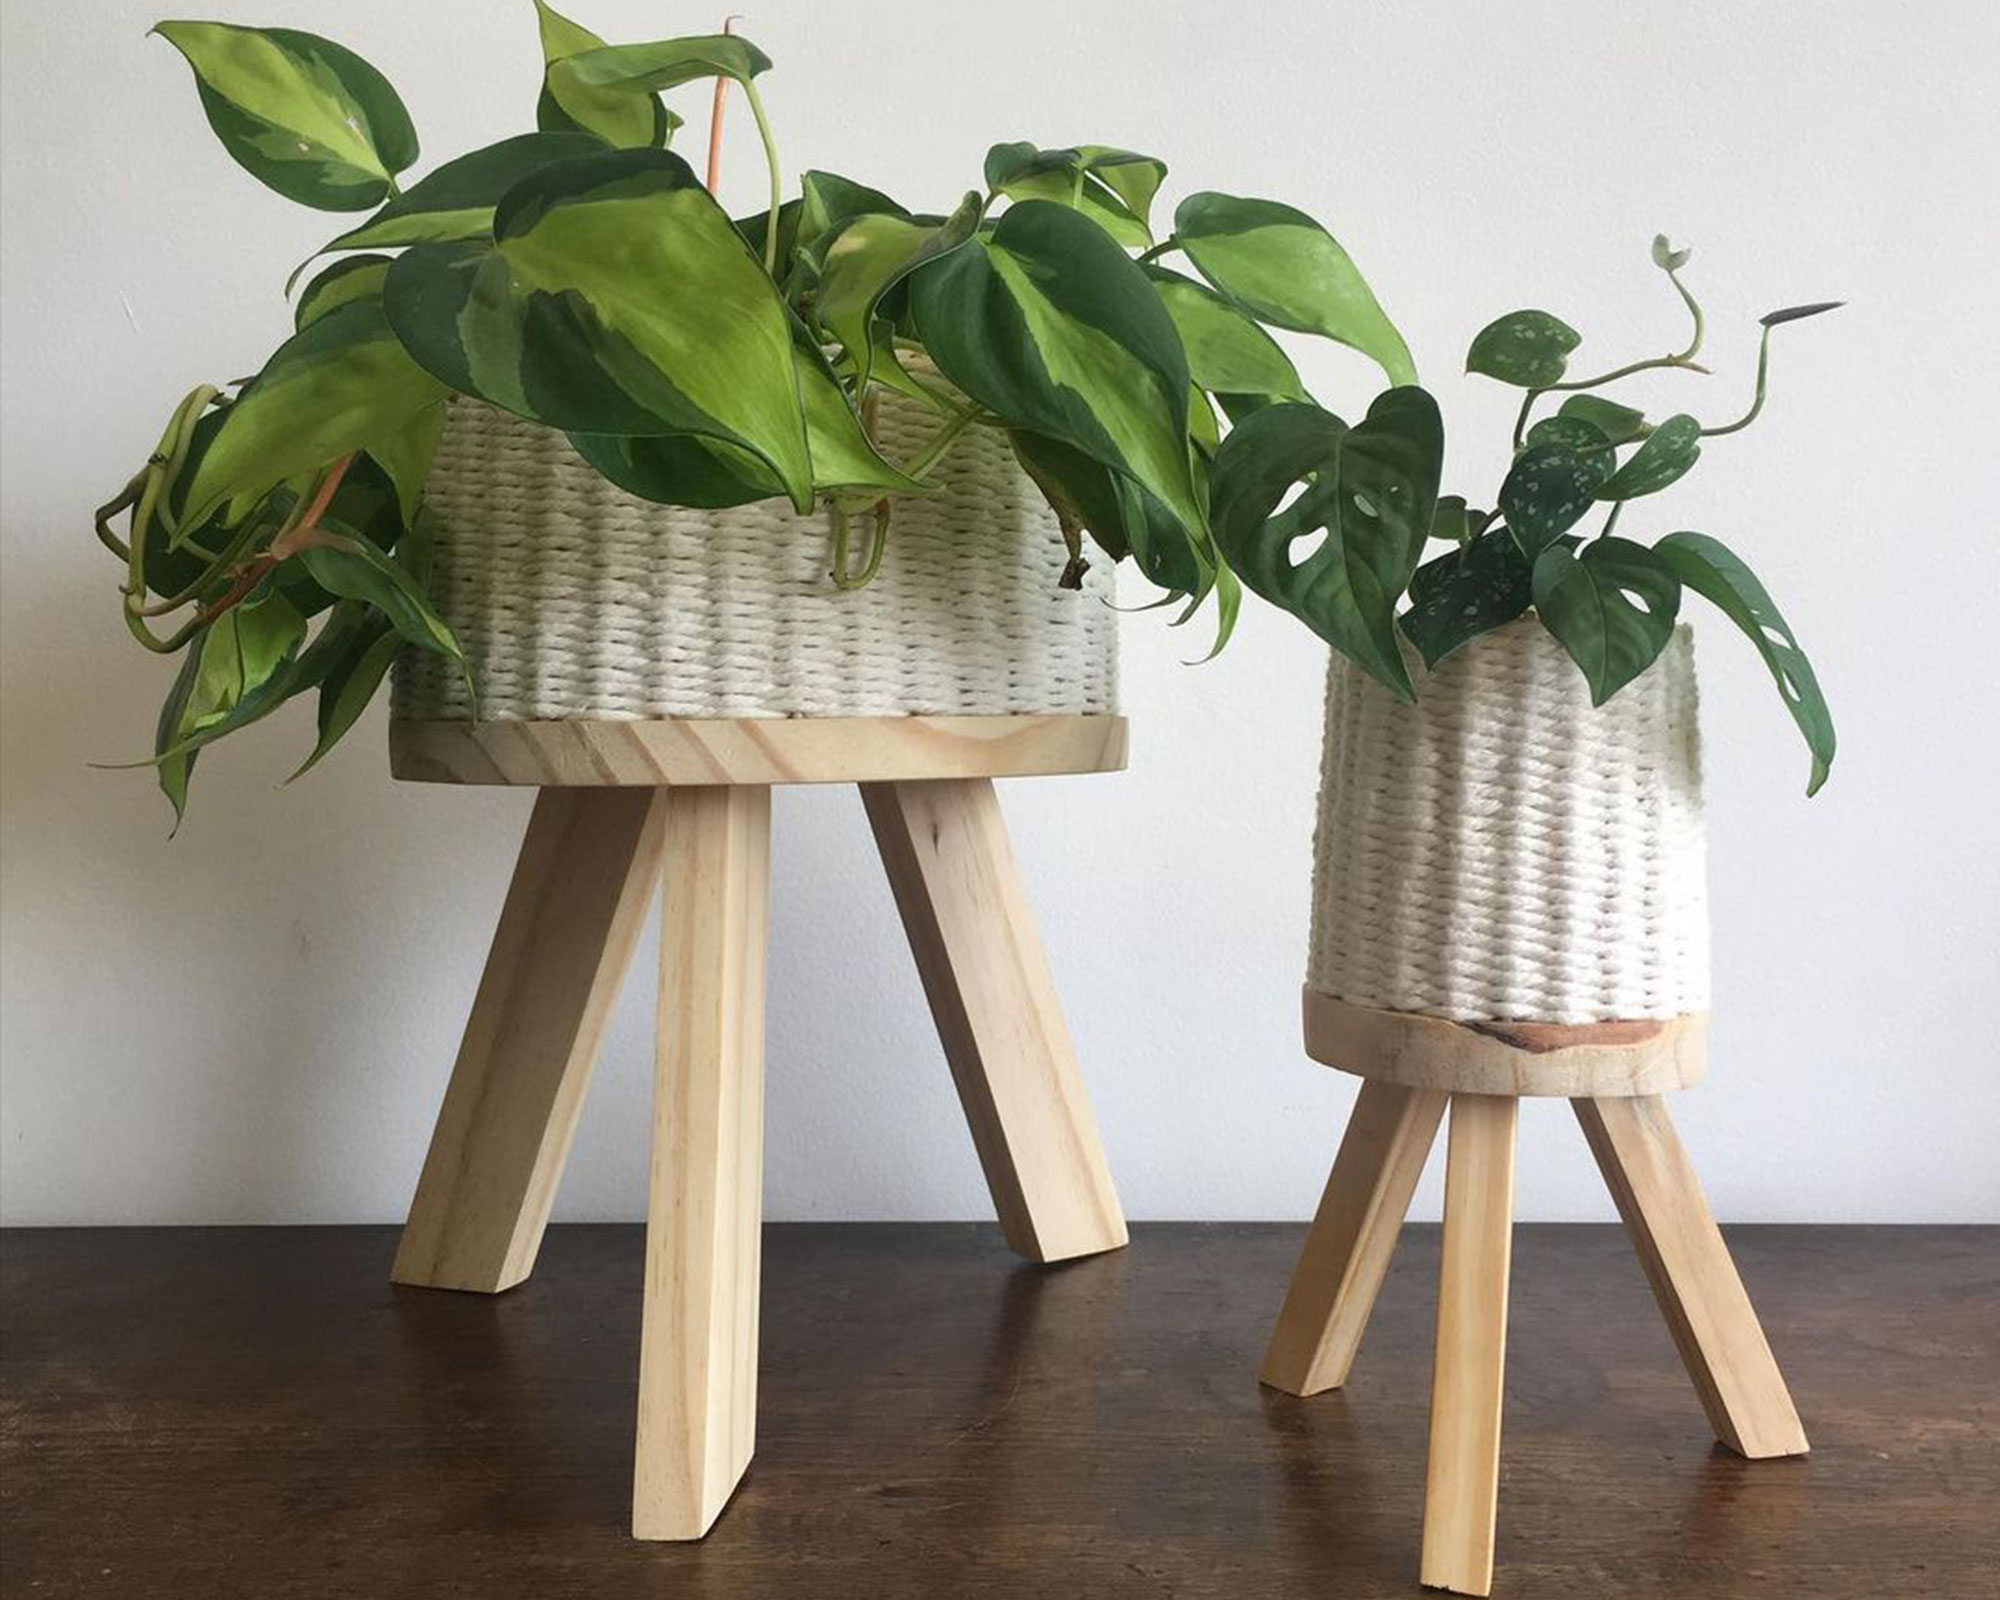
'This is, for sure, one of my favorite projects!' admits Paula, aka @hilagep
'So easy, beginner-friendly woodworking, no fancy tools needed and the result is just beautiful.'
You will need:
- Wooden sticks (available from any craft store)
- Tapestry needle
- Macrame cord (shop a selection at Amazon)
- Scrap wood (Paula used pine wood and slats)
- Wood glue (also lots of options on Amazon)
- Screws
- Scissors
- Cut a 12-in disc from a 3/4-in pine board using a jigsaw and then, using a drill bit with the same size as the wood sticks, make holes around its entire perimeter. These holes are about 1-in apart from each other and they don’t go all the way through the wood disc, just half of its depth.
- Cut the wood sticks 5-in tall (the size of the plant pot I wanted to cover) and placed them in the holes with a dot of wood glue. To complete the base I cut 3 10-in long feet from scrap pine slats with the ends angled in about 15° and they’re attached to the disc with wood glue and 2 screws each.
- The last part is weaving the macrame cord through the wood sticks to create a wall.Be careful to not pull the cord too much, so the wall keeps going up straight (pulling the cord tight can create a funnel shape!)
- When you get to the top of the wood sticks, you can put a few dots of hot glue around the last row of weaving to make it extra secure.
- Cut the excess cord leaving a little tail and, using a tapestry needle, pass the tail down through the woven wall to hide the end, to create a clean finish.
10. Lauren's turned wood plant stand
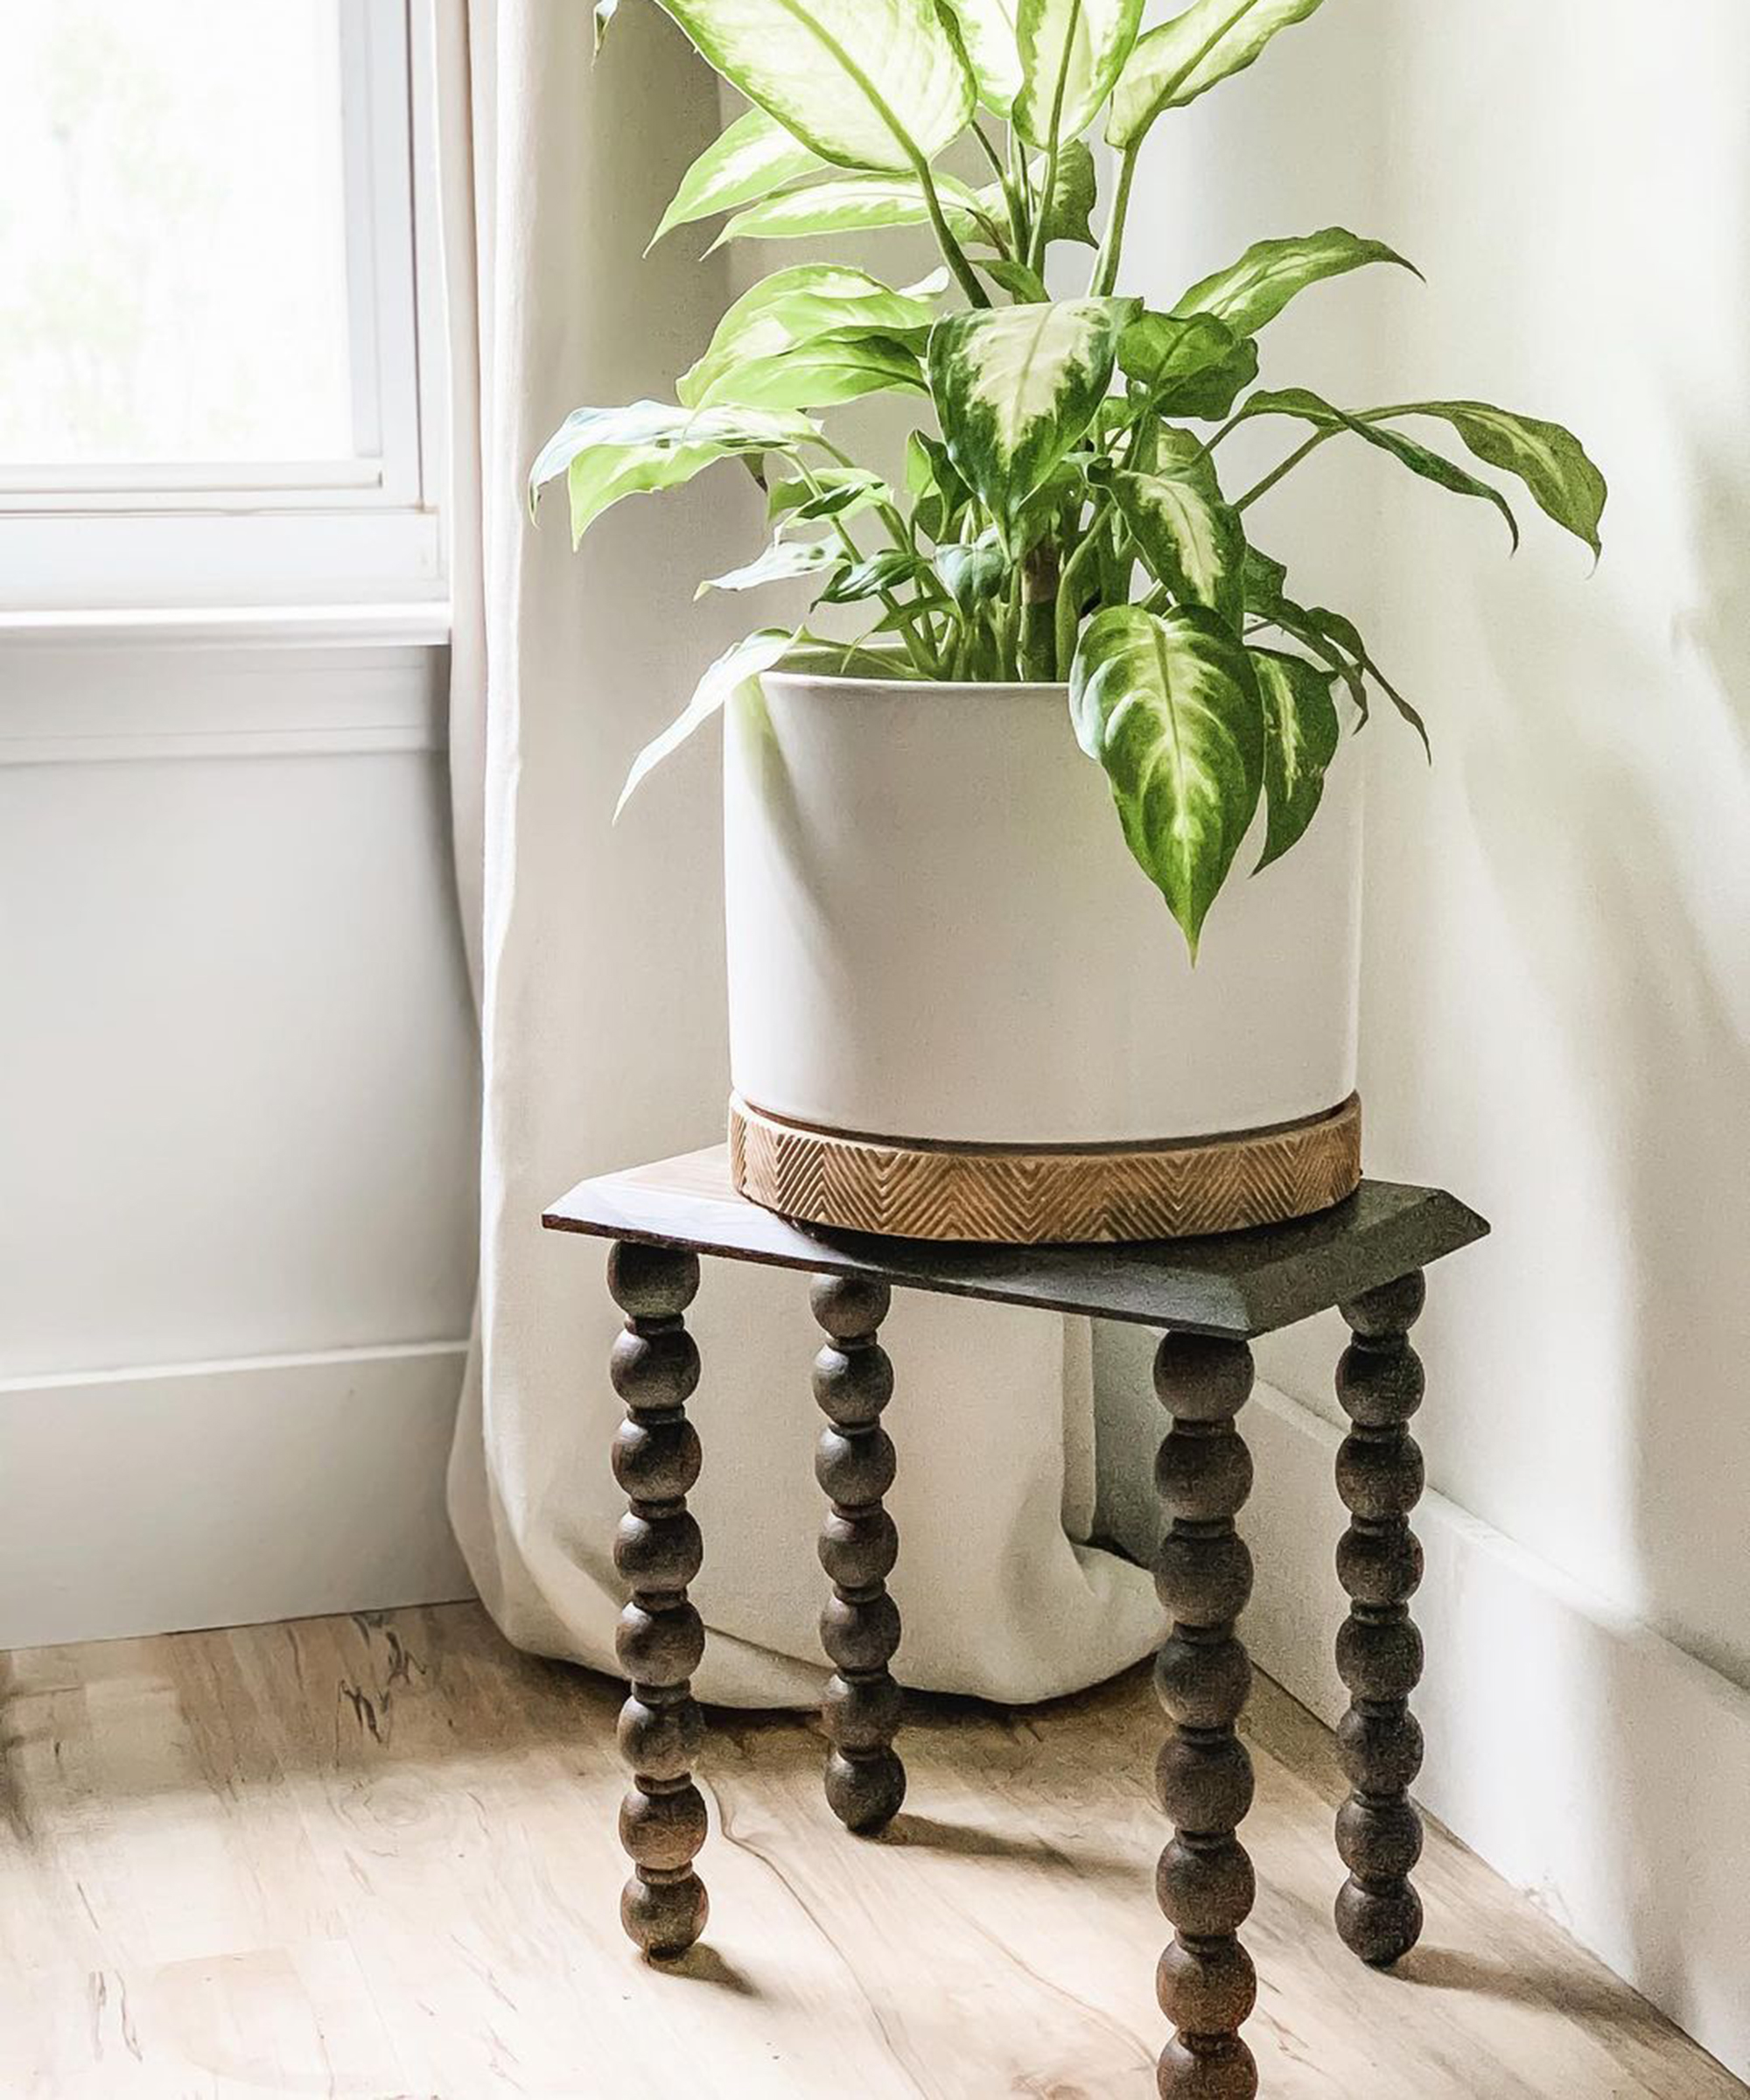
You will need:
- Precut wooden tops/plaques (available from most craft stores)
- Gorilla Glue
- Turned wood 'legs' (available from most craft stores)
- Minwax stain in Dark Walnut (available from Amazon)
- Varathane stain in shade Briarsmoke (available from Amazon)
'I used scrap 1x4s and glued them together, and turned wood pieces from Michael's. For the quick and easy version, just buy the precut wooden tops/plaques you can find at Home Depot, Michael's, or Hobby Lobby,' says Lauren Jamison aka @laurenajamison.
'Those premade pieces come in rectangle and round pieces with nice edging. I used the turned wood pieces as the legs. I then measured to my corners in the top to determine where I want to place my legs on the underside (about an inch and a quarter in). I turned the wood over, measure, and mark the leg spots.'
'I used Gorilla glue because I want it to dry fast and I don't have any way to clamp the legs down. I'm going to supplement this with my nail gun, just to help hold those legs in place.'
'I applied the glue, held the top in place a shot a nail from the top. At this stage, it's pretty wobbly but once the glue dries, it'll be good to go. Let it dry for a couple of hours, then apply stain.'
'I used a newer to me staining technique that involves mixing your stain into Polycrylic. I love how this technique helps to create an even, uniform finish. It’s great when you have blotchy wood, or you are applying it to a piece that has multiple kinds of woods that vary in color. The mixed stain floats the color on top of the piece rather than allowing the stain to soak in. It’s buildable and it seals as you stain so it helps to cut down the finishing process time.'
'I used a combination of Dark Walnut by Minwax and Briarsmoke by Varathane, which together create a rich smokey brown and not weathered, but dustier appearance. When you're using this technique you need to find the ratio of stain to poly that you like. This Briarsmoke stain is almost a solid color so I used a 2:1 ratio of Dark Walnut to Briarsmoke.'
11. Elysia English DIY plant stand
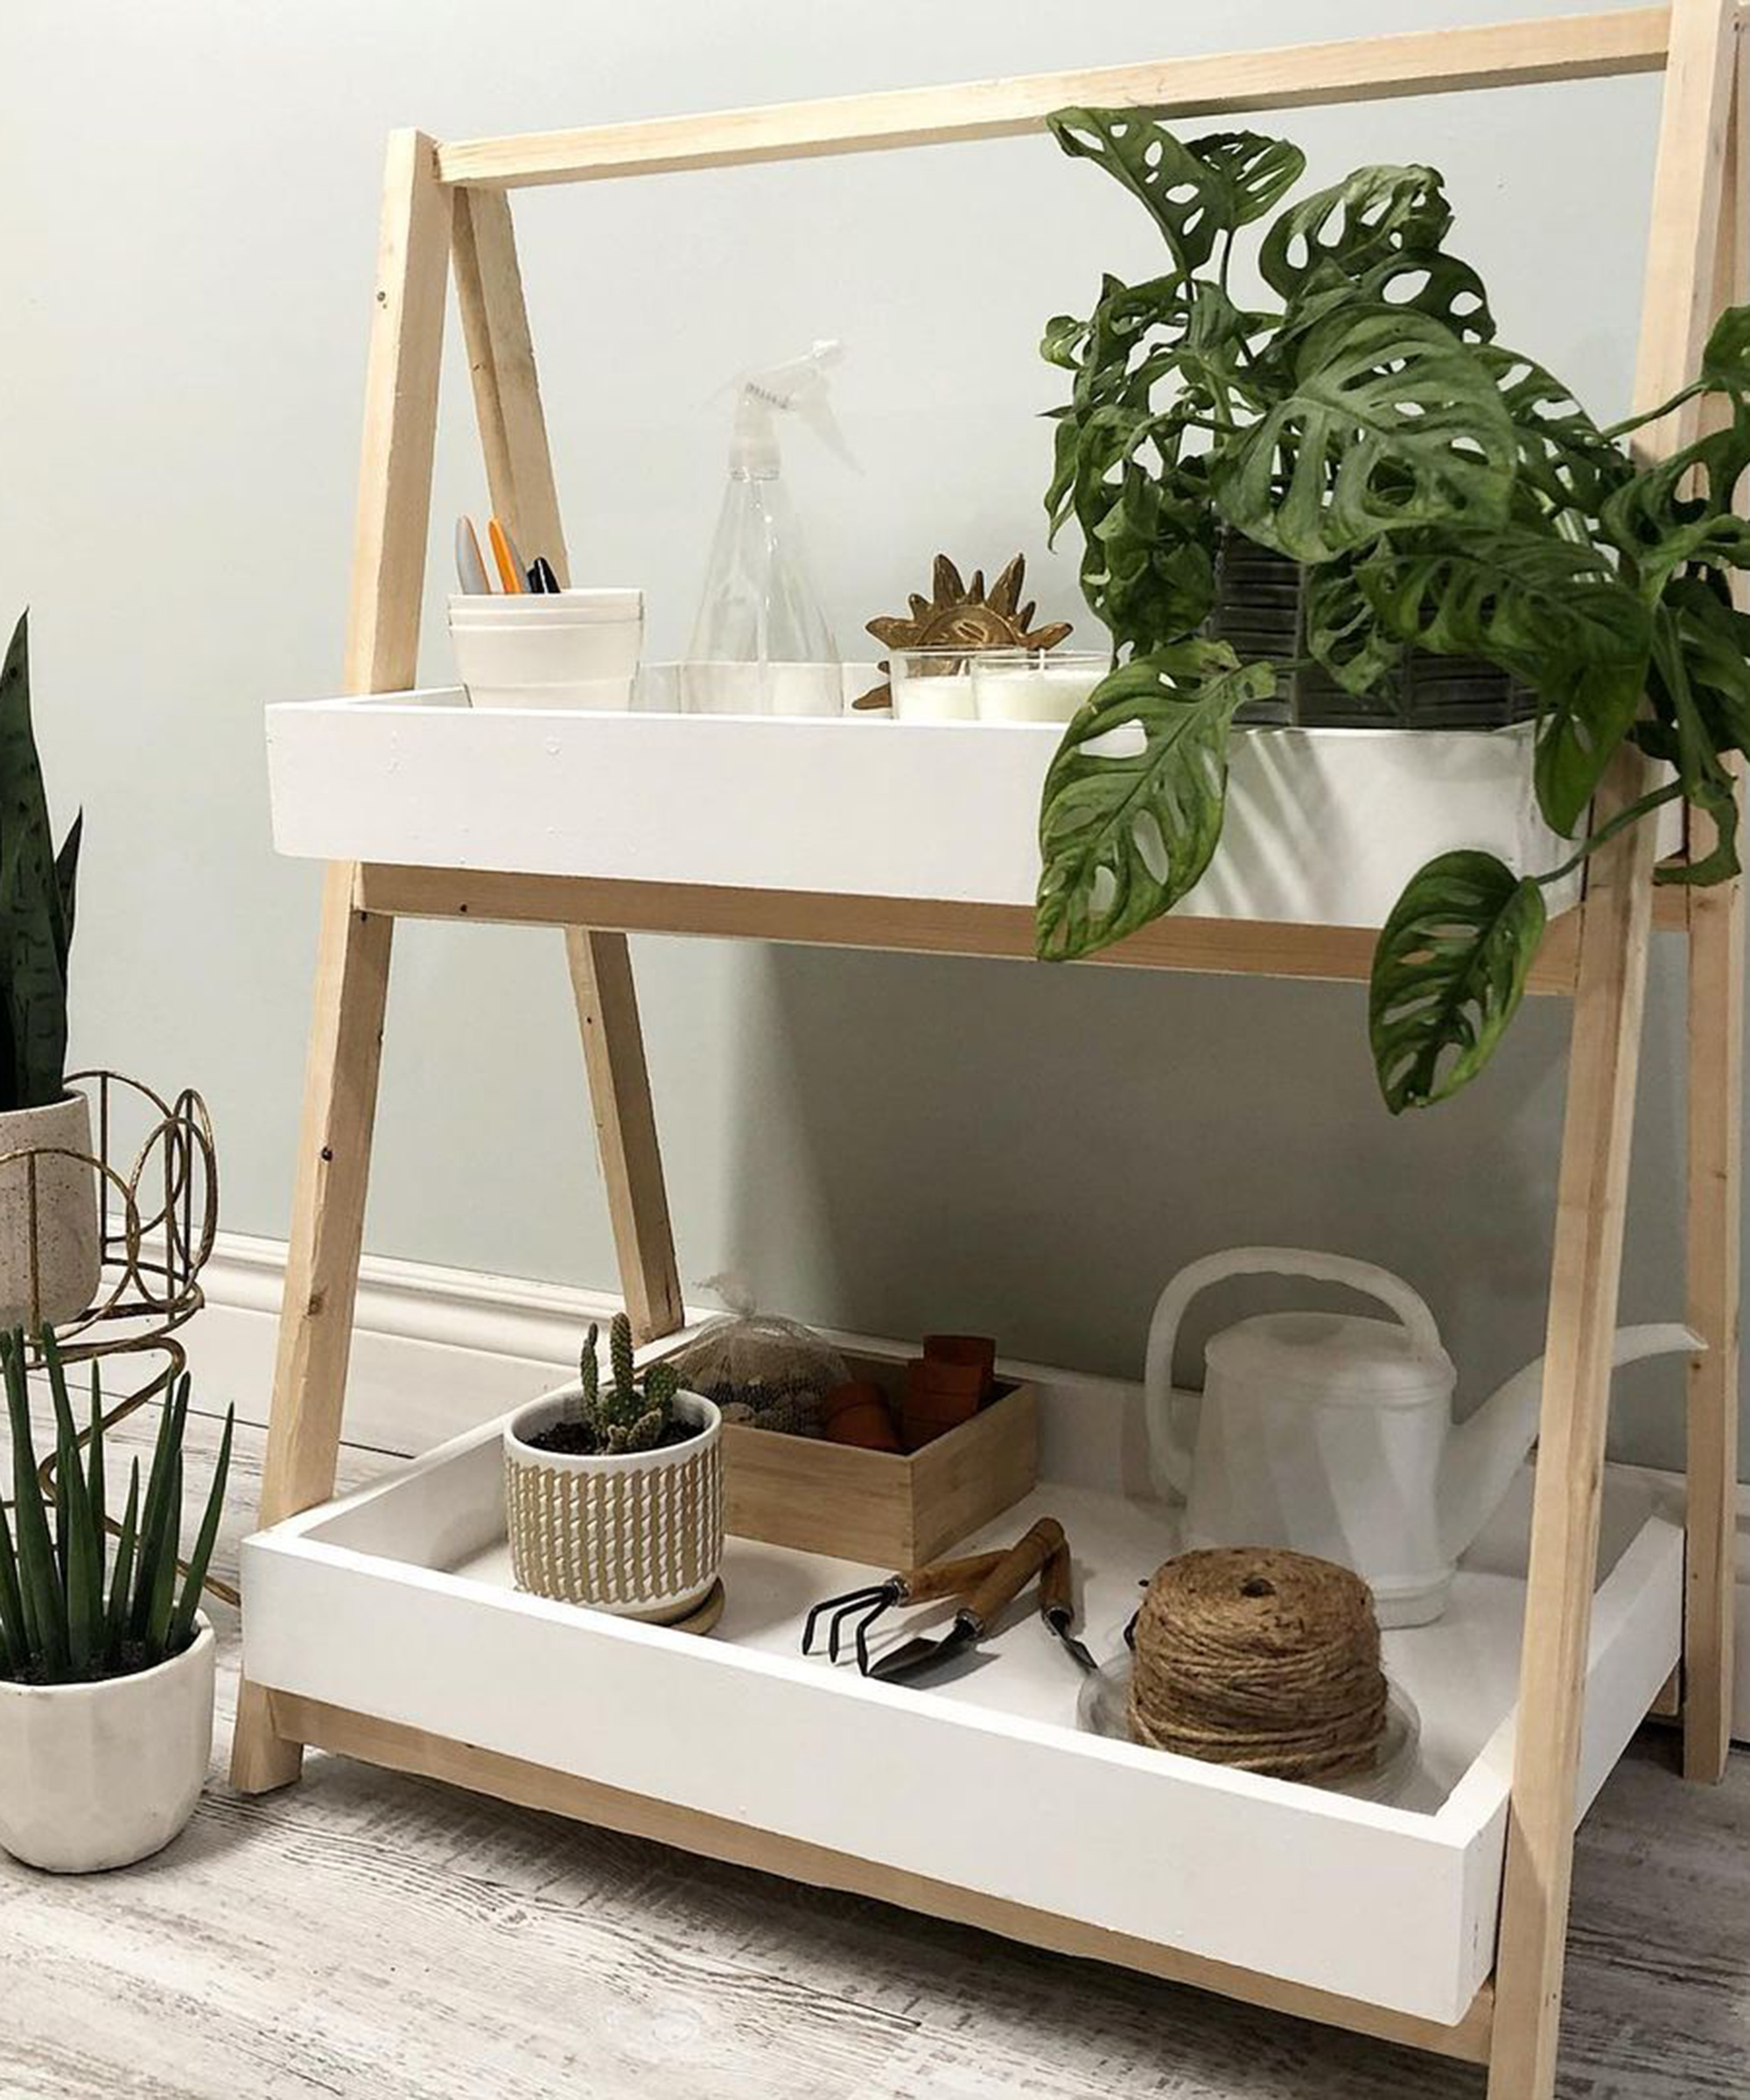
You will need:
- 1x10 scrapboard
- Plywood
- Table saw
- Palm sander
- Beautitone paint in High Hide White (available from Home Hardware)
- Goggles
- A long table to work on (Elysia used a dining table covered in cloth)
- Wood glue (we buy big 36oz bottles of Gorilla Glue on Amazon)
- Nail gun pre-loaded with nails
- Small foam roller
- Paintbrush
'We love to reuse, so I found this scrapboard in the garage. It's a 1x10, so we made three 1x3s,'
'We cut some plywood into two different pieces at the length of 24 inches and then we cut the width of the plant stand separately because we wanted them to be two different sizes (30 inches and 16 inches) to make a tier, they'll be two different levels and will also be framed up.'
'But before I framed them up, I wanted to make sure there are no rough edges on any of them so that when we put it together, it'll be perfect. When you're using a palm sander, or sanding at all, is that I always sand with the grain – even if it's plywood, you get a better finish when you do it that way.'
'Use the 1x3s that you cut out of the 1x10 to make a frame. We're going to make a standard box frame because this is going to get painted, so you won't see any fancy corner cuts anyway. Start with the shorter side and then do the front and back long sides. That gives it a really nice clean look at the front.'
'I always use Gorilla glue, it's the best I've used and I'm just going to add it all on the bottom of the wood I'm using to make the frame. You definitely want to put wood glue in, because sometimes the plant and the soil and adding water to it, it can get a little heavy, so you want that extra durability, especially if it's going to be out in the temperature elements, you want it to last.'
'Secure the frame in place by using a nail gun – this will reinforce the structure. Because I want to have a second tier, I made the second box frame just a little bit smaller and I'm going to do the exact thing and replicate the steps to create that tier.'
'If you want more than two tiers, you just want to make sure that each of your tiers are at least a couple of inches longer than the ones from the top. So I did 13 inches and 16 inches, you might want to do 12, 16, and 20 if you want to do three, but I think just the smaller one for my porch will be perfect.'
'I used a combination of a small foam roller and a paintbrush and use my Beautitone paint, it's called High Hide White – and I'm going to be using some neutral posts to hold up the stand, so it'll really help that white be a pop of color against my plants.'
'Now that our trays are ready we're going to make the stand that's going to hold these trays that our plants are gonna go in. I want to leave these as a neutral wood, so we're going to use the pine 2x2s, they don't have to be heavy-duty. I'm going to do a little shelf inlay on both of the widths of the trays. I already know the bigger tray is 17.5 on both sides, and the smaller 14.75, so I need to make two for each. And then I'm also going to cut a 2x2 that is the width that we already know is 24 inches plus our frame, so 26 inches, then do a few pre-cuts, and then we're going to make our actual A-frame.'
'To create an A-frame, cut the 2x2 pieces into 4 3ft pieces. You'll need to double them up on each side. You'll also use the 3 26-inch pre-cuts to create a center bar to "shelve" the box frames, and one at the top of the frame. Again, use a nail gun to secure these at your preferred height.'
12. Lindsay's concrete DIY plant stand
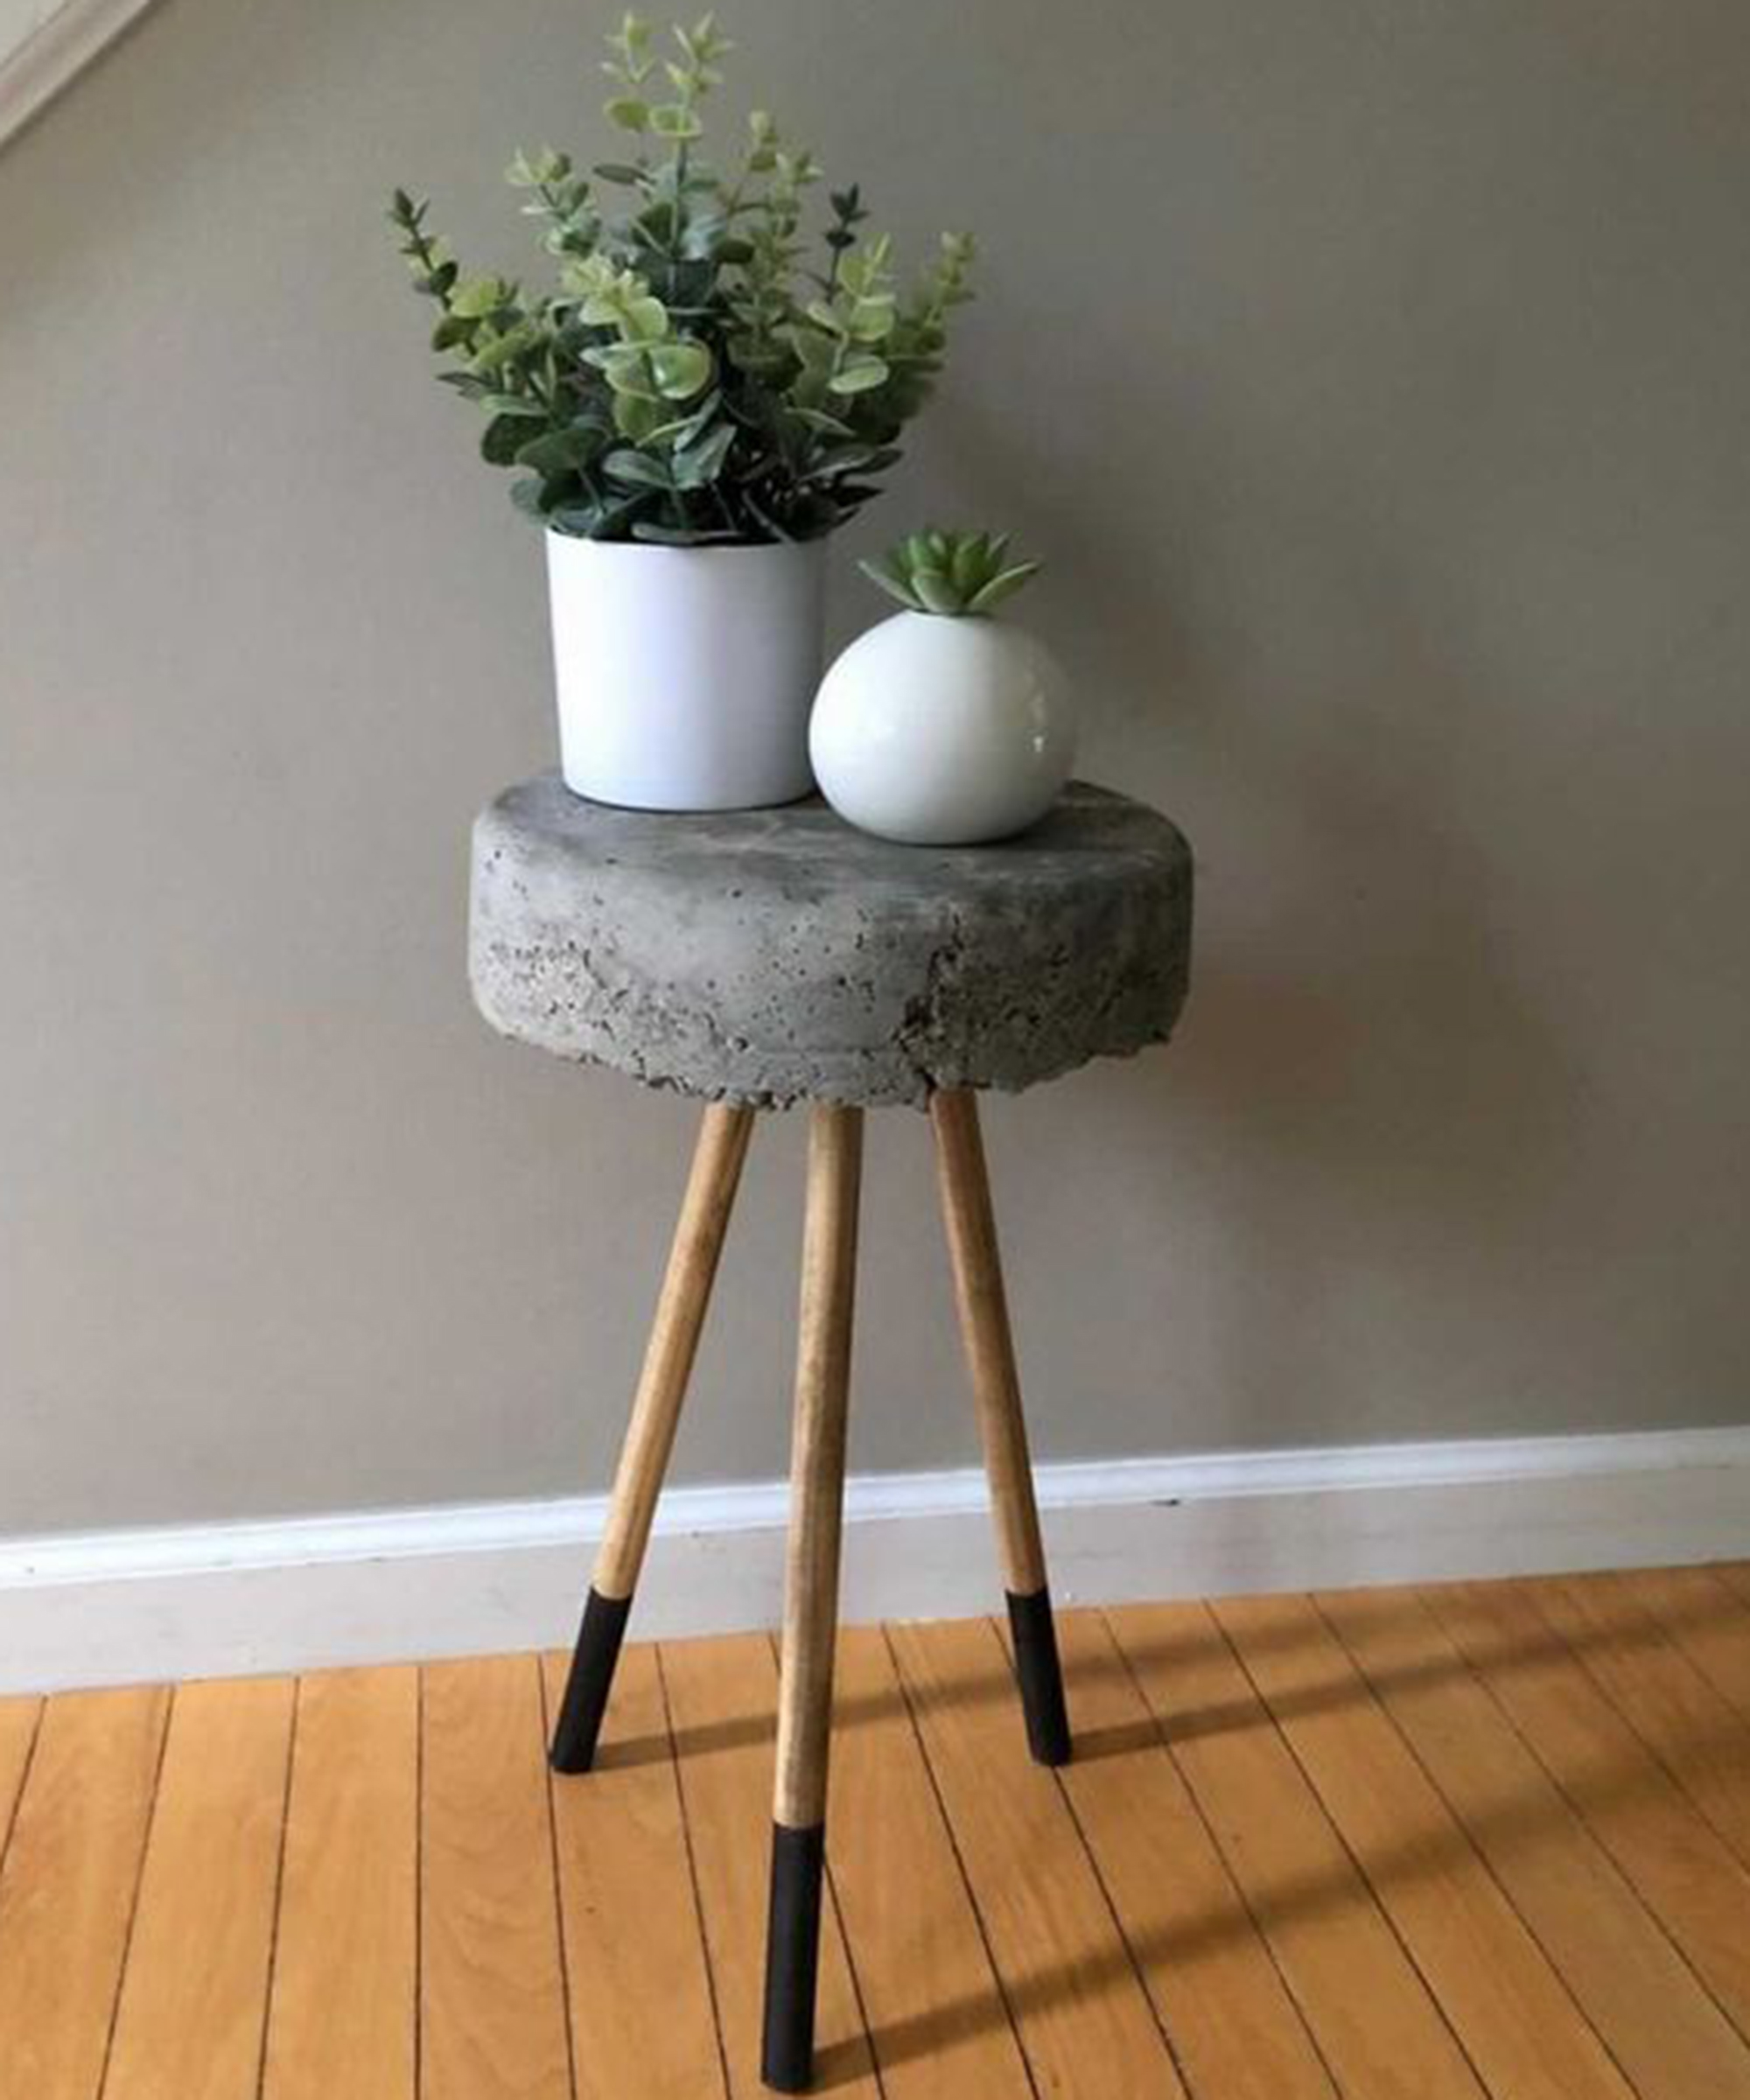
Two words: Concrete jungle. If you like mixing the organic with the industrial, this aggregate and cement DIY plant stand by Lindsey aka @_distresseddaisy will give you an on-trend aesthetic. The black dip-dyed legs are so simple to execute, but give it that extra je-ne-sais-quoi.
You will need:
- Quikrete concrete
- 5-gallon bucket
- 6 ft dowel
- Black spray paint
- Painter's tape
- A stain of your choice (Lindsay used Minwax Dark Walnut)
- Rust-Oleum Metallic Spray Paint in Oil Rubbed Bronze or Antique Brass (shop all colours of Rust-Oleum Metallic on Amazon)
- Mixing together your Quikrete in a separate bucket taking care to not use too much water. Once it is mixed we’ll transfer it to your 5-gallon bucket until the bucket is filled about 4-5 inches deep.
- Next, take your 6-foot dowel and cut it into 2 ft sections (with either a chop saw or handsaw is fine). Then, stain your dowels with the dark walnut stain and allow them to dry.
- Place the dowels into the Quikcrete inserting them about 2 -3 inches. You may want to use painter tape across the top of the bucket to set the dowels at a more narrow base.
- After about 48 hours you will be able to tip the bucket over and pull out the plant stand in one piece. If the concrete is rough it may be sanded and if it will be on a porch you may consider sealing the top. For an indoor plant stand, you can just leave the raw concrete.
- The last step is taping off the top two-thirds of the dowels and spraying the bases of the dowels with either black spray paint, oil rubbed bronze Rustoleum spray paint or Antique brass.
13. Paula's macrame plant stand

Macrame has far more potential than wall hangings and retro decor. Create a chic DIY plant stand using scrap wood, carpentry, and textile skill with tapestry needles. If you want to jazz it up, tie-dye or dip-dye your macrame cord in pastel colors before you begin for a contemporary update on seventies style.
'This was a free project for me because I already had everything, but the materials are not expensive at all,' explains Paula Lage aka @hilagep.
'You can get pre-cut wood discs from craft stores for $5 to $10 (depending on the size). The wood sticks I’m pretty sure you can find in dollar stores and Amazon has very affordable options for macrame cords.'
'The wood to make the legs doesn’t need to be a new slat from the lumber store. I suggest looking for free pallets, for those who have the tools and can cut it themselves, or ask a local workshop nearby if you can have some scrap wood (small pieces are thrown away most of the time).'
You will need:
- Scrap pine board/slats
- Jigsaw
- Electric screwdriver
- Wooden sticks
- Wood glue (take your pick of wood glues on Amazon)
- Screws
- Plant pot
- Macrame cord (loads of choice on Amazon for macrame cord, too)
- Scissors
- Tapestry needle
- Goggles (optional)
- Cut a 12-in disc from a 3/4-in pine board using a jigsaw and then, using a drill bit with the same size as the wood sticks, make holes around its entire perimeter. These holes are about 1-in apart from each other and they don’t go all the way through the wood disc, just half of its depth.
- Cut the wood sticks 5-in tall (the size of the plant pot I wanted to cover) and place them in the holes with a dot of wood glue. To complete the base, cut 3 10-in long feet from scrap pine slats with the ends angled in about 15° and they’re attached to the disc with wood glue and 2 screws each.
- The last part is weaving the macrame cord through the wood sticks to create a wall, being careful to not pull the cord too much, so the wall keeps going up straight (pulling the cord tight can create a funnel shape!).
- When you get to the top of the wood sticks, you can put a few dots of hot glue around the last row of weaving to make it extra secure.
- Finally, cut the excess cord leaving a little tail, and, using a tapestry needle, pass the tail down through the woven wall to hide the end for a clean finish.
14. Cuprinol's DIY plant stand
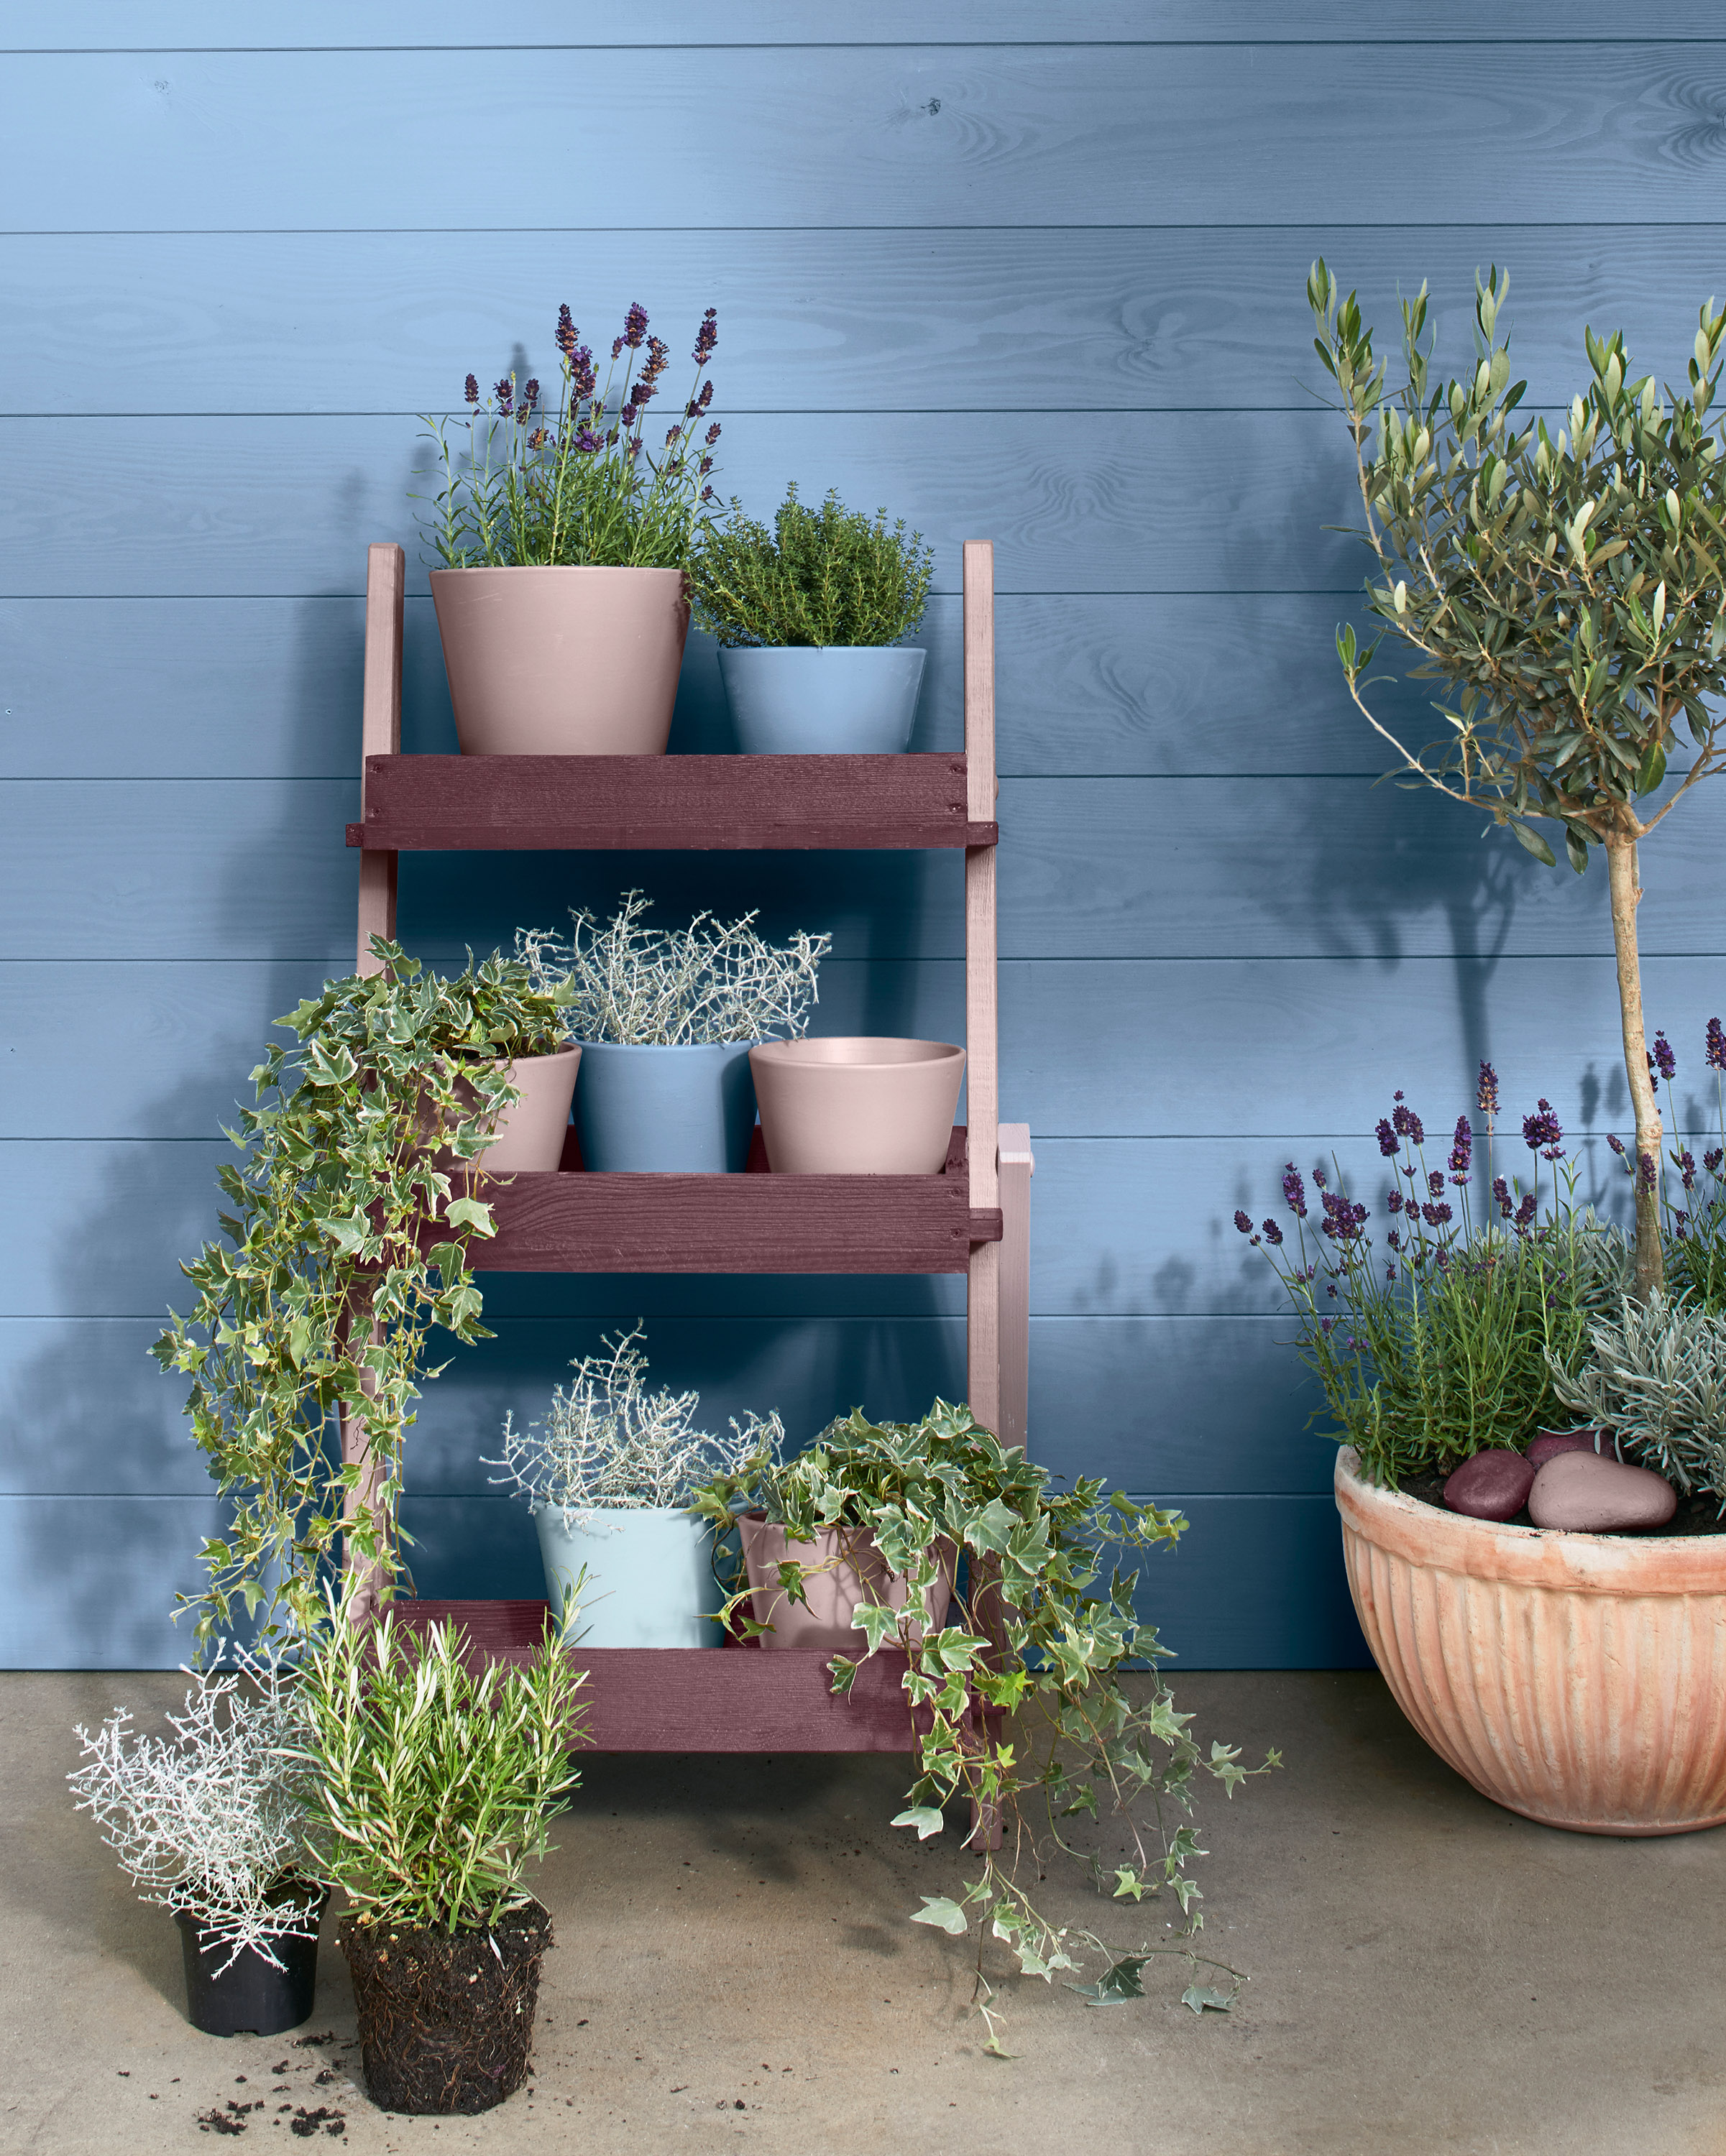
You will need:
- 2 x 1ltr Cuprinol Garden Shades in your choice of colors
- 2in paint brush
- Small roller and tray
- Unpainted wooden ladder shelving
- Terracotta pots which you can paint to match your color scheme
- A selection of your favourite growing herbs or plants
- Sand and clean your shelves: Before you begin your DIY plant stand transformation, ensure its shelves are as smooth and clean as possible. Any textural imperfections now will show up after you've painted, so it's worth spending a little extra time getting this right. Brush away any dust and ensure your shelves are completely dry before your start painting.
- Paint two coats of your first color onto the legs: Using a brush, paint your first coat onto the legs of your shelving unit. Allow to dry completely before adding a second coat. Two coats will ensure a quality finish, and also make your paint job more durable and last longer. Follow the wood grain for a neat look.
- Tape off the edges where the legs meet the ladder steps: To ensure a pristine finish, use a good-quality masking tape to cover the edges you have just painted, where the legs meet the ladder steps. This means you don't even need to have a steady hand when painting around the corners, as the masking tape takes the strain and does all the hard work for you, guaranteeing (in an ideal world) a straight line.
- Apply two coats of your second color to the ladder shelves with a small roller and brush: Use your roller to paint the shelves, again rolling in the direction of the wood grain. Try not to put too much paint on your roller, as it could end up looking a little gloopy, and also make a mess. This is where your masking tape comes in handy as you can just roll straight onto it. Again, wait to dry before applying a second coat. Peel off the masking tape and voila!
- Paint your terracotta pots and allow them to dry: Don't let your paint go to waste. Paint your plant pots in corresponding colors to draw your little shelving scheme together.
What can I use to make a DIY plant stand?
'A plant stand is such a simple idea and a great way to display your best indoor plants or garden plants on the patio,' says Amelia Smith, acting style editor, Real Homes.
'And it's an easy thing to DIY if you’ve got a wooden ladder shelf that’s looking a little worse for wear or have bought a cheap ladder shelf to customize. Why not transform plain or tired storage into a statement display for your finest herbs and plants this weekend?'
'Simply choose a selection of stand-out colors to paint the shelves and some plant pots, creating a vibrant focal point that gives your plants the attention they deserve. Whether you’ve got a large patio, small balcony, bland kitchen, plain bathroom it’s the perfect way to maximize your space (and the beauty of your plants) on a budget.'
You really can use anything! From teacups to food tins, discover our DIY alternative planter ideas which are uber-quirky!
What can I display on a DIY plant stand?
'Whether this will be a herb station for your kitchen, a green display for your bathroom, or a statement feature on your patio, select your plants accordingly,' says Smith.
'Basil, parsley, coriander, mint, rosemary, and thyme are great to have within grab-able distance to your cooking area. Trailing ivy, string of hearts, and string of pearls are pretty trailing plants which will grow down from your higher shelves, creating an elegant feel.'
Our indoor gardening guide is blooming with tips to help your houseplants grow.
How big should my DIY plant stand be?
Honestly, it can be as large or little as your space can accommodate! For example, if you've got a small apartment, you won't want a DIY plant stand that you have to wade through. Be sure to be savvy with your space, and make use of your walls with do-it-yourself wall planters and indoor plant walls, and vertical garden ideas.
What should I display on a DIY plant stand?
Whether you choose uniform pots for a consistent feel or go chintzy with mismatched planters, there's no right or wrong way to style a DIY plant stand. It's all about injecting your personality into it. If you have the time and creativity and know how to decorate a plant pot, this can also be a bespoke route you can go down.
'Think about round bottoms or light curves,' says Tycho Schafraad, CEO, Pottery Pots USA.
'Low, round bowls for plants and flowers score really good as well, according to the latest garden trends. Organic shapes give a garden a playful and cozy character.'
Where can I display a DIY plant stand?
A DIY plant stand looks good as a feature in any room in the home. But, for your houseplants to thrive, they will need optimal light and water conditions. Placing it near a window with natural sunlight will allow your greenery to photosynthesize (hello biology class!) to its full potential, but if you're thinking of having this piece of furniture in your washroom, then it's best to look at the best bathroom plants that enjoy humid conditions and survive with low or little light.

Hi, I'm the former acting head ecommerce editor at Real Homes. Prior to working for the Future plc family, I've worked on a number of consumer events including the Ideal Home Show, Grand Designs Live, and Good Homes Magazine. With a first class degree from Keele University, and a plethora of experience in digital marketing, editorial, and social media, I have an eye for what should be in your shopping basket and have gone through the internal customer advisor accreditation process.