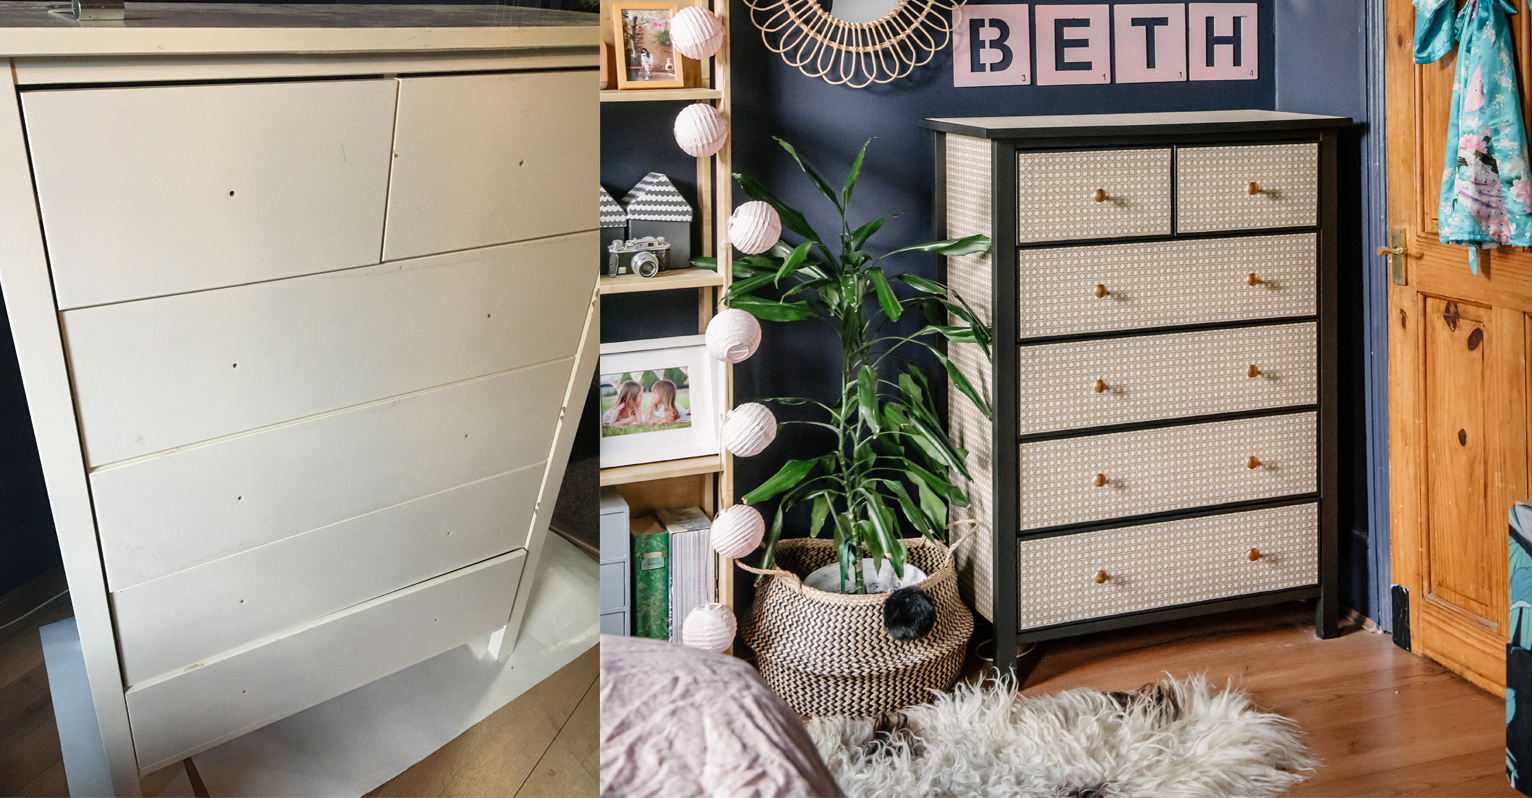
This simple Ikea hack can upcycle old furniture using just wallpaper – genius!
Looking for a fab Ikea hack? This is one of the easiest and most effective we have seen in a long time...


Get small space home decor ideas, celeb inspiration, DIY tips and more, straight to your inbox!
You are now subscribed
Your newsletter sign-up was successful
Like most people, we love a good Ikea hack. We love having a scroll through Instagram checking out all the amazing projects you guys have been getting on with, and we thought we would get sharing them! Our kind of Ikea hacks are always easy and always quick so you know they aren't going to take you too long or be too complicated.
This project comes from Lily Sawyer at @layered.home, and is such an easy and effect way to update your old furniture. Keep scrolling to find out how you can get the look.
You will need:
- Paint
- Wallpaper
- Wallpaper paste
- Pasting brush
- Ruler
- Pencil
- Scissors
- Spray paint (or new handles)
Step one: clean your furniture and remove hardware
Give your piece of furniture a clean with warm water and a microfibre cloth, making sure it's totally dry before moving onto the next step. For this Ikea hack Lily used a set of Ikea drawers but it would work with any drawer with a flat front, you could go even bigger and upcycle a wardrobe too. Take of any handles or hardware before painting.
Step two: paint your furniture
Give your furniture a coat of paint in whatever colour you have chosen as your base coat. Lily used Frenchic's Black Jack but if you want more of the best furniture paint, head to our guide and for more of the best paint for furniture. If you want any tips on how to paint furniture and get the best results check out our step by step guide too.
Step three: cut your wallpaper
Measure the areas you want to cover with wallpaper – here it's the drawer fronts and the sides – and use a ruler and a pencil to drawer those measurements onto the wallpaper, add a bit extra as you can fold them over the drawers for the neatest results. Cut out the shapes and check the fit on the drawer fronts.
Step four: paste the wallpaper onto the furniture
Using a brush apply the paste to the back of the wallpaper, covering the whole piece with a thin coat. Place it on to the surface of your furniture and use your hands to gently smooth it over, checking there are no bubbles. Allow to dry.
Step five: update your handles
This could mean spray painting the original handles a different colour or replacing them altogether. Whatever you choose to do, once the paper has dried use a screw to poke a hole into the paper where the handle was and then fix all the handles back on.
Get small space home decor ideas, celeb inspiration, DIY tips and more, straight to your inbox!
If you after more DIY ideas, tips on using social media and creating content, and just gorgeous interiors make sure you check out Lily's website too.
Read more:
- Living room ideas on a budget: 16 cheap ways to update your space
- Real home: this mid-century house has had a skillful DIY makeover
- How much does a new kitchen cost in 2020? Plus 16 tips to make it cheaper

Hebe joined the Real Homes team in early 2018 as Staff Writer before moving to the Livingetc team in 2021 where she took on a role as Digital Editor. She loves boho and 70's style and is a big fan of Instagram as a source of interiors inspiration. When she isn't writing about interiors, she is renovating her own spaces – be it wallpapering a hallway, painting kitchen cupboards or converting a van.