How to install pocket doors: 7 steps to a space-saving partition
Learn how to install pocket doors to save valuable floor space and create better flow between your rooms

Installing pocket doors is a great way to create extra floor space in any room. These types of doors are hung on a rail and then slide away sidewards into a cavity inside the wall, meaning no hinges and no need to factor in the swing space needed for a standard door to open and close.
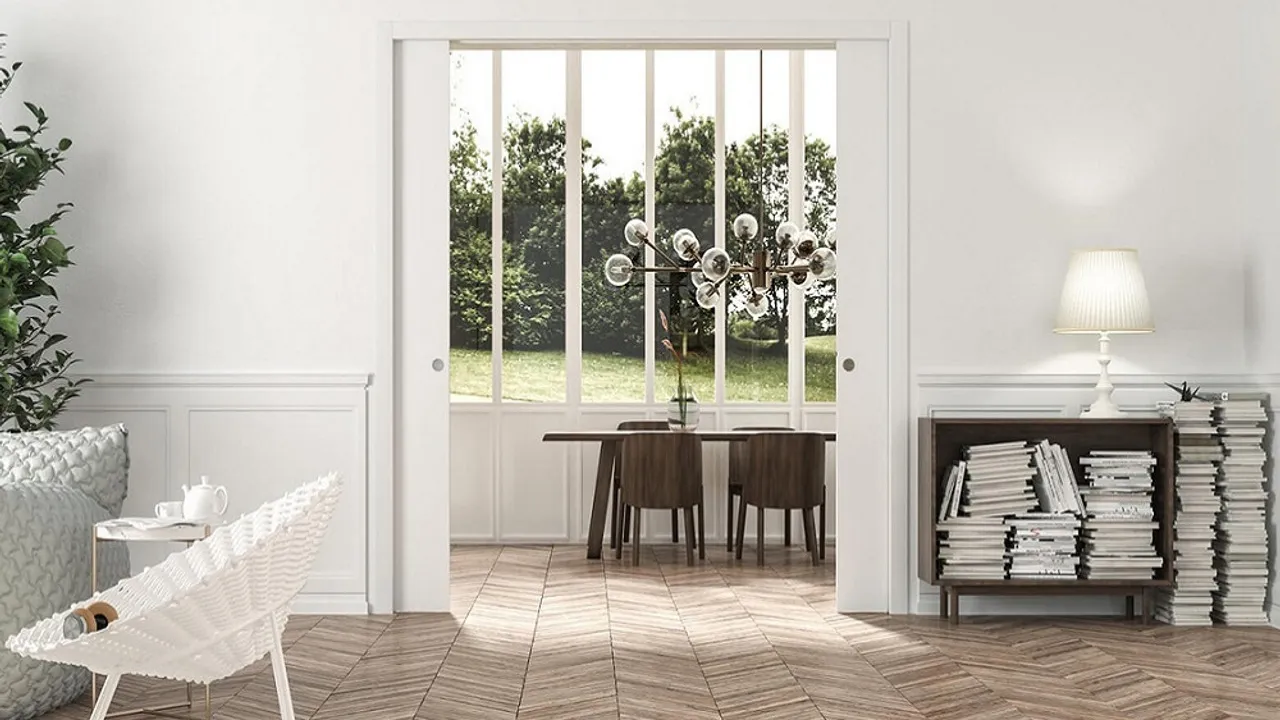
Pocket doors can be either single, which are mostly used on bathrooms and utility rooms, or double, which are great if you want to create a semi open-plan living area that can also be closed off when needed.
You can pay a professional to install a pocket door system for you, but it’s a relatively simple job for a competent DIY-er to fit, although you will need two people for some stages. Read on for our step-by-step guide on how to install pocket doors.
Article continues belowThis is for an interior door, so if you're looking to create a better link between inside and out, take a look at our guide to how to install sliding patio doors, instead.
You will need
1. Pocket door system and fixings: ours was from Eclisse
2. Pocket door of choice
3. Timber for studwork
4. Plasterboard
5. A level or laser level
6. Drill and screwdriver
7. Architrave
8. Door handles and fittings
9. Hammer and nails
10. Wood filler
Finding the right pocket door system
Pocket door systems come as a kit that includes a metal frame and hanging rail for the door. The doors aren’t included but so you’ll have to know the depth and size of the doors you plan to use before you order. It might sound obvious, but you need to choose a door size that you will slide back into the wall space you have available, so if you only have 700mm of wall space next to your door opening, you won’t be able to accommodate a 762mm door.
The other thing you need to consider is the type of wall you have. It’s easiest and least intrusive to install pocket doors onto existing stud walls – timber supports covered with plasterboard on either side. This is because there’s already a void in place that you can use, so you won’t lose any floor space.
However, you can fit a pocket door system to an existing brick wall, you’ll just need to build a stud wall out from it to accommodate the door. This means you will lose a small amount of floorspace in your room.
Pocket door systems are sold in various ‘finished’ depths. This denotes how deep the pocket containing the door will be when plasterboard is fitted on either side of the cavity. Most pocket door systems come in a finished depth of 100mm or 125mm. If you have a stud wall, measure the depth of the existing timbers and then add on the depth of two pieces of plasterboard.
Many people think you can’t fit pocket doors on a wall that has electrics but this isn’t the case. There are special pocket door systems that include wiring channels, but this will need to be connected by a qualified electrician.
Unless you’re a pro at both carpentry and plumbing, it won’t be possible to have a radiator on a studwork pocket door system, so you’ll need to find another location for wall-hung heating.

This double pocket door system from Eclisse has been installed behind an existing brick wall
How to install a pocket door
We installed a pocket door between our kitchen and playroom. In our case, we built studwork infront of a brick wall to accommodate it, but if you have an existing stud, you can see how the process will apply. You will need to remove plasterboard to access the cavity and rebuild studwork as needed.
Skill level: advanced (you need to be confident in your carpentry and drywalling)
Time: a weekend
Total cost: budget £600–£2,000 in the UK and $500–$1,800 in the US. Costs depend on the kit and door you use, and how much remedial work is involved. Double door installations like this cost much more.
If remedial plastering is required, you will need to budget for this too, and carpentry if you don't feel comfortable fitting the architrave yourself.
1. Before you start
You can only install a pocket door system once the finished floor in the room is down. If you miss this part, you’ll find that the doors that should fit the system you’ve ordered won’t open!
You’ll need a large workspace to build the pocket door system. If you’re fitting the system in a small room, clear out space in your garage or lay down dust sheets on your drive or yard. Just make sure you'll be able to carry the frame back in once it's built.
Even if you have a stud wall already, you’ll need to adapt the timber that’s already there to fit around the pocket door frame. Make sure you have the amount of timber you need (in the correct depth) before you start work.
2. Build the studwork
Before you build the metal pocket door frame, you need to make sure there is studwork in place to fix it to. To do this, you’ll need to strip the plasterboard off all the way around the door opening. You’ll then need to use the dimensions of your pocket door system to build the studwork that the metal frame will be fixed to.
It’s extremely important that the studwork you build is level in all directions, so use a spirit level and/or laser level to help. Remember that you will be plasterboarding the wall once you’re done, so it needs to be level vertically as well as horizontally.

You'll need plenty of space to assemble your pocket door system, especially if it's a double
3. Assemble the pocket door frame
How you assemble the door frame depends on the manufacturer you choose, so follow the instructions included. Most systems slot together with a rail system at the top that the door is eventually hung onto and slides along.
It might sound obvious, but if you assemble the frame outside of the room it will be installed in, make sure you can get it back in once it's built.

Use the screws that are included with your pocket door to secure the metal frame to the wooden studwork you built
4. Secure your pocket door frame to the wall
It’s normally easiest to assemble the pocket door system with it lying on the floor and then lift it up into position – this is a two-person job.
Once the pocket door system is positioned within the studwork you built, use the screws that are included in your kit to attach the metal frame to the studwork.
At this point, you’ll need to insert some packers into the frame. This is normally high-density foam that you squeeze in where the door will eventually go to make sure the frame stays in place while the walls are plastered.
If you’re adding a soft-close mechanism, or a coordination system – to make a set of double doors open and close together – then now is the time to do that, too. All systems differ, so follow the manufacturer’s instructions.

Leave the plaster to dry for two weeks before applying a mist coat of watered down emulsion. Then decorate the walls before you fit the doors to reduce the risk of damaging them
5. Plasterboard and plaster the walls
Once the frame is securely in place, you’ll need to plasterboard it and plaster all the walls. Most competent DIY-ers can plasterboard to save money but it’s always best to call in the professionals for the plastering itself.
This is the last chance you’ll get to access the inside of the door frame, so make sure it’s clean and there’s no debris inside. You should also set the maximum open distance on the slide rail at the top of the pocket door system – this makes sure your door doesn’t disappear all the way back into the wall with nothing for you to grab hold of once you’ve fitted it.
6. Insert your doors
Before you add any door trim or architrave, it’s time to hang your door. This is best done by a carpenter unless you’re a pro at woodwork. You’ll need to attach the hanging system to the top of the door and then route a channel into the bottom of the door to make sure it runs straight when it opens and closes. If you do go for it yourself, be very careful as you can easily ruin a door with a dodgy cut.
How the door fits into the frame differs by system, but you generally slide the hanging system out to where the opening is. You then slot the hooks you’ve attached to the top of the door onto the hooks attached to the slide rail.
You should also attach any handles now, making sure they are positioned so they won’t bash into the door pocket.

Once your doors are installed, you can fit the door jambs and any architrave and then paint it
7. Add the door jambs and architrave
Unless you’ve gone for a contemporary frameless style, your pocket door kit will come with door jambs – pieces of wood with brushes attached that fit around the pocket door. These hide the metal framework and help make sure that dirt is kept out of the pocket.
Once the door is fitted and working, it’s time to add these and any architrave that you need. This can be done using a hammer and pins and adhesive. You can then use wood filler to cover any pin holes and prime and paint the wood.
And that’s it, your sliding doors are now good to go. It’s worth mentioning that you’ll need to take any architrave and door jambs off to change the doors, so make sure you choose a timeless style that you love.
