Draughty floorboards are a common issue in a lot of period homes with original floors. They add a lot of character as space, but come with the possibility of gaps that can allow draughts up and into the room, especially if you are dealing with floorboards on an upper level of your house.
It is always a good idea to keep a large rug to lay down in the winter months for some extra insulation, particularly if the floorboards get cold underfoot, but floorboard draughts aren’t an issue that you have to live with. Follow this simple eight-step guide to eliminate chilly draughts and improve a rooms overall insulation.
Article continues below
Related articles: How to choose hard flooring | Repairing wood floorboards | Timber floors: a period character guide | How to use salvaged wood floors
You will need:
- Old plastic credit card or plastic knife
- Measure
- Scissors
- Roll of Stopgap or DraughtEx

1. Tackling draughts with Stopgap: For the first area of floorboards I’m using Stopgap sealant strip. Firstly clear away dirt that may have builtup in the gaps. An old credit card or a sturdy plastic knife are useful tools for the job. It’s best not to use a metal screwdriver or scraper just in case there is some electrical wiring running beneath the boards.
2. It’s easy to use, even for beginners: Stopgap is a new product designed to stop the draughts. It’s simple to use and requires no tools, fixings or previous DIY experience. To keep the roll manageable it’s best to contain it within its plastic bag to create a dispenser. Snip off the corner and pull out a metre or so of strip. Fold along the central crease.

3. Press Stopgap inbetween boards: Starting at one side of the room press Stopgap in the gap between the boards with the fold downwards. The ingenious design plugs gaps of varying widths between 1mm and 8mm and won’t drop out when the boards shrink in hot weather. As it resists the passage of air it will also reduce dust, pollen and insects.
4. Press down strip to touch joists: Fill gap in one continuous piece until you reach the opposite wall. Cut to length. Take an old credit card and go along the strip pressing it down until it makes contact with the joists (nails securing the boards to the joists show you the exact position). Then use Stopgap to fill gaps between floor and skirtings.

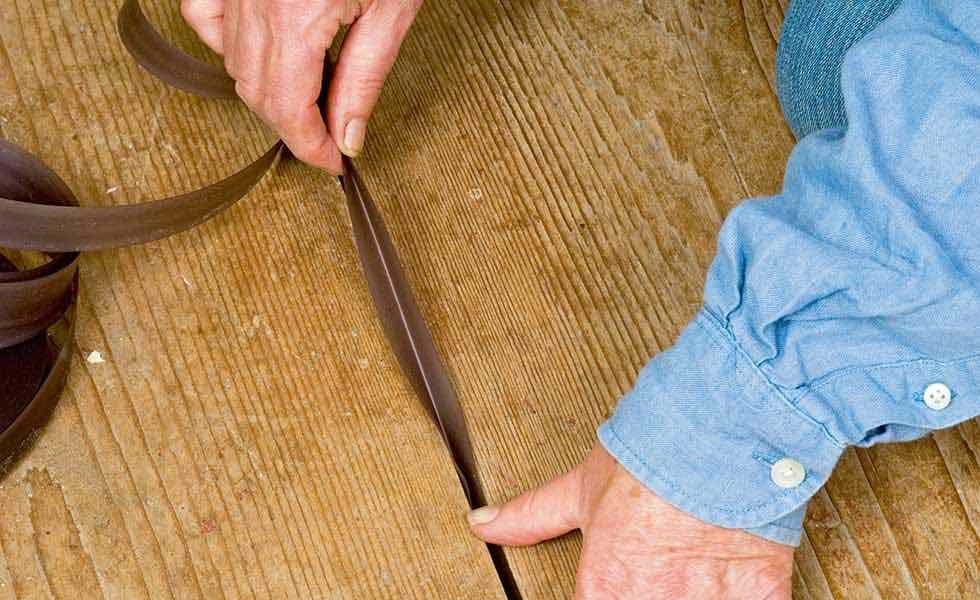
5. Tackling draughts with DraughtEx: DraughtEx is a plastic strip with thousands of air pockets that allow the sealant to be compressed by almost 90% of its original profile. This enables the strip to fill gaps much narrower than its basic dimensions. Begin at the edge of a board. Use a plastic knife to press the first few inches into the gap.
6. Push the sealant strip into gaps: Once the first few inches are firmly in place use the applicator to gently push the sealant into the rest of the gap. It’s astounding how much heat can be lost through draughty floorboards: added up together they can be the equivalent to a small window being permanently left open winter and summer.

7. For narrow gaps stretch the seal: When dealing with narrow gaps don’t try to force the sealant in by pressing hard with the applicator tool. Instead stretch the strip as you push it into the gap – once in place it expands to fill the gap. Two sizes of DraughtEx are available, one for gaps with widths of 2mm-8mm, and one for 6mm-12mm gaps.
8. Finishing touches to the installation: Continue installing the strip until 5cm or so away from the opposite wall. Measure the length of sealant required and cut strip accordingly. Now, using a plastic knife, push sealant to fill the remaining gap and create an effective seal. Repeat, using the same method on all gaps between the boards.
What not to do
- Never remove original floorboards in exchange for a new floor. It could devalue your house and ruin the integrity of a Period Property.
- It’s not advisable to sand original old floorboards. Apart from destroying the patina, the surface can be destabilised – for example wood-boring beetle larvae may have been busy tunnelling below the surface and if you take off the top layer the unsightly, worm-ridden wood will be on view.
- Don’t let a builder take up the entire floor and re-lay the boards to close the gaps. Floorboards are usually secured with long nails or clouts and it is all too easy to damage floorboards as they are lifted, particularly if they are worn.