How to deal with damp and rot
Problems with damp and rot are a common curse, particularly in older properties, where inadvisable remedial work can make it worse. Here, we look at the causes of damp – and its solutions

Get small space home decor ideas, celeb inspiration, DIY tips and more, straight to your inbox!
You are now subscribed
Your newsletter sign-up was successful
How to deal with damp
According to conventional wisdom, older houses are routinely afflicted by the twin horrors of rising damp and dry rot. Together with their unsavoury cousins, wet rot and beetle infestation, this can be enough to scare even the most intrepid homebuyers.
To make matters worse, such problems are frequently misdiagnosed, resulting in unnecessary and expensive ‘remedial work’. So, if your home seems to be afflicted with damp and you are already furiously researching how to install damp a damp proof course or how to treat rising damp, take a breather and read on – things might not be as troublesome as they seem.
Newer homes can suffer from damp, too. Excess moisture is the cause and there are various remedies. So, if you're renovating or simply repairing, here's how to deal with damp.
This feature is an edited extract from the Victorian & Edwardian House Manual by Ian Rock, published by Haynes. Ian Rock is a chartered surveyor and director of survey price comparison website rightsurvey.co.uk
What is damp?
Damp is moisture that impacts on the structure of your home in some way. Mild cases of damp will lead to a bit of mildew on walls, or perhaps peeling paint – superficial issues that can be solved if you find the cause, solve it and clean up any residue. More severe cases of damp will affect the structural integrity of your home and must be taken seriously.
It is caused by water entering the walls of the building, or moisture building on the surface of walls, internally or externally.
So, how do you know if your home is damp?
Get small space home decor ideas, celeb inspiration, DIY tips and more, straight to your inbox!
Signs of damp
More from Period Living

Period Living is the UK's best-selling period homes magazine. Get inspiration, ideas and advice straight to your door every month with a subscription.
- Stained walls or plaster;
- A musty smell;
- Warped wood or damp timber (which, if left untreated, can lead to wet rot);
- Peeling paint or wallpaper mould;
- Water droplets from condensation;
- Salt deposits on walls, leaving a tide mark.
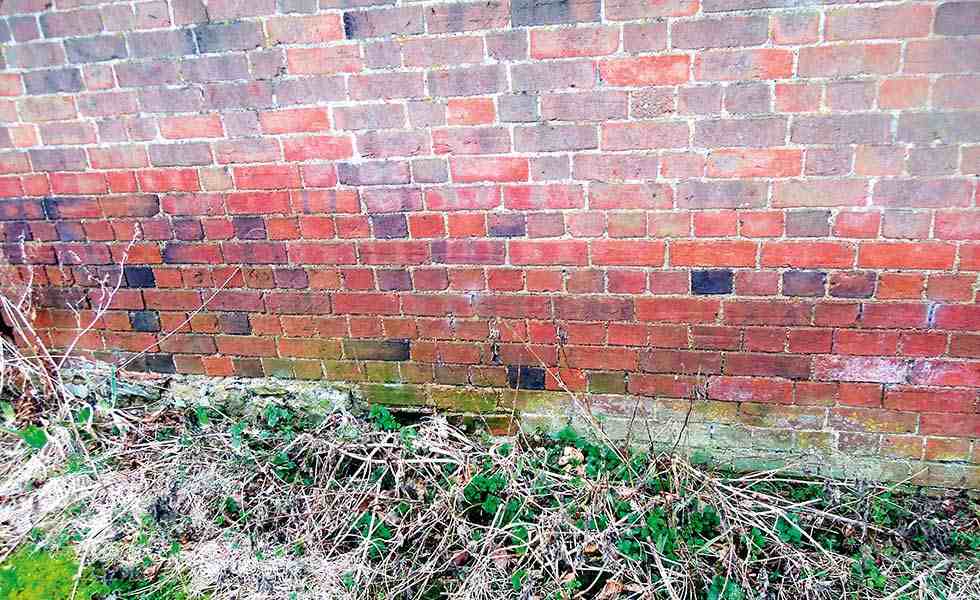
However, the reality is that true rising damp is extremely rare. Wetness in lower walls is usually due to other causes, such as condensation on steamy windows running down the wall and soaking in, or raised flower-beds or paving stones allowing damp to get past the damp-proof course.

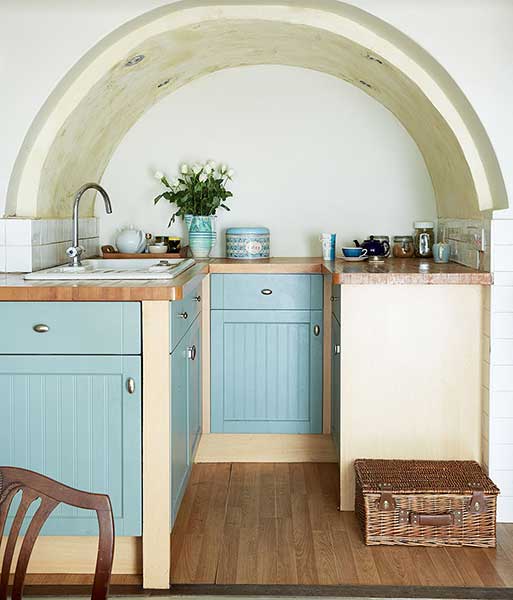
In this house, which is built into a bank, the arch in the kitchen has been lime rendered and lime paint applied on top. ‘You can actually see the house breathing as darker spots in the paint appear and disappear over time,’ says owner Sasha Wardell
What you need to know about rising damp treatment
It’s generally accepted that moisture from the ground can rise about a metre up the walls of your house if there’s a problem with the damp-proof course. Damp proof courses were first required on houses built after 1875, and are usually evident as a wide mortar joint near the base of the main walls, typically comprising a couple of layers of slate, or a similar water-resistant material.
The usual response to any form of damp is to have the walls pressure-injected with a liquid silicone damp-proof course, via lots of small holes drilled into the mortar just below floor level.
This, however, should be a last resort since it is rarely effective; the work is often badly carried out, with damp-proof courses injected in the wrong place, plus it doesn’t work at all in thick stone walls. Despite this, mortgage lenders commonly insist that such works are carried out, although the 20-year guarantees often turn out to be worthless.

The true causes of damp
As we have already said, all damp is caused by excess moisture. This may be from leaking pipes, condensation or other myriad causes. Identifying the cause of your damp problem is key to choosing the right cure.
Penetrating damp
Damp can sometimes soak through old solid walls, particularly if the pointing is inadequate, leaving brown patchy stains on the plaster or wallpaper. For this reason, houses built in exposed locations, such as coastal towns, would often have additional protection with the walls rendered or clad with tiles.
Common weak points include:
- Windowsills: check for cracks where rain can seep into the wall below, causing damp patches, loose plaster or rot in the skirting. Sills should project sufficiently away from the wall and have a small groove underneath; otherwise the rain will run back and soak into the wall.
- Doors and windows: rain runs down and seeks out joints between the frames and the walls.
- Rainwater goods: blocked, overflowing gutters, cracked downpipes and leaking overflow pipes cause water to splash on hard ground surfaces next to the house.
- Decorative brickwork or stone: protruding ledges on walls (known as ‘string courses’) should slope outwards to prevent puddles forming and water soaking in.
- Defective flashings: Joints to roofs and chimneystacks should have watertight flashings.
- Chimneys: rain can pour down unprotected flues, soaking into old soot behind fireplaces.
Plumbing leaks
One of the most common sources of damp is from defective plumbing and drainage. Tiny leaks can develop around old pipes and shower trays, or at the back of toilets, remaining unnoticed for years until the floorboards start to rot. Even tiny hairline cracks in the grouting to bathroom wall tiles, when combined with ‘power showers’, can invite trouble. Leaks from hidden pipework behind kitchen units are often only discovered when the units are replaced, by which time quite serious decay may have set in to timber floors.
Condensation
When warm, humid air in your house hits a cold surface, it will instantly cool and condense back to water. Steamed up windows, damp walls and moist ceilings can eventually attract black speckled mould. Even carpets can acquire the unpleasant smell of damp when there is excessive indoor humidity. Patches of mould growth resulting from moist air condensing commonly occur where there is little air movement behind furniture and unventilated cupboards.
So what’s the source of all this water vapour? The worst offenders are tumble dryers, gas cookers, baths and showers. Add to this pets, kettles and house plants and you’re generating several litres of water vapour every day.
A big part of the solution is decent ventilation. This wasn’t originally a problem with Victorian fireplaces, since they ensured a steady flow of air through the house, helping to disperse moist air – aided by draughty floorboards and sash windows. But our modern obsession with sealing up homes to eliminate draughts can promote condensation.
Our complete guide to dealing with condensation will help you remedy these problems.
Salt contamination
Sometimes when rooms are heated after being left empty for a while, moisture can reappear on the surface of the plaster. This is largely because old plasterwork that has become damp can retain a residue of salts from the water, picked up from the earth and the masonry. Long after you’ve fixed the source of the problem, each time the air in the room becomes a little humid, these salts absorb fresh moisture from the atmosphere causing patches of damp on the plaster.
Salt can normally be brushed or vacuumed off, but shouldn’t be washed as it can seep back into the wall. Where plasterwork is heavily contaminated, the only remedy may be to hack off the affected area and replace it with new lime plaster. But first rectify the source of damp and give the wall time to dry out.
Solutions for damp
Over the years, much time and money has been wasted on ineffective damp treatments, such as small ‘ceramic vents’ embedded in the lower walls, sealant fluids and ‘never paint again’ coatings that can actually make matters worse by trapping damp in the walls. Fortunately, most problems can be remedied with a few common-sense improvements:
1. Check external ground levels:
Ensure that earth is not banked up against outside walls. External ground levels should be at least 20cm below floor level, ideally with a shallow gravel-filled trench at the base, to reduce the risk of rain splashing and saturating the wall.
2. Repair gutters and prevent water running down external walls:
Clear gutters and fix downpipes and drains. Fix defective sills to prevent water from pouring down the walls of your home.
3. Check pipes, sealant and fix leaks:
Leaking pipes should be fixed as soon as they are noted and checked on a regular basis. You should also check the sealant around your sinks, bath and shower to ensure no water is dripping through.
4. Solve condensation issues:
Combat condensation by improving ventilation and reducing emissions of water vapour, for example, by limiting time spent boiling food. Fit extractor fans in kitchens and bathrooms to expel humid air. It also helps if the wall surfaces are well insulated. The best dehumidifiers can provide a short-term solution.
5. Remedy modern 'fixes':
Remove harmful modern materials, such as cement render or mortar pointing, which can trap damp. Replace with traditional lime-based breathable materials that allow it to escape by evaporating away.
6. Allow walls to dry:
Put on the heating and allow the home to dry out. Keeping a stable temperature will help prevent condensation. It can take as long as six months for damp to dry so remember this after a leak.
7. Clear vegetation:
Ivy and wisteria climbing the exterior of your home can look pretty but can increase the chances of damp, not to mention cause root damage to the brickwork.
Fungal decay and rot
Untreated ‘dry rot’ has a fearsome reputation for spreading throughout the house while consuming everything in its path. But this isn’t the only type of fungal decay – so how worried should we be?
Dry rot
Tiny spores of dry rot fungus are present in the atmosphere, seeking out suitably damp, poorly ventilated spaces to invade and conquer, such as cellars and old timber floors. Wooden panelling and beams in contact with damp walls are other popular habitats. Dry rot has a dank, decaying aroma (rather like mushrooms), and detector dogs have been successfully used to detect it.
When the airborne spores settle on damp timber, they send out thin web-like root strands that spread across the surface of the wood. The fungus feeds by sucking the moisture from the wood, making the timber dry and structurally feeble.
These fungal root strands quickly multiply and rapidly become matted, completely consuming the wood. They then adopt the appearance of cotton wool, tinged with grey, lilac and yellow patches, until finally morphing into a colourful, mature pancake-shaped ‘fruiting body’, which emits millions of spores into the air, starting the life-cycle all over again.
Wet rot
As the name suggests, this type of fungus prefers wetter conditions, causing affected wood to become soft and spongy, caving in easily when prodded with a screwdriver. But it’s not always obvious, since painted timber can sometimes appear perfectly sound while decaying away from the inside.
External joinery is commonly affected where water accumulates and can’t drain away freely. Window frames are especially vulnerable around the lower sill area. Wet rot thrives best in damp, dark and poorly ventilated places: timber lintels and the ends of floor joists embedded in damp walls are areas typically at risk if moisture isn’t free to evaporate out.
How to treat rot
Rots of all types thrive in damp conditions, so if you cut off their water supply by eliminating the source of the damp, they die. Isolating the timber from damp surroundings and boosting ventilation may be all that’s required to deal with an outbreak. However, profit-driven timber treatment firms have an incentive to hype up the danger to justify expensive works involving indiscriminate spraying with chemicals, aggressive cutting and burning, and hacking off historic plasterwork. This is why it’s rarely advisable to rely on a ‘free’ survey.
Minor damage to window frames and so on can often be repaired quite easily. Where rot has attacked structural timbers like lintels, physical repairs or replacement may be needed. Lofts and timber ground floors also need a good flow of air to keep them dry. Poor ventilation is often a big part of the problem, as it prevents damp from evaporating harmlessly away. So if any vents or airbricks are blocked, they need to be cleared.
How much does it cost to deal with damp or rot?
Costs will vary depending on the amount of work required to rectify the signs of damp or rot, as well as the extent of the problem and the type of damp or rot found. Some smaller repairs, which you can carry out yourself, will be relatively low-cost, while treatments for condensation, such as improving ventilation and buying a dehumidifier, may require a larger initial outlay, but will provide long-lasting results.
Penetrating and rising damp are more likely to cost more to resolve, as a specialist’s expertise may be required. Always get at least three quotes from independent consultants and aim to obtain a recommendation, or look for trade body accreditation before employing help. Try Property Care Association as a starter for guidance and accredited trades.
More on property maintenance:
The Victorian House Manual | RRP £17.50 on Amazon
Want to take better care of your period home? This Haynes Manual by Ian Rock is the essential read for any owner of a Victorian (or Edwardian home).

Ian Rock MRICS is the chartered surveyor author of eight Haynes Property Manuals, and is the director of the RICS home survey price comparison website Rightsurvey.co.uk

