Patience and preparation are key when learning how to tile a wall – whether you're installing tile on a bathroom wall or in a kitchen, this is actually an easy DIY job but that's not to say that you shouldn't tackle it with care and precision for professional-looking results.
Whether you go for solid stones like granite and marble, handmade terracotta, quarry tiles, or for budget-friendly but stylish options like porcelain and ceramic, choosing the DIY route instead of hiring a professional is sure to salvage some of your bathroom remodeling budget.
Knowing how to tile a wall properly is key to ensuring a professional and Insta-worthy finish (the latter being very important), our video and step-by-step guide with tips from industry pros can help you with that.
We spoke with DIYer and Real Homes blogger, Dori Turner about her experience in tiling walls and whether it's a simple enough job for beginners. She says it's a good move to add your own personal stamp to your space, all while you keep bathroom remodel costs down. 'As long as you have the right tools, tiling a wall yourself isn't hard. If it's your first time, consider choosing a tile with a simple shape and pattern that will be easier to install.'
How to tile a wall
Turner advises, 'If tiling a bathroom wall you want to make sure the proper type of material was used on the wall before installing the tile.
If you're tiling a shower, it should be cement backer board. In the rest of the bathroom it needs to be mold-resistant sheetrock.'
If the proper materials aren’t used, water and condensation can seep in and cause problems like mold and mildew. Recently a friend of mine went to clean her tile grout thinking it was just dirty. It turned out to be mold coming from behind the tilework because the builder hadn’t used the correct materials. It had to be completely ripped out and redone and cost thousands of dollars, so using the right base material is a must!'
Here's a full list of tools and materials needed to use with our video:
- Your chosen tiles
- Grout
- Adhesive
- Protective floor covering
- Small bucket
- Large bucket
- Clean sponge
- Water
- Sugar soap
- Pencil
- Tape measure
- Spirit level
- Protective gloves
- Tile spacers
- Grout float
- Notched trowel
- Tile cutters or a tile saw from Amazon as Turner recommends below
- Timber baton
- Screws
- Drill and mixer attachment (if using)
- Silicone sealant and caulking gun
Turner adds 'Make sure you invest in a quality tile saw to make the cuts. If you don’t want to purchase one, you can rent one from your local hardware store.' You can easily rent a tile saw from Home Depot.
1. Work out how many tiles you need
To work out how many tiles you need, measure the wall height and width and multiplied the two measurements to calculate the meter-squared value.
Make sure to measure each wall separately and add together the values to get a total coverage. As when tiling a floor, it’s a good idea to include a 10 per cent contingency for off-cuts and any mistakes or breakages. This is particularly important if you’re creating a more decorative laying pattern, such as herringbone.
Lee Devlin, Director at Homecure Plumbers adds, 'The necessary number of tiles can be calculated by measuring the height and width of the space and then multiplying the figures. It’s always best to buy a few extra tiles, in case of breakages or other issues. This also accounts for you measuring incorrectly and not having enough!'
2. Prepare the wall for tiling
Begin by laying a protective cover on the floor and secure this with masking tape. Then, use a clean, damp cloth, to wipe down your wall surface, or use a suitable degreasing agent, such as sugar soap, and wash this away with water before leaving the wall to dry completely.
Max Cohen, founder of FLHomeBuyers.com says, 'First and foremost, make sure the wall is level. Make sure there are no bumps or swollen areas, that will throw off the grout lines and make it look bad.'
So if you find any cracks in the wall or any areas that need repair, it’s a good idea to fix these before you begin to tile. It’s important to make sure the surface is flat,, so make sure to sand away any lumps and bumps at this stage.
Andra DelMonico, Lead Interior Designer for Trendey reminds us, 'Before you begin tiling, you need to prep the wall by removing fittings, fixtures, hardware, and wallpaper. Then make any necessary repairs to ensure you have a smooth and level surface. Clean and sand the wall so you can promote strong adhesion.' Adds DelMonico
3. Prime surfaces that need it
Depending on the tiles chosen, you may need to prime the wall, but check with the adhesive manufacturer to see if this is recommended. Remember that in wet areas, such as a bathroom or near a bathroom sink, apply a specialist waterproofing product, such as BAL Waterproof Plus. Depending on the tile size and substrate cement, Hardiebacker boards may be required to ensure the wall will hold the weight of the tiles.
4. Mark up your starting point
Find your starting point by locating the center of your wall and marking a pencil line.
Turner adds, 'Start the project in the center of the wall so the pattern comes out even on either side.'
Then, using a tile measure, or tile staff, mark the width and length of the tiles so you can see where they will lay. Where the bottom tile is less than about half a tile, re-arrange the layout slightly by raising the tile so you have at least half a tile and mark the wall once you are happy.
On the mark nearest the floor, use a level and draw a straight line horizontally across the wall and fix a timber baton into the surface – you’ll use this as a guide and tile up from this point. Remember, the baton will need to be removed later.
'Start tiling your wall by marking the vertical and horizontal center of the wall. Then position your tiles from the center out towards both wall edges. The tile on each end should be roughly the same size. You may need to adjust your vertical centerline to make this happen.' Says DelMonico.
5. Prepare the adhesive
Mix the adhesive in a bucket according to the packet instructions. For smaller tiles, it is fine to use a pre-mixed adhesive, but for larger designs, a cement-based type, which you mix yourself is recommended. Follow the packet instructions to ensure the mix is right. To apply the adhesive, use a notched trowel held at a 45 degree angle, to spread the adhesive on the wall.
Drag it across the surface to ensure an even coverage right up to the timber baton and pencil outline. Make grooves in the same direction and only cover enough to suit your application without the adhesive going off, meaning it will harden, before the tiles are fixed – around one square meter.
6. Begin tiling
'Once you have proper positioning, use your adhesive to adhere the tiles to the wall as you work your way out from the centerline.' Adds DelMonico.
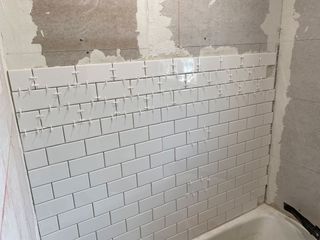
Place the first tile onto the wall and push gently, twisting and sliding it, to make sure it sticks. Put a tile spacer along each edge and use a cloth to wipe away any excess adhesive as you go. Carry on the above steps until you’ve covered the whole area.
Turner notes to 'Work in small sections so the mortar doesn’t dry out before you have a chance to lay all of the tiles.;
'Work in a square meter space at a time as your position tiles with spacers between each tile. Work your way up from the bottom of the wall towards the top.' Adds DelMonico.
'My guys find it is best to work from bottom to top. That way as the tiles stack the ones below it can support the ones going above them while using the correct spacers.' Adds Cohen.

7. Fill any gaps with cut tiles
When you come to the edges, you may need to cut some of the tiles to fit. To do this, use either a manual cutter, which is best for straight cuts; a tile scribe for thin tiles; or an electric cutter for right angles or curved edges and for thicker tiles such as those made from porcelain or natural stone.
How to cut tiles with...
A manual cutter: A manual cutter is used for straight cuts.
A tile scribe: This method can be used on thinner tiles.
An electric tile cutter: Electric cutters are used for right angles, curved edges and thicker tiles such as porcelain and natural stone.

8. Finish the edges
Then, follow the same steps to secure the edge sections of tiles to the wall. Adhesive drying times vary by substrate and type so check the guidance on the adhesive packet. Once dry, remove the spacers and any remaining excess adhesive then prepare your grout.
9. Prepare and apply the grout
Mix the grout powder and water in a bucket, but don’t mix too much at once, as this too will set quickly. Using a grout float, push the grout the tile by pushing into the gaps and wipe away any excess with a damp sponge. You’ll need to wipe the wall again after around an hour to get rid of any residue and use a grout profiler to smooth the grout lines. Avoid over-wetting the grout as this will weaken the finished grout.
10. Seal the edges
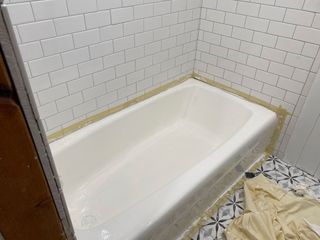
Finally, use a silicone sealant to seal the edges of the wall, ensuring a watertight finish. 'When the tile job is finished, use caulk in the corners and at the base of the tile for a finished look! ' Says Turner.
Use a caulking gun to squeeze it from the tube and a sealant profiler or your finger to take away any excess, but make sure to wear rubber gloves. Leave the sealant for 24 hours to fully cure and then your newly tiled wall is complete – with a perfect professional-style result.
Can you tile directly onto a painted wall?
DelMonico says, 'As a general rule, you shouldn’t tile over a painted surface. The paint creates issues with adhesion. If you have painted drywall, you can thoroughly wash and dry the walls. Then use 80-grit sandpaper to give them a rough finish. This helps the tile adhere to the wall. Be sure to wipe away the dust before you begin tiling.'
Cohen adds 'The paint on the wall is not as important as the quality of the drywall behind the paint. Just make sure that the drywall is free of cracks, holes, or bumps. Before we apply the tile adhesive, we always sand the subject wall regardless if it is painted or not. Sanding the wall will ensure that you are getting the best grip possible on the actual drywall itself. That is important so that the drywall is actually supporting the tile, not just the adhesive.'
Can you tile directly on drywall?
Turner says 'You can tile directly on drywall if it's in an area that doesn't get moisture. Water can seep behind the tile and cause mold, etc. If you're working in a bathroom you should use cement backer board.'
Where do you start when tiling a wall?
'When tiling a wall you first want to measure to find the center of the wall both horizontally and vertically. Apply the mortar and then place your tile in the center of the wall working out from there. This way your pattern will end evenly on all sides of the wall and look cohesive.'


